
Eppley Custom Facial Implants Knowledge Center
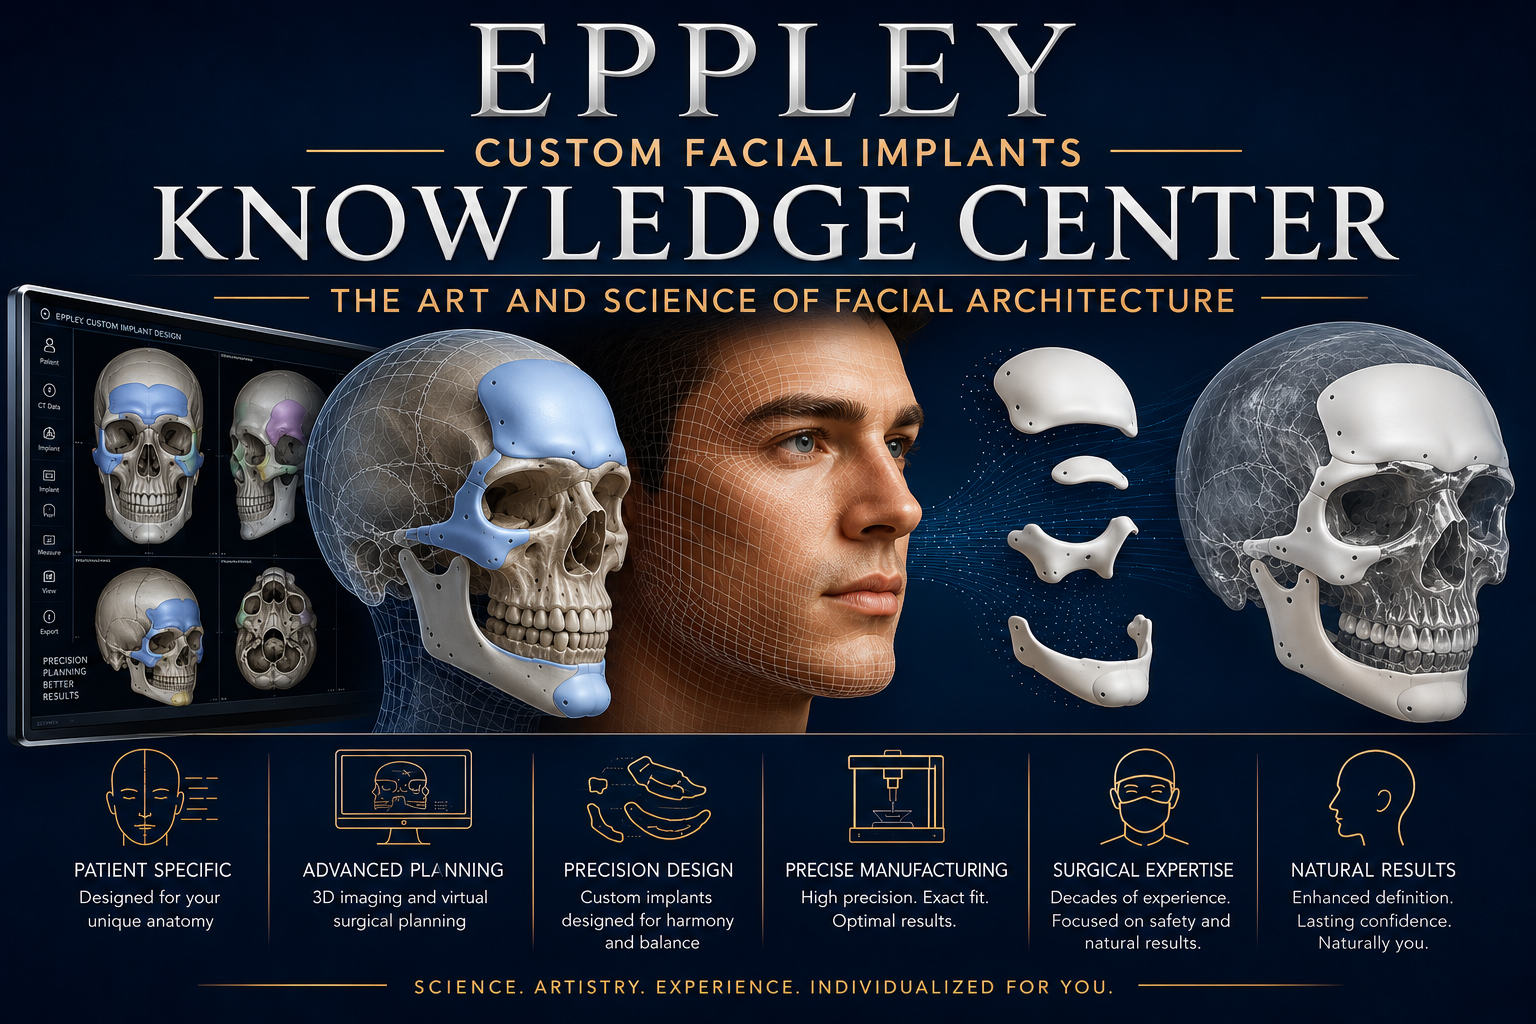
Welcome to the Eppley Custom Facial Implants Knowledge Center
Custom facial implants represent the most advanced approach to facial skeletal enhancement, combining three-dimensional imaging, digital engineering, and decades of surgical experience to create implants designed specifically for one individual’s anatomy. The Eppley Custom Facial Implants Knowledge Center was created to provide the most comprehensive educational resource available on this rapidly evolving field. Whether you are beginning your research or are already considering surgery, you’ll find in-depth articles, illustrations, surgical concepts, and expert insights that explain not only what custom facial implants are, but how they are designed, why they work, and the principles that create natural, balanced, and long-lasting results. Our mission is simple: to help patients understand the art and science of facial architecture through accurate, unbiased, and experience-based education.
Because every exceptional result begins with knowledge.
A Complete Guide to Custom Facial Implants
To make this complex subject easier to understand, the Knowledge Center has been organized into ten comprehensive Cornerstone Articles. Together, they provide a step-by-step educational journey that covers virtually every aspect of custom facial implants—from the basic principles of facial skeletal enhancement to implant design, surgery, recovery, revision procedures, facial aesthetics, and the future role of artificial intelligence in patient-specific implant planning.
Much of what you will read reflects more than 20 years of experience in custom facial and skull implant surgery, including the design of thousands of patient-specific implants and consultations with many thousands of patients from around the world. While the technology behind custom implants continues to evolve rapidly, the principles discussed throughout this Knowledge Center are grounded in extensive clinical experience, careful surgical analysis, and a commitment to achieving natural, individualized results.
The ten Cornerstone Articles are designed to be read individually or as a complete educational series. Together, they provide a comprehensive understanding of one of the most exciting advances in modern facial plastic surgery.
Ten Definitive Guides to Custom Facial Implants
Building the Foundation of Facial Architecture
Article 1 of 10
What are Custom Facial Implants – Understanding the Foundation of Modern Facial Skeletal Augmentation
Article 2 of 10
How are Custom Facial Implants Made From a 3D CT Scan – The Role of CT Imaging in Custom Implant Design
Article 3 of 10
Custom Facial Implant Design Principles: How Patient-Specific Facial Implants Are Designed
Article 4 of 10
The Complete Guide to Custom Facial Implant Surgery – Understanding the Surgical Journey
Article 5 of 10
What Custom Facial Implant Do I Need? A Region-by-Region Guide to Facial Skeletal Enhancement.
Article 6 of 10
Custom Facial Implant Materials – Silicone, PEEK, Porous Polyethylene, Titanium, and the Science of Choosing the Right Implant
Article 7 of 10
Recovery After Custom Facial Implant Surgery – A Complete Guide to Swelling, Pain, Numbness, Activity, and Final Results
Article 8 of 10
Revision Custom Facial Implant Surgery -Why Facial Implants Are Revised, How Revision Surgery Is Performed, and What Patients Can Expect
Article 9 of 10
Facial Skeletal Aesthetics – How Bone Structure Shapes Facial Proportion, Masculinity, Femininity, Symmetry, and Attractiveness
Article 10 of 10
The Future of Custom Facial Implants – Artificial Intelligence, Digital Planning, Robotic Surgery, and the Next Generation of Patient-Specific Facial Design
CORNERSTONE ARTICLE #1
What Are Custom Facial Implants?
Understanding the Foundation of Modern Facial Skeletal Augmentation
Quick Answer
Every face is built upon a unique skeletal foundation. If that foundation is underdeveloped, asymmetrical, or lacks proportion, the overlying soft tissues can only do so much to compensate. Custom facial implants were developed to permanently reshape that foundation itself.
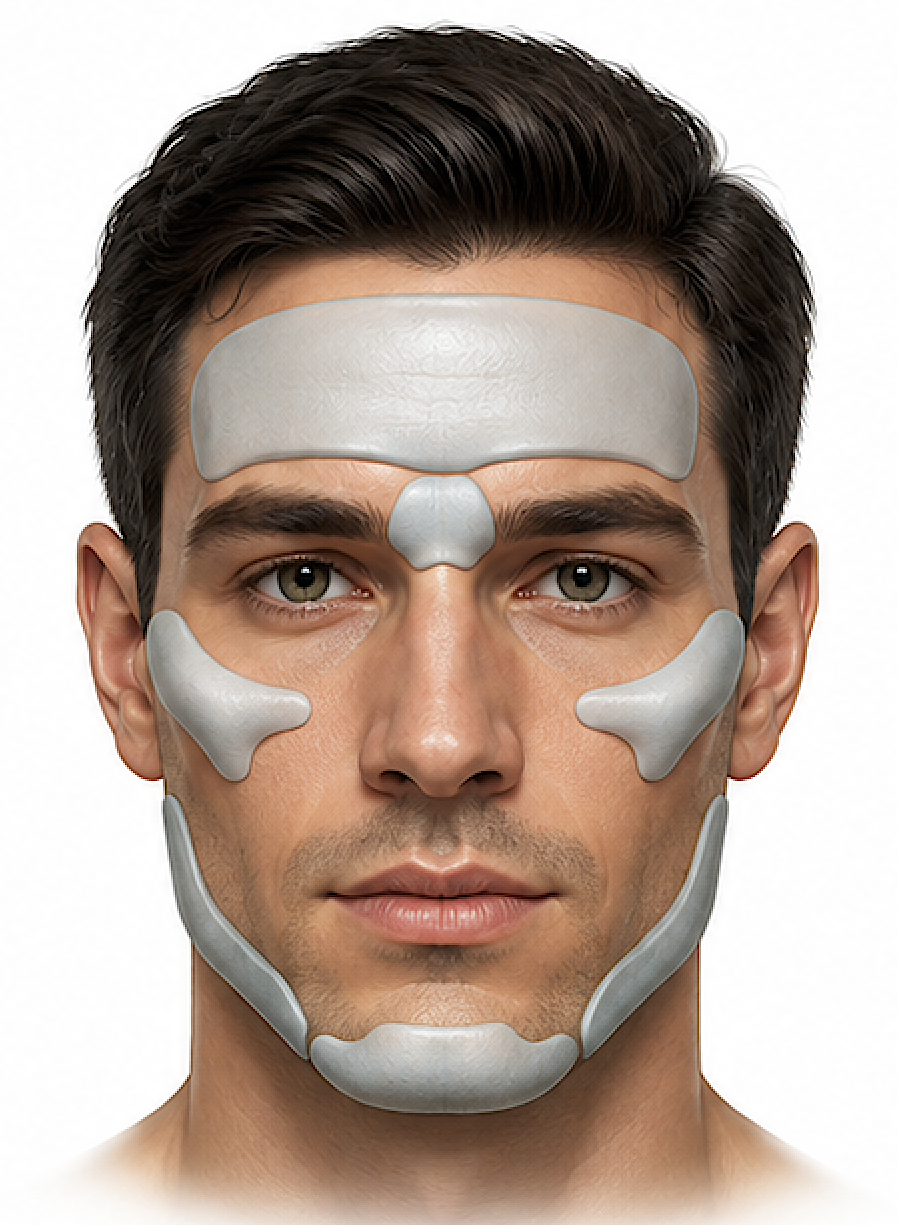
Unlike standard facial implants, which are selected from a limited inventory of pre-manufactured shapes and sizes, custom facial implants are individually designed for one specific patient using a three-dimensional CT scan of the facial skeleton. Every curve, contour, edge, and thickness is engineered to fit the patient’s anatomy while producing a predetermined aesthetic change. This level of customization allows changes in facial width, projection, vertical height, symmetry, and contour that simply cannot be achieved with stock implants.
The process combines modern CT imaging, computer-aided design (CAD), three-dimensional modeling, and advanced implant manufacturing with surgical experience and aesthetic judgment. While the technology allows remarkable precision, the quality of the final result depends just as much on thoughtful implant design as it does on accurate manufacturing and surgical placement.
For patients seeking permanent facial skeletal enhancement, custom facial implants represent the most sophisticated and precise form of facial implant surgery currently available.
Quick Facts
| Feature | Description |
| Procedure | Patient-specific facial implants |
| Purpose | Permanent skeletal augmentation and contouring |
| Planning | Three-dimensional CT scan with CAD design |
| Manufacturing | Individually manufactured for one patient |
| Anesthesia | General anesthesia |
| Surgery | Outpatient |
| Implant Materials | Silicone, PEEK, Porous Polyethylene, Titanium (selected cases) |
| Recovery | Initial recovery 2–6 weeks; final refinement over several months |
| Longevity | Permanent but removable or revisable if necessary |
Why Patients Begin Researching Custom Facial Implants
Patients rarely begin by searching for “custom facial implants.” Instead, they usually start with a concern about one specific facial feature:
“My jawline has always looked weak.”
“My chin doesn’t project enough.”
“My cheekbones are flat.”
“One side of my face is different from the other.”
“I’ve had jaw surgery, but my face still doesn’t look balanced.”
“Standard implants don’t seem to match what I want.”
Although these concerns appear different, they often share the same underlying cause: the shape of the facial skeleton.
Many people initially believe that improving facial appearance requires tightening skin, injecting fillers, or altering soft tissues. While these treatments have important roles, they cannot fundamentally change the shape of the underlying bone.
Custom facial implants address a different level of facial anatomy. Instead of camouflaging skeletal deficiencies, they reshape the skeletal framework itself.
That distinction is what makes custom facial implants fundamentally different from almost every other cosmetic facial procedure.
 Dr. Eppley’s bottom line
‘Patients often think they are looking for a better chin, a stronger jawline, or higher cheekbones. In reality, they are usually looking for better facial balance. Custom facial implants are simply one method of improving that balance by changing the underlying skeletal framework.’
Part 1: The Facial Skeleton: The Foundation of Facial Appearance
The human face is much like a building.
Everyone notices the exterior—the walls, windows, and roof—but the strength, proportions, and overall appearance of the structure are determined by its foundation.
The facial skeleton serves exactly that role.
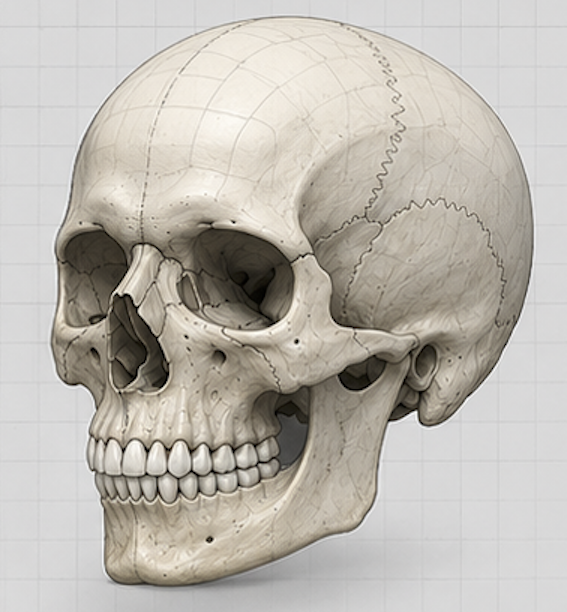
Every visible contour of the face originates from the underlying bones. The forehead determines upper facial projection. The brow bones influence eye position. The cheekbones create facial width and midfacial support. The jawline defines lower facial shape, while the chin establishes facial projection and profile balance.
The skin, muscles, fat, and connective tissues simply drape over this framework.
When the skeleton is underdeveloped, the soft tissues cannot create facial projection where none exists. Conversely, when the skeletal framework is well proportioned, even normal soft tissues tend to produce a more defined and balanced appearance.
This relationship explains why procedures directed solely at the soft tissues often have limitations. Skin tightening cannot create cheekbone projection. Fillers can temporarily add volume, but they cannot permanently reshape the facial skeleton. Fat grafting improves soft-tissue volume but cannot reliably change the underlying architecture.
Custom facial implants are unique because they alter the structural framework upon which the entire face is built.
The Three Layers of Facial Architecture
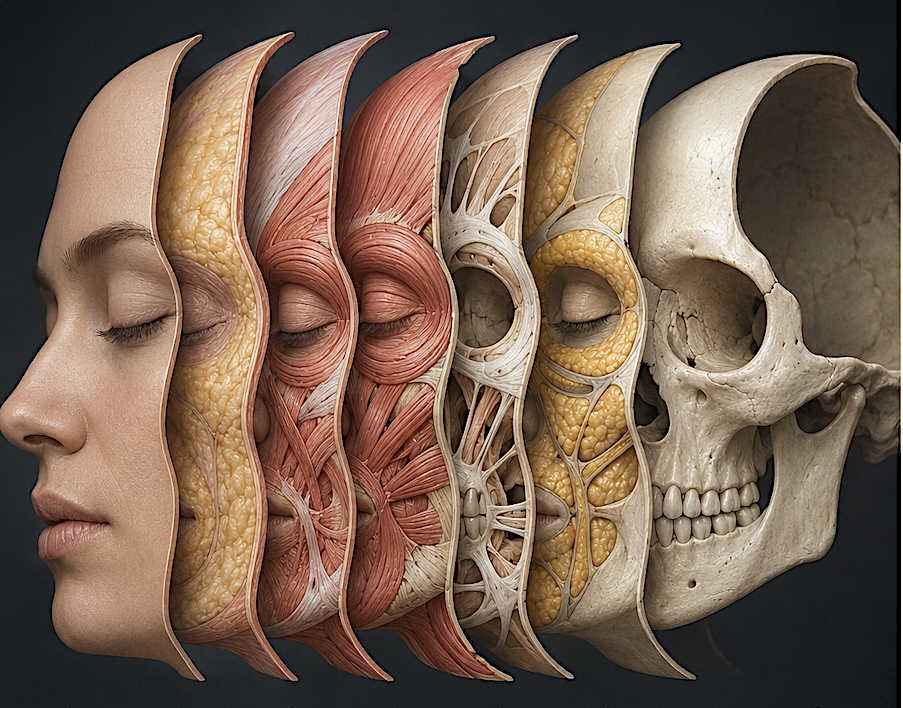
For patients to understand what custom facial implants accomplish, it helps to think of the face as consisting of many anatomic layers, three in particular..
Layer One: The Facial Skeleton
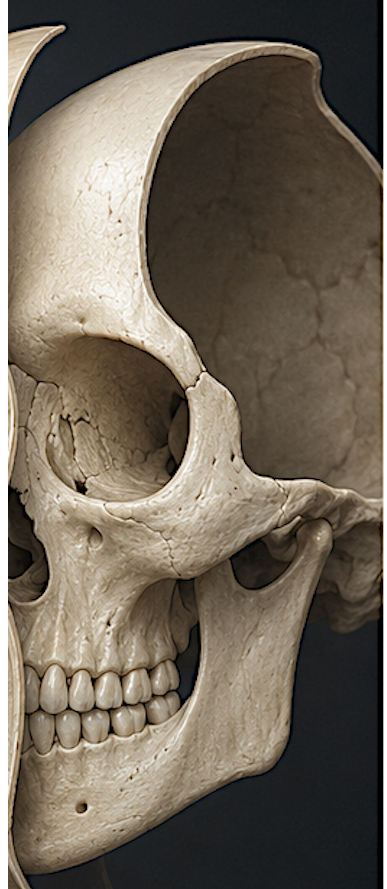
This is the permanent framework.
It determines:
- Facial width
- Facial projection
- Facial height
- Skeletal symmetry
- Jawline definition
- Chin position
- Cheek prominence
- Forehead contour
Custom facial implants work at this level.
Layer Two: The Soft Tissue Envelope
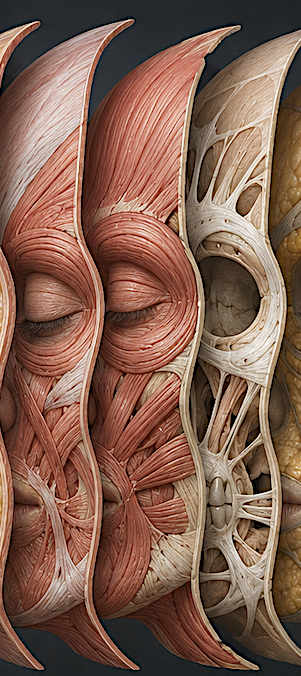
This includes:
- Muscles
- Facial fat
- Connective tissues
- Facial ligaments
These tissues move with facial expression and influence how the skeletal changes become visible externally.
Layer Three: The Skin
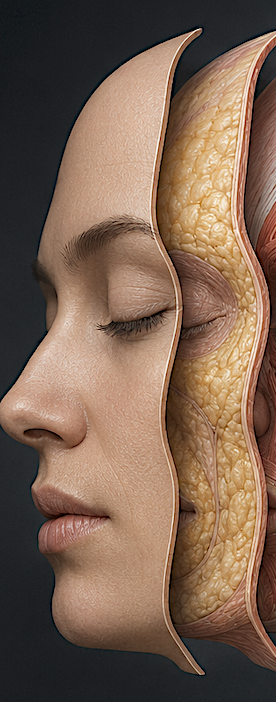
The skin forms the outer covering of the face.
Its appearance is influenced by:
- Age
- Sun exposure
- Genetics
- Elasticity
- Skin thickness
While skin quality contributes greatly to a youthful appearance, it cannot compensate for deficiencies in skeletal structure.
Dr. Eppley’s Bottom Line:
‘The face is built from the inside out. Bone determines facial shape, soft tissue follows the bone, and skin simply covers everything. If the skeletal foundation is weak, treating only the skin or soft tissues can improve appearance—but it cannot completely change facial structure.’
Why Skeletal Structure Matters More Than Most Patients Realize
Many patients are surprised to learn how much facial attractiveness depends on bone rather than soft tissue.
The position of the cheeks influences the appearance of the lower eyelids.
The projection of the chin affects perceived nose size.
Jawline width changes facial masculinity.
Brow projection alters the appearance of the eyes.
Even neck definition is partially influenced by chin position and mandibular projection.
A relatively small skeletal change—often measured in only a few millimeters—can significantly influence overall facial harmony because every overlying soft tissue adjusts to the new foundation.
This principle explains why custom facial implants can create substantial improvements without changing the patient’s essential identity.
The goal is rarely to make someone look like a different person.
The goal is to make the existing facial framework more balanced, proportional, and structurally complete.
What Makes a Facial Implant “Custom”?
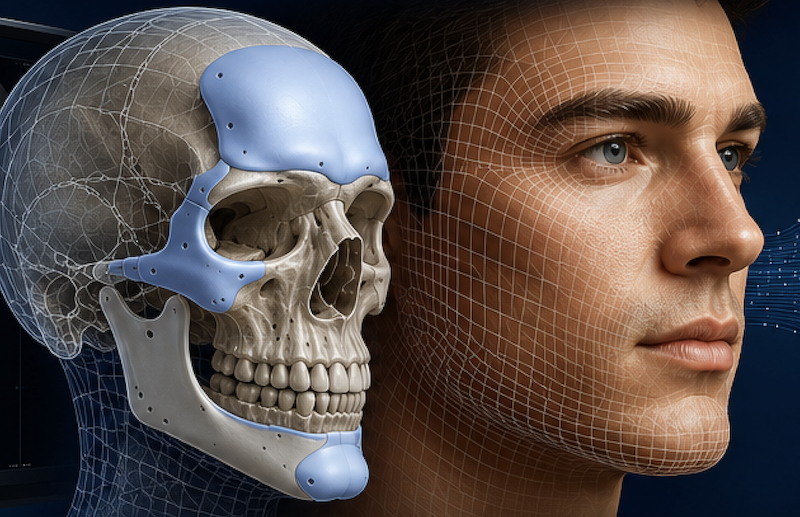
The word custom is frequently used in medicine, but in facial implant surgery it has a very specific meaning.
A custom facial implant is not simply a larger implant.
It is not a modified stock implant.
It is not an implant selected from a catalog.
Instead, it is an implant designed from the beginning for one individual patient.
Everything about the implant is created specifically for that person’s anatomy.
The backside of the implant precisely matches the patient’s bone.
The front surface creates the desired aesthetic change.
The thickness varies continuously across the implant depending on the planned correction.
Its borders are tapered to blend naturally into the surrounding skeleton.
Its fixation points are incorporated into the digital design before the implant is ever manufactured.
No two custom facial implants are identical because no two facial skeletons are identical.
Dr. Eppley’s Bottom Line:
‘A custom facial implant is not defined by the material it is made from. It is defined by the fact that every surface of the implant has been designed specifically for one patient’s anatomy and aesthetic goals. That distinction changes the entire planning process.’
Custom Implants Versus Standard Facial Implants
The easiest way to understand custom implants is to compare them with traditional stock implants.
| Standard Facial Implants | Custom Facial Implants |
| Selected from a catalog | Designed for one patient |
| Limited sizes and shapes | Unlimited design possibilities |
| Surgeon adapts implant to patient | Implant is designed to fit the patient |
| Generic bone contact | Exact CT-derived bone fit |
| Limited asymmetry correction | Complete three-dimensional asymmetry correction |
| Fixed dimensions | Variable projection, width, height, and contour |
| Minimal design flexibility | Unlimited CAD customization |
Stock implants remain excellent options for many patients with relatively straightforward deficiencies.
However, when facial anatomy becomes more complex—such as asymmetry, previous surgery, congenital deformity, or combined augmentation of multiple facial regions—the advantages of customization become increasingly significant.
Why CT-Based Design Changed Facial Implant Surgery
Historically, facial implant surgery depended largely on the surgeon selecting the closest available implant and modifying it during surgery when necessary.
Although this approach remains effective in selected cases, it has inherent limitations.
A standard implant cannot perfectly match every patient’s anatomy because it was never designed for that patient.
Three-dimensional CT imaging fundamentally changed this process.
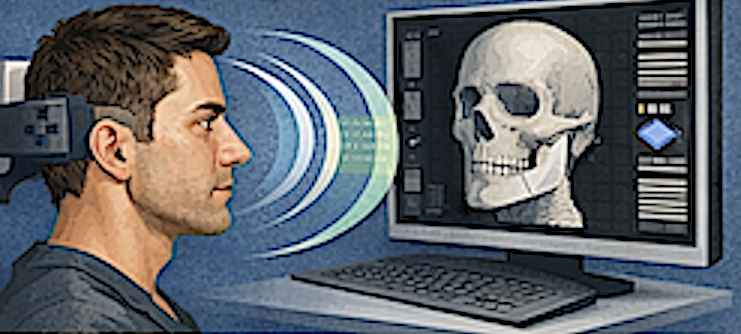
Instead of selecting an implant first, surgeons now begin by studying the patient’s unique skeletal anatomy.
Only after understanding that anatomy is the implant designed.
The result is a completely different philosophy of facial augmentation:
Rather than making the patient fit the implant, the implant is made to fit the patient.
That simple concept represents one of the most important advances in facial skeletal surgery over the past two decades.
Dr. Eppley’s Clinical Perspective
One of the biggest misconceptions patients have is that custom facial implants are simply “better implants.” They are not just better implants—they represent an entirely different approach to facial skeletal surgery. Instead of adapting a pre-made implant to the patient’s anatomy, every aspect of the implant is engineered specifically for that individual. In my experience, this shift from implant selection to implant design has fundamentally changed what is surgically possible, particularly for complex facial contouring and asymmetry correction.
Part 2: Custom Facial Implant Design and Fabrication
How are Custom Facial Implants Made?
Every custom facial implant starts with one question:
What does your facial skeleton actually look like?
Unlike standard facial implants, which exist before the patient is ever evaluated, a custom implant does not exist until your own anatomy has been digitally reconstructed.
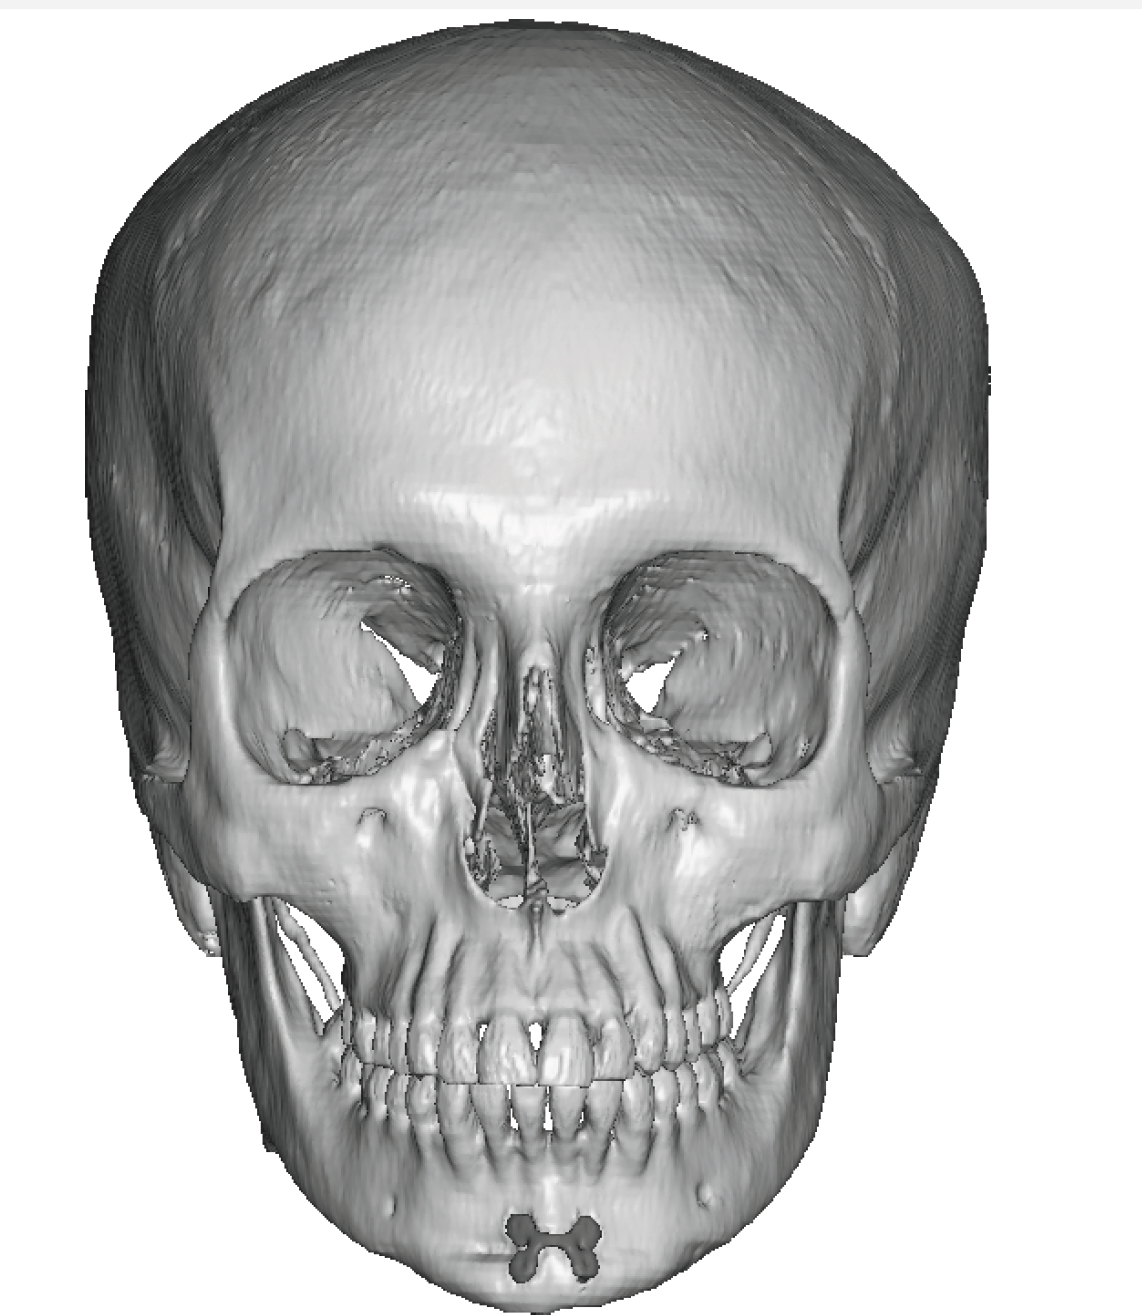
The process begins with a high-resolution 3D CT scan of the facial skeleton. That scan becomes the blueprint for every design decision that follows. It tells us everything we need to jknow about your facial bone structure and shape, the presence of any indwelling implants and what prior bone surgery has been done.
Patients often imagine that the computer automatically creates the implant after the CT scan is completed. In reality, the CT scan is simply the raw information. It provides an extraordinarily accurate digital model of your facial skeleton, but it does not determine how your face should look.
That is where the surgeon’s analysis and aesthetic judgment begin.
Dr. Eppley’s Bottom Line
The CT scan gives us the anatomy. It does not give us the answer. The implant must still be thoughtfully designed around your anatomy, your goals, and what will produce the most natural facial balance.
Step 1: The CT Scan
A custom implant cannot be designed from photographs alone.
While photographs show how the face appears externally, they reveal very little about the underlying bone.
A CT scan provides detailed information about:
- Chin projection
- Jawline width
- Jaw angle shape
- Cheekbone prominence
- Orbital rim position
- Forehead contour
- Skull shape
- Facial asymmetry
- Previous implants
- Previous surgical hardware
- Bone thickness
- Areas available for fixation
For cosmetic facial implant planning, a thin-cut CT scan (typically 1 mm slices or less) is preferred because it captures fine skeletal detail that is essential for accurate implant design.
The CT data are stored as DICOM files, which can then be converted into a three-dimensional digital model.
Step 2: Creating a Three-Dimensional Skull
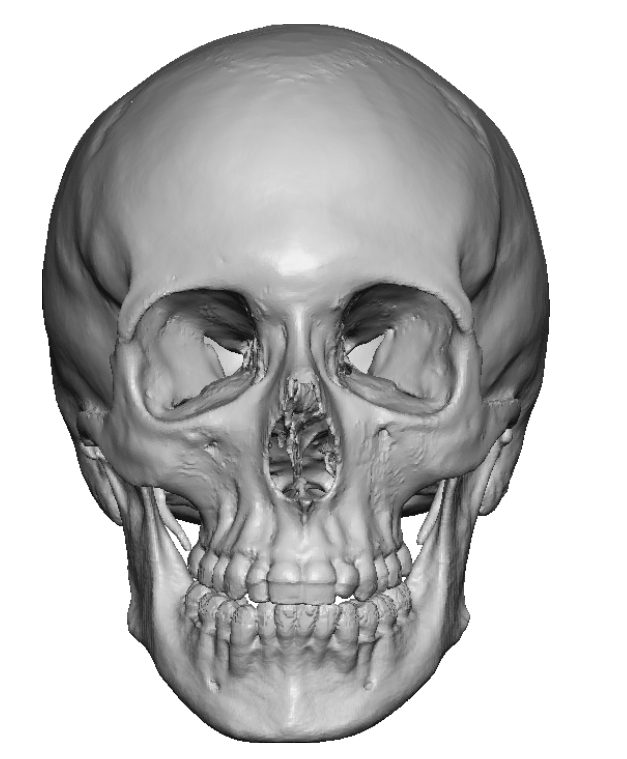
Once the CT scan has been processed, specialized software reconstructs the patient’s skull in three dimensions.
This digital model allows the surgeon to rotate, enlarge, and inspect every part of the facial skeleton.
Unlike photographs, which are affected by lighting, facial expression, camera angle, hairstyle, and soft tissue thickness, the digital skull represents the actual architecture of the face.
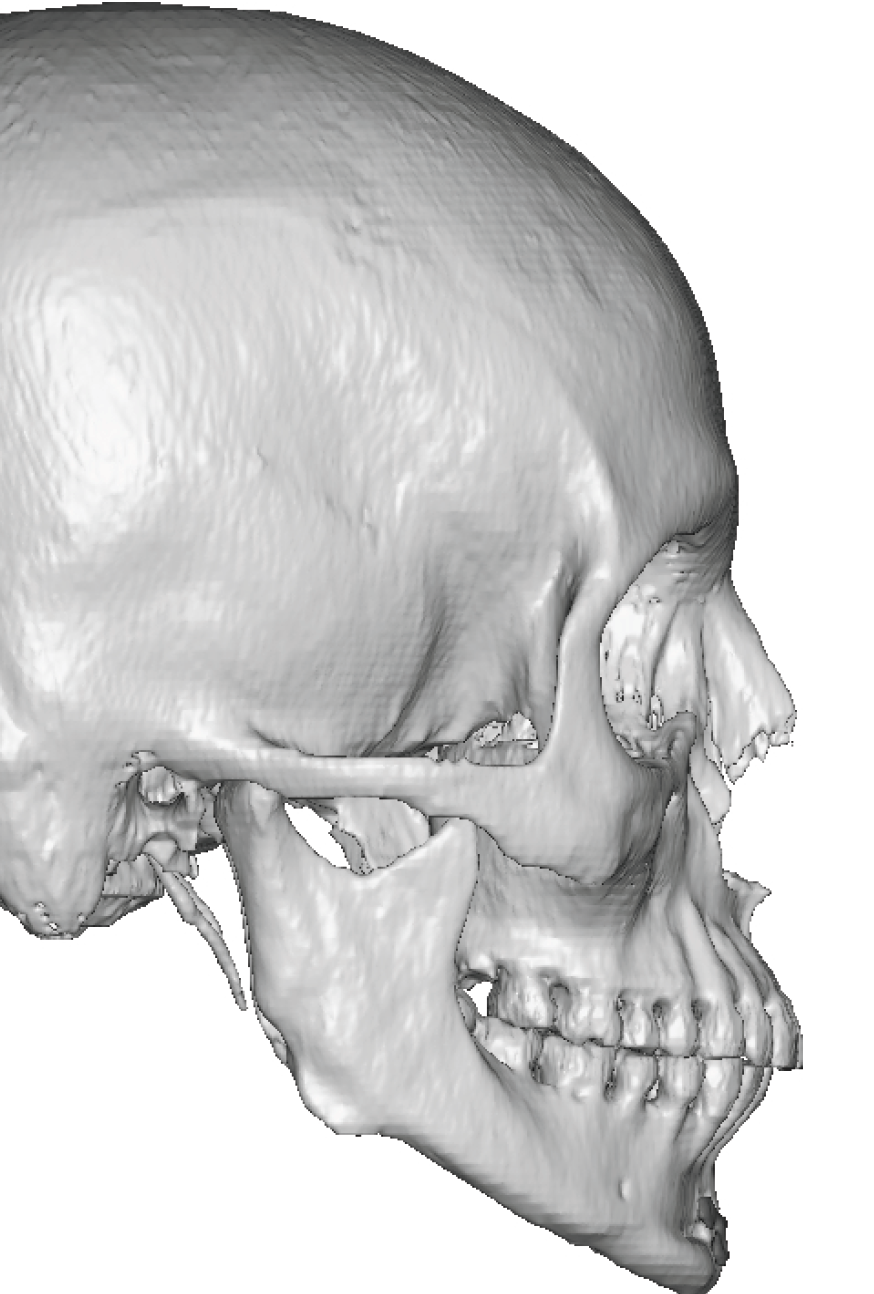
At this stage, the surgeon can accurately evaluate:
- Skeletal deficiencies
- Areas of asymmetry
- Previous surgical changes
- Facial proportions
- Relationships between different facial regions
This objective analysis is one of the greatest advantages of CT-based planning.
Looking Beyond a Single Facial Feature
Patients frequently focus on one area of concern.
“My chin is too small.”
“My jawline is weak.”
“My cheeks are flat.”
However, the surgeon evaluates the face as an integrated structure.
For example:
A patient who believes they need a larger chin may actually have an underdeveloped jawline.
Another patient may appear to have flat cheeks when the true deficiency lies in the infraorbital rims.
Others may benefit from improving several regions simultaneously rather than dramatically changing only one.
This comprehensive analysis is one of the major reasons custom implants often produce more harmonious results than isolated procedures.
Clinical Insight
The Face Is Judged as a Whole
Patients naturally focus on the feature they dislike most.
Other people do not.
Friends, family, and coworkers perceive overall facial harmony rather than individual measurements.
The most successful implant designs improve the balance of the entire face rather than maximizing one isolated feature.
Step 3: Digital Facial Analysis
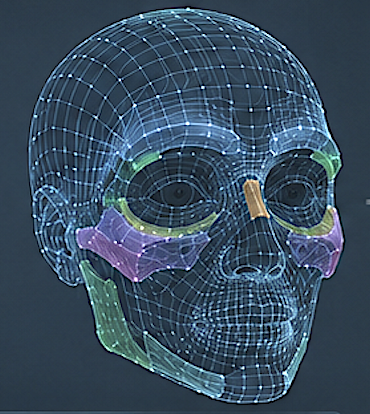
After the three-dimensional skull has been created, the planning process begins.
This is where engineering transitions into surgical artistry.
The surgeon studies questions such as:
- Should the jaw become wider or simply more defined?
- Should the chin be advanced, lengthened, widened, or all three?
- Should the cheeks project forward, outward, or both?
- Should asymmetry be corrected completely or partially?
- Should the overall change be subtle or dramatic?
These decisions cannot be made by software.
They depend upon:
- Facial proportions
- Skeletal anatomy
- Soft tissue thickness
- Gender characteristics
- Ethnicity
- Patient goals
- Surgical experience
This planning phase often takes longer than patients expect because small adjustments measured in millimeters can significantly influence the final appearance.
Dr. Eppley’s Bottom Line
Designing a custom facial implant is much more like architecture than engineering. The measurements can be exact, but deciding what will look attractive still requires experience and aesthetic judgment.
Step 4: Computer-Aided Design (CAD)
Once the surgical goals have been established, the implant is digitally sculpted using computer-aided design (CAD) software.
This is where the implant begins to take shape.
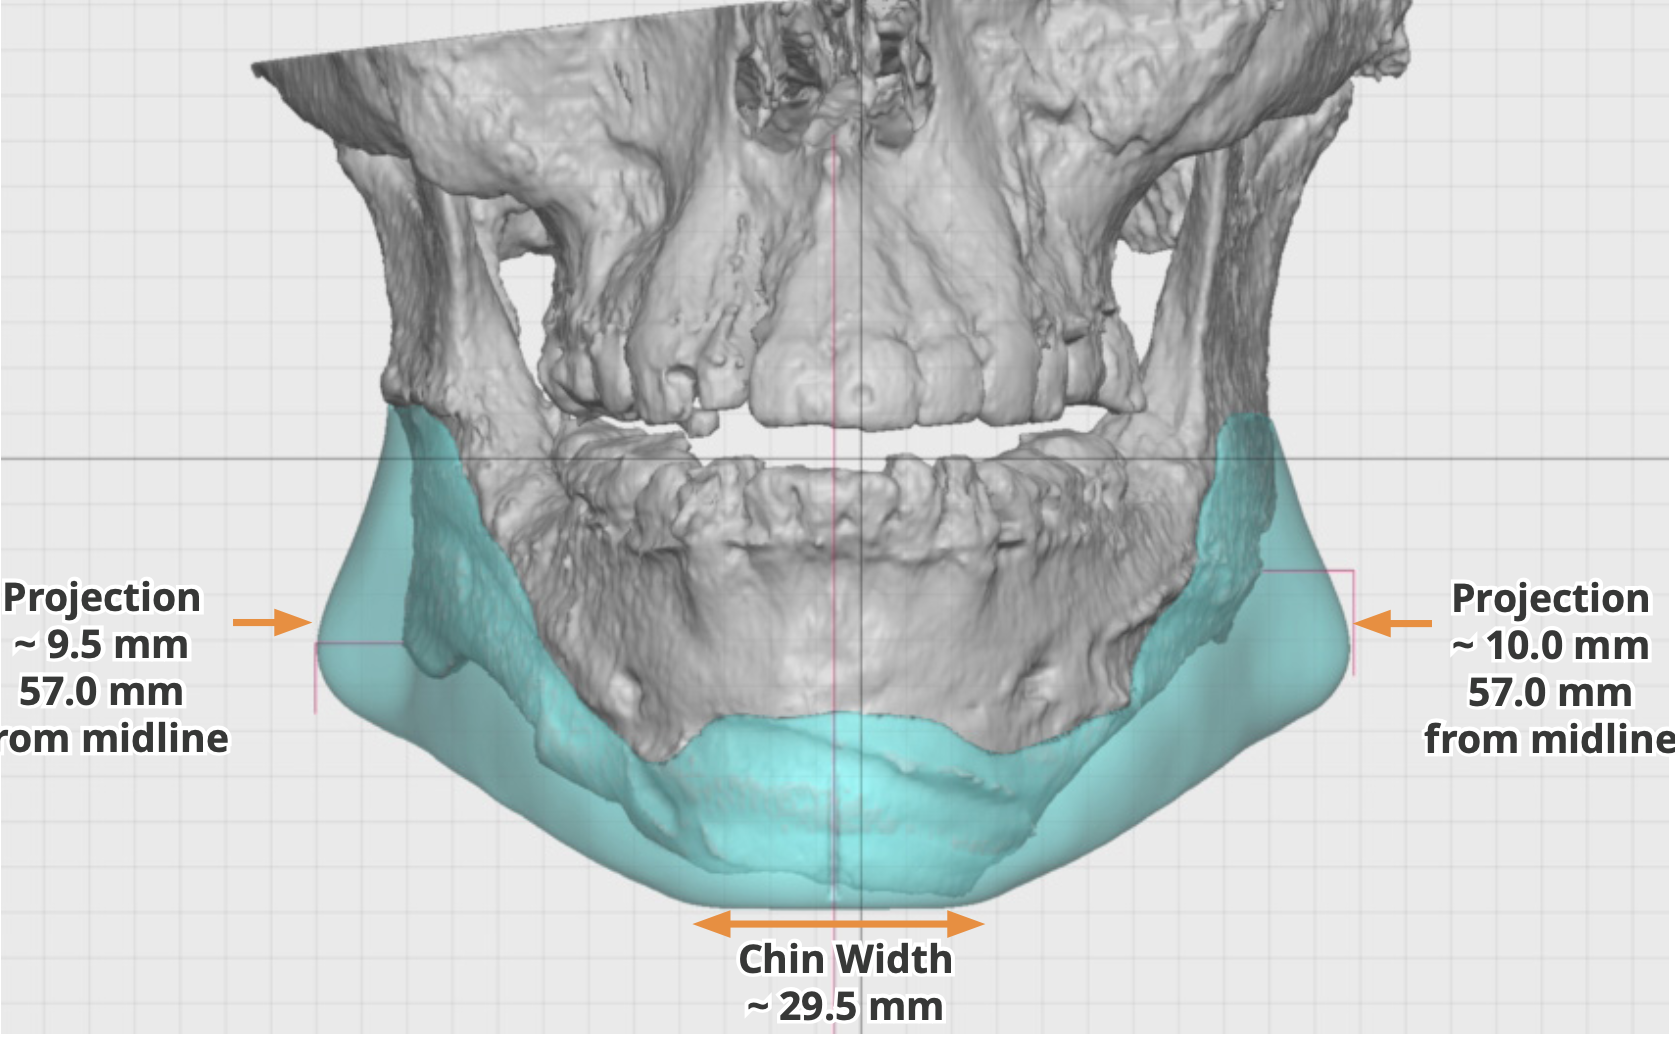
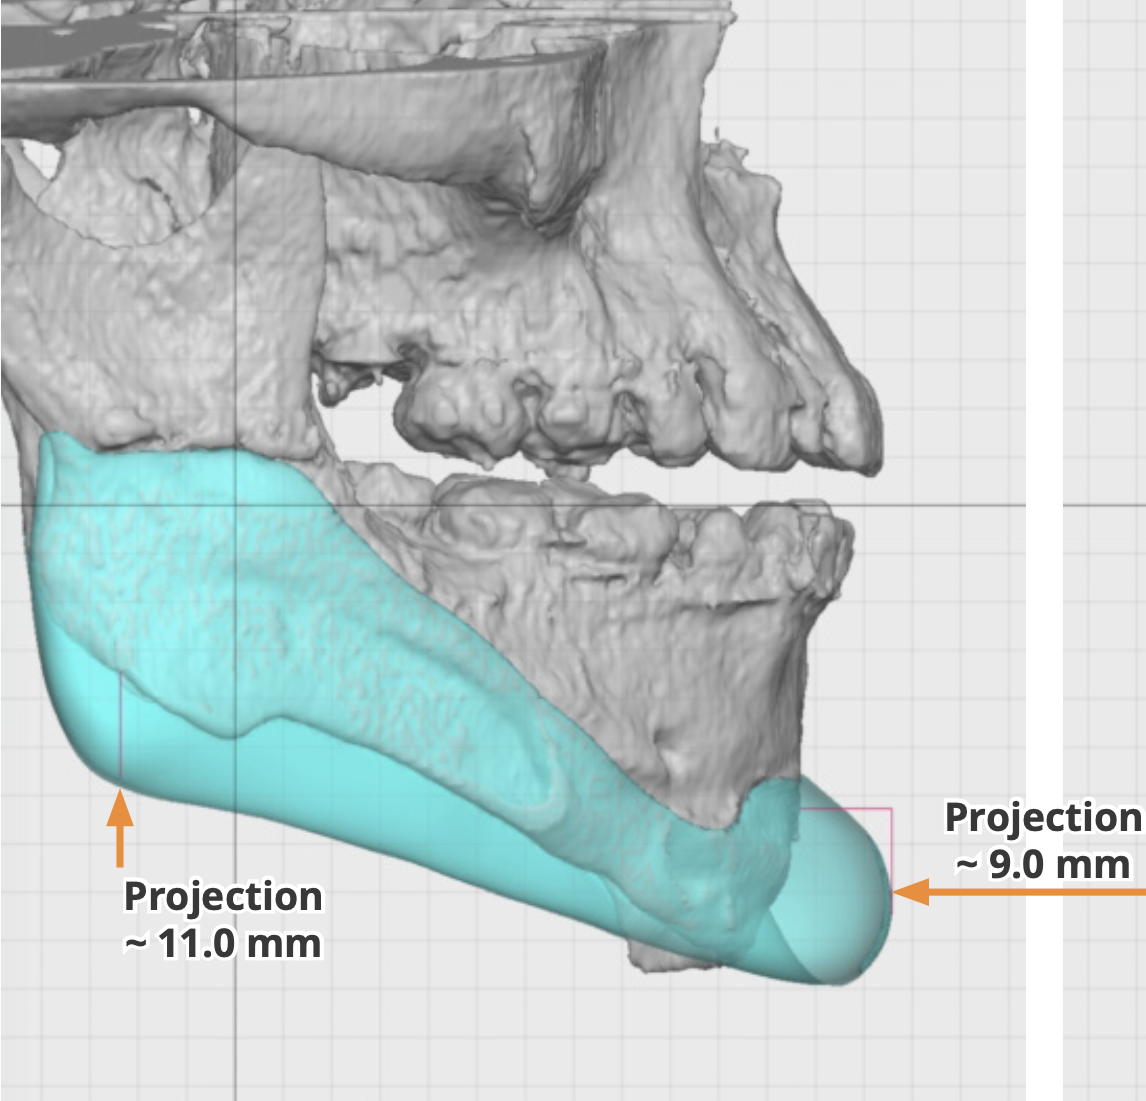
Unlike a standard implant, which has a fixed geometry, a custom implant can vary continuously in:
- Projection
- Width
- Vertical height
- Edge thickness
- Contour
- Surface transitions
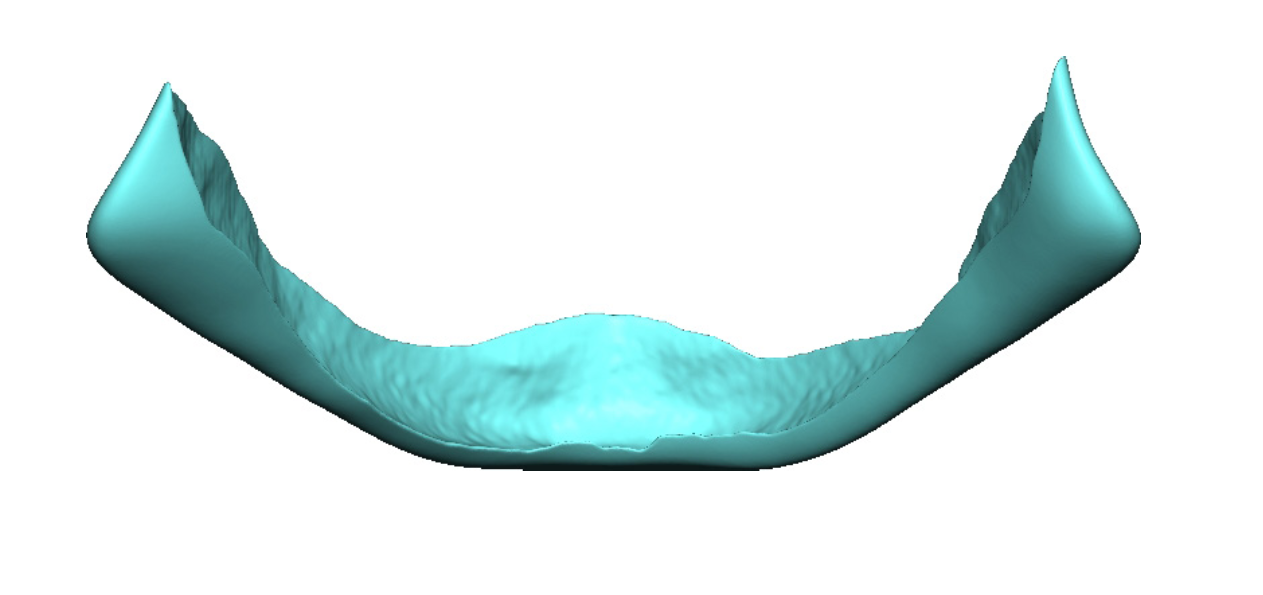
The backside or inner surface of the implant is designed to match the patient’s bone with remarkable precision.
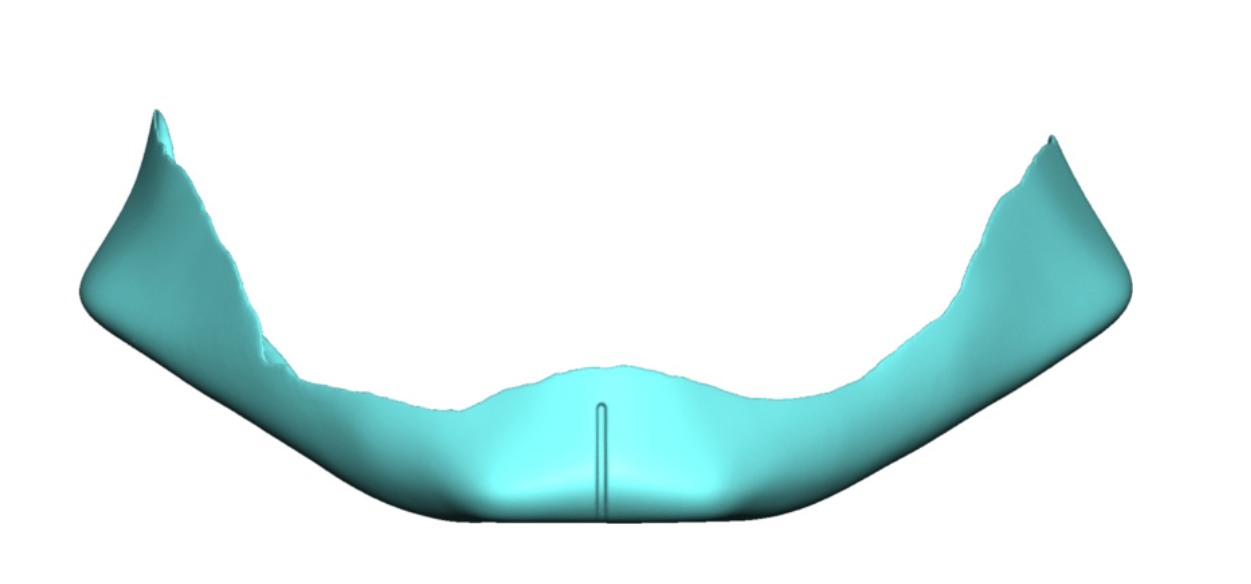
The front or outer surface is sculpted to create the desired external facial appearance.
This distinction is important.
One surface fits the patient.
The other creates the aesthetic result.
“The back surface of the implant matches the patient’s bone while the front surface creates the planned facial contour.”
Why Edge Design Matters
Patients usually focus on the thickest part of the implant.
Surgeons often focus on the thinnest.
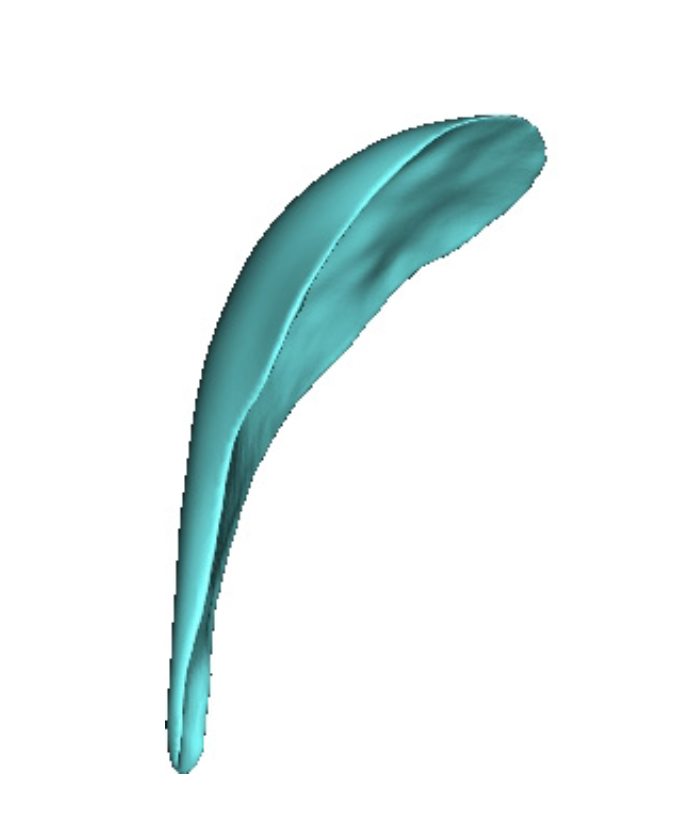
The edges of the implant determine how naturally it blends into the surrounding skeleton.
Abrupt transitions may become visible or palpable.
Gradually feathered edges allow the implant to disappear seamlessly into the adjacent bone.
Although patients rarely notice these design details, they often determine whether the result looks natural.
Clinical Insight
The Most Important Part of Many Implants Is the Edge
Large changes attract attention during planning.
Tiny edge refinements often determine whether the finished result appears completely natural.
Step 5: Surgeon Review and Design Refinement
The first CAD model is rarely the final design.
Instead, the surgeon carefully evaluates:
- Facial balance
- Implant thickness
- Projection
- Width
- Symmetry
- Edge transitions
- Screw placement
- Surgical access
Small adjustments are common.
Changes of only 1–2 millimeters may significantly improve the final aesthetic result.
Patients are often surprised to learn that more time is spent reviewing and refining the digital design than manufacturing the implant itself.
Dr. Eppley’s Bottom Line
The operation should never be the first time the surgeon decides what the implant should look like. Those decisions belong in the planning phase, where they can be refined carefully before the implant is ever manufactured.
Step 6: Manufacturing
Only after the design has been approved does manufacturing begin.
The production method depends upon the implant material.
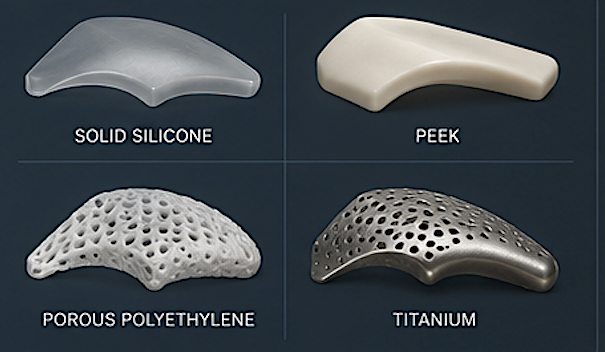
Silicone
- Manufactured from precision molds created from the CAD design
- Flexible and easy to revise
- Most commonly used for cosmetic facial implants
PEEK
- Precision-machined from solid polymer blocks
- Very rigid
- Excellent for selected reconstructive applications
Porous Polyethylene (Medpor)
- Manufactured with a porous structure that allows tissue ingrowth
- More difficult to revise
Titanium
- Usually produced by 3D printing
- Primarily reserved for reconstructive applications
Regardless of the material, the goal remains the same:
To reproduce the approved digital design with submillimeter accuracy.
Which Areas Can Be Treated?
One of the greatest strengths of custom implant technology is that it is not limited to a few standard implant shapes.
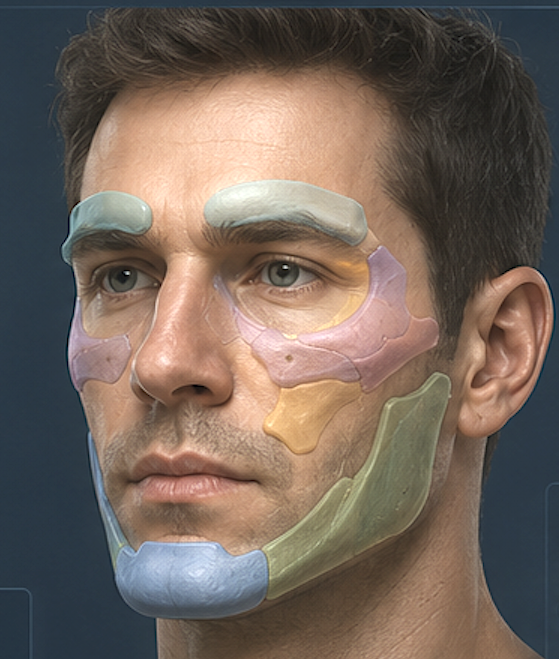
Almost any region of the facial skeleton can be augmented.
Upper Face
- Forehead
- Brow bone
- Temporal region
- Skull
Midface
- Cheeks
- Infraorbital rims
- Infraorbital-malar region
- Infraorbital-maxillary region
- Paranasal area
- Midface mask implants
Lower Face
- Chin
- Jaw angles
- Mandibular body
- Complete wraparound jawline implants
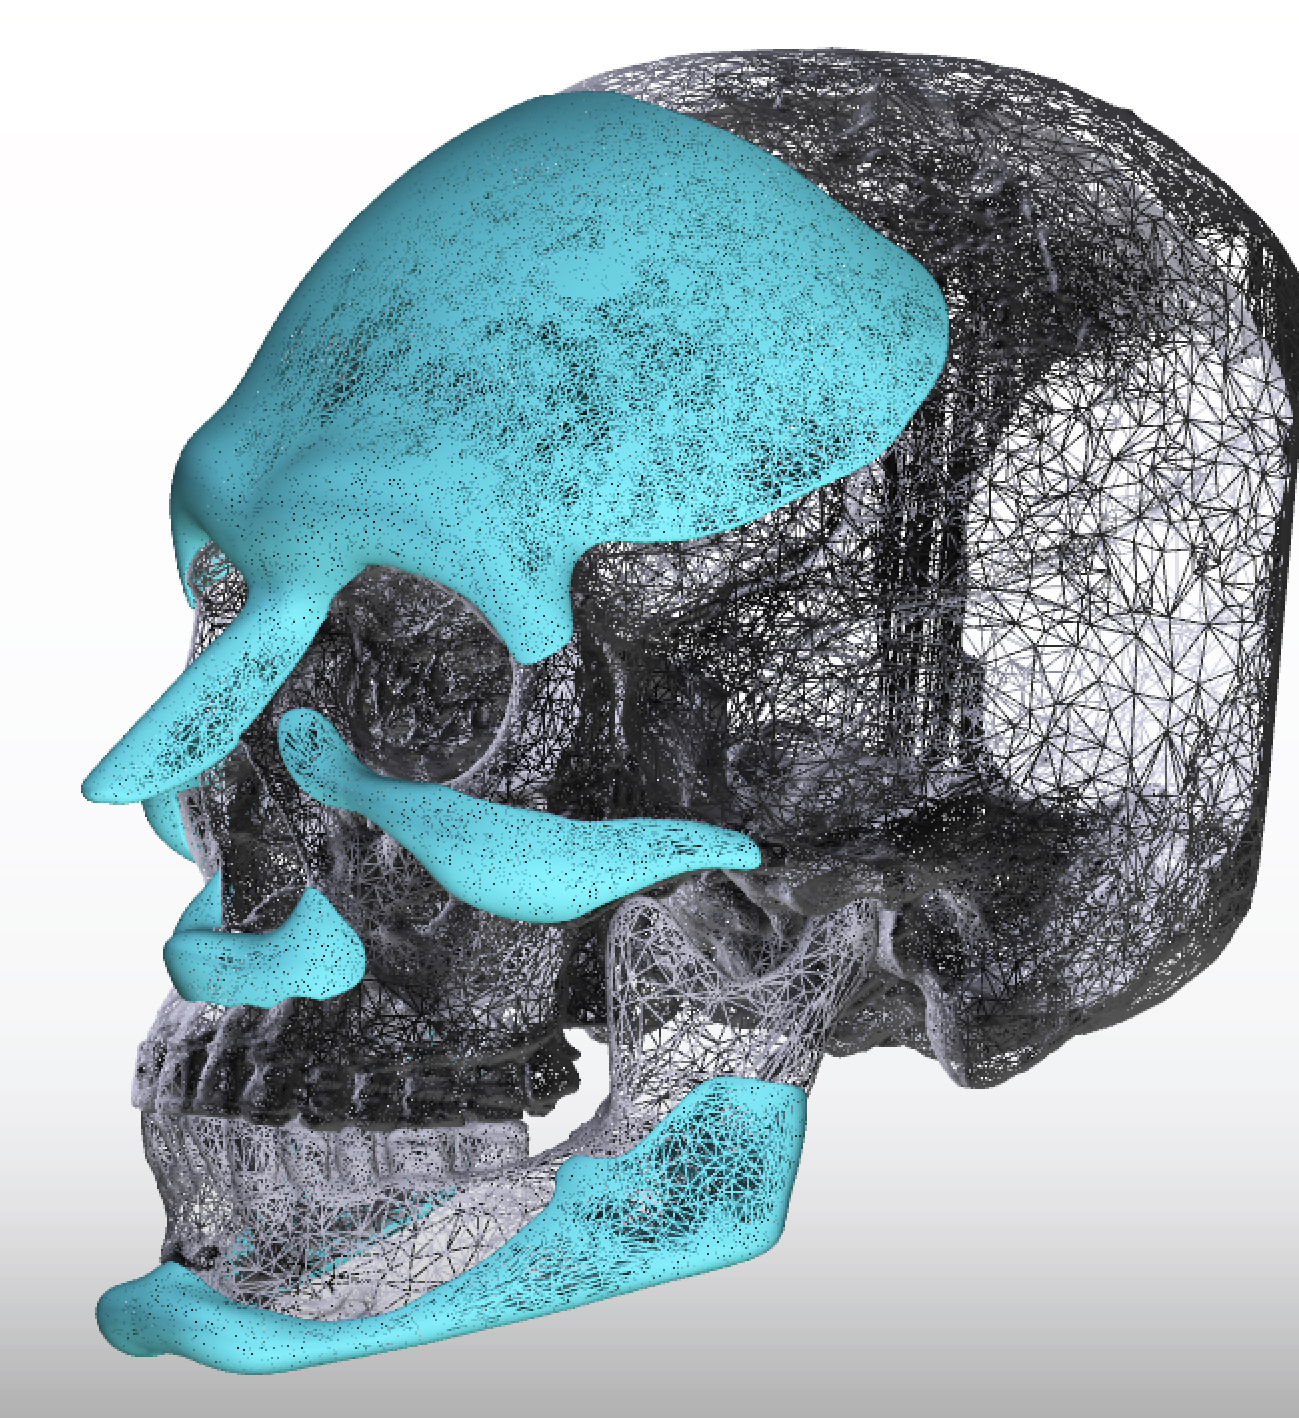
Because each implant is designed independently, multiple facial regions can be treated during the same operation when appropriate.
Dr. Eppley’s Bottom Line:
‘One of the greatest strengths of custom facial implants is that they allow the entire face to be analyzed as one structure. Instead of treating the chin, cheeks, or jawline independently, multiple regions can be designed together to create a more harmonious overall result.’
Why Technology Alone Is Not Enough
It is tempting to believe that modern software has made implant design automatic.
It has not.
Technology has dramatically improved precision.
It has not replaced judgment.
Computers cannot determine:
- Facial attractiveness
- Masculinity
- Femininity
- Balance
- Proportion
- Patient preference
Those decisions still belong to the surgeon.
The software simply allows those decisions to be reproduced with extraordinary accuracy.
Dr. Eppley’s Bottom Line
Technology has transformed how custom facial implants are designed, but it has not replaced the surgeon. The computer is an extraordinarily precise tool—but like any tool, its value depends entirely on the experience and judgment of the person using it.
Key Takeaways
- Every custom facial implant begins with a high-resolution CT scan.
- The CT scan creates a digital model of the patient’s facial skeleton but does not determine the implant design.
- Computer-aided design (CAD) allows precise control of implant shape, thickness, projection, and contour.
- Implant design is an iterative process that often involves multiple refinements before manufacturing.
- The greatest value of custom facial implants lies not only in advanced technology but in combining that technology with careful surgical planning and aesthetic judgment.
Part 3: Surgery, Recovery, Risks, and Long-Term Expectation
The Day Your Digital Design Becomes Reality
Months of planning ultimately come down to a single operation.
For many patients, surgery seems like the most important part of the entire process. In reality, surgery is the execution of a carefully developed blueprint. By the time the operation begins, the implant has already been analyzed, designed, revised, manufactured, sterilized, and inspected. The surgical goal is no longer to determine what should be done—it is to accurately reproduce the digital plan inside the patient.
This is one of the greatest advantages of custom facial implants. Rather than making major aesthetic decisions in the operating room, those decisions have already been made under ideal planning conditions.
Dr. Eppley’s Bottom Line
The operation is not where the result is created—it is where the design is executed. The quality of the final result depends far more on thoughtful planning than on making last-minute decisions during surgery.
The Goals of Surgery
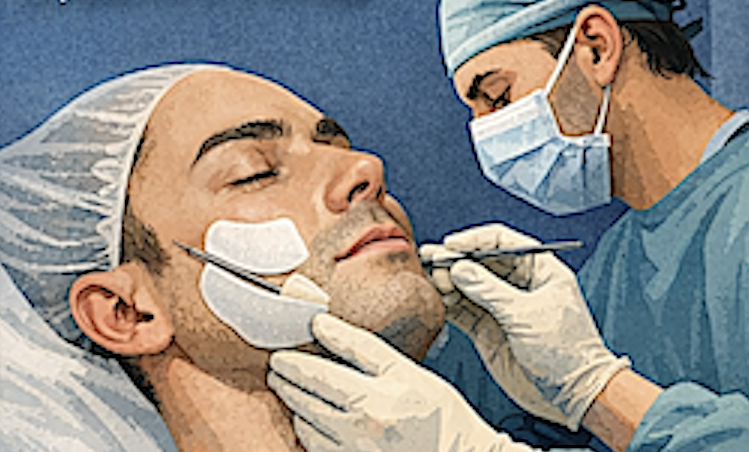
Every custom facial implant procedure has four primary objectives:
1. Safe Surgical Access
The surgeon must expose the underlying facial skeleton while protecting important nerves, blood vessels, muscles, and surrounding soft tissues.
2. Accurate Pocket Creation
A precise subperiosteal pocket is developed directly on the bone. Because the implant has been custom-designed for that anatomy, the pocket should mirror the implant’s planned position.
3. Precise Implant Placement
The implant is positioned exactly as it was designed on the digital skull model.
4. Stable Fixation
Titanium screws secure the implant to prevent movement while healing occurs.
Each of these steps contributes to a predictable long-term result.
Outpatient Surgery
Most cosmetic custom facial implant procedures are performed as outpatient surgery under general anesthesia.
Patients typically arrive at the surgical facility on the morning of surgery and return home later the same day.
Only exceptionally large combined procedures or patients with specific medical conditions require overnight observation.
Surgical Incisions
One of the first questions many patients ask is:
“Will I have visible scars?”
Fortunately, most custom facial implants can be inserted through incisions that are hidden inside the mouth, beneath the chin, inside the lower eyelid, or within the hair-bearing scalp.
The location depends entirely on the implant being placed.
Chin and Jawline Implants
These are commonly inserted through:
- A small incision beneath the chin (submental approach)
- An incision inside the mouth (intraoral approach)
The submental approach often provides excellent visualization, particularly for large wraparound jawline implants and secure screw fixation.
Cheek and Midface Implants
Depending on the implant design, access may be obtained through:
- Lower eyelid (transconjunctival) incisions
- Intraoral incisions
- Combined approaches
These incisions avoid visible facial scars while providing excellent access to the cheekbones and orbital rims.
Forehead and Skull Implants
These implants are generally inserted through:
- Hairline incisions
- Scalp incisions hidden within the hair
Once healed, these scars are usually very difficult to detect.
“Custom facial implants are typically inserted through concealed incisions that minimize visible scarring.”
Clinical Insight
Patients Usually Overestimate the Size of the Incision
Because custom implants can be quite large, many patients assume the incisions must also be large.
In reality, the implant is designed to pass through carefully planned surgical openings, and silicone implants in particular can often be inserted through surprisingly small incisions due to their flexibility.
Creating the Implant Pocket
The implant is placed beneath the periosteum, the thin but durable layer that covers the facial skeleton.
This location provides several advantages:
- Excellent stability
- Strong blood supply
- Close contact with bone
- Natural soft-tissue draping
- Long-term comfort
The implant pocket should closely match the implant itself.
A pocket that is too small may prevent complete seating.
A pocket that is too large may allow movement before healing occurs.
Because the implant has been designed specifically for the patient’s anatomy, the surgical dissection often follows the exact boundaries established during digital planning.
Dr. Eppley’s Bottom Line
The implant should fit the pocket—not the other way around. A custom implant works best when the surgical pocket reproduces the digital design as accurately as possible.
Implant Placement
After the pocket has been prepared, the implant is inserted and carefully guided into its planned position.
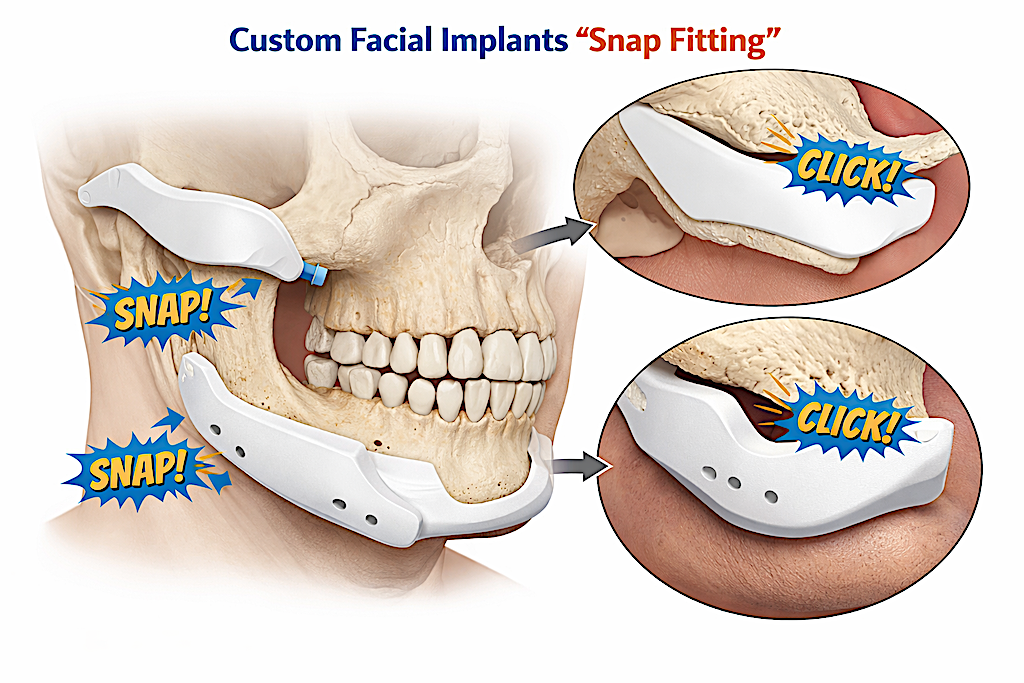
Patients often imagine that the implant “snaps” into place. THIS COULD NOT BE FURTHER FROM THE TRUTH, REGARDLESS OF THE IMPLANT’S MATERIAL COMPOSITION.
While some areas provide obvious anatomical landmarks, the implant is actually seated gradually and methodically until its back surface rests completely against the underlying bone in what is believed to be the right position through the limited visual access that exist through the small incisions. It does NOT just automatically fit like the implant design file shows on a skeletal model, nor it is always obvious where its placement is down to the millimeter level.
The surgeon verifies:
- Complete bone contact
- Perceived best orientation
- Symmetry
- Edge blending
- Overall stability after screw fixation
Only after these goals have been achieved is fixation performed.
Why Screw Fixation Matters
Nearly all modern custom facial implants are secured with small titanium screws.
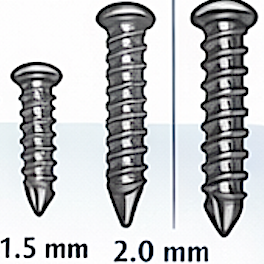
These screws are not intended to permanently hold the implant in place through force alone. Instead, they stabilize the implant while the surrounding tissues heal and adapt.
Benefits of screw fixation include:
- Preventing rotation
- Preventing migration
- Maintaining symmetry
- Eliminating micromotion
- Improving long-term stability
Once healing has occurred, the surrounding soft tissues and periosteum provide additional support.
Patients generally cannot feel the screws after recovery, and they rarely cause long-term problems.
“Small titanium screws stabilize the implant during healing and help maintain precise positioning.”
Closing the Operation
After final positioning has been confirmed:
- The surgical field is irrigated.
- The soft tissues are repositioned.
- Incisions are closed in layers.
- Compression dressings may be applied depending on the procedure.
Patients are then transferred to the recovery area before returning home later the same day.
Recovery: What Patients Can Expect
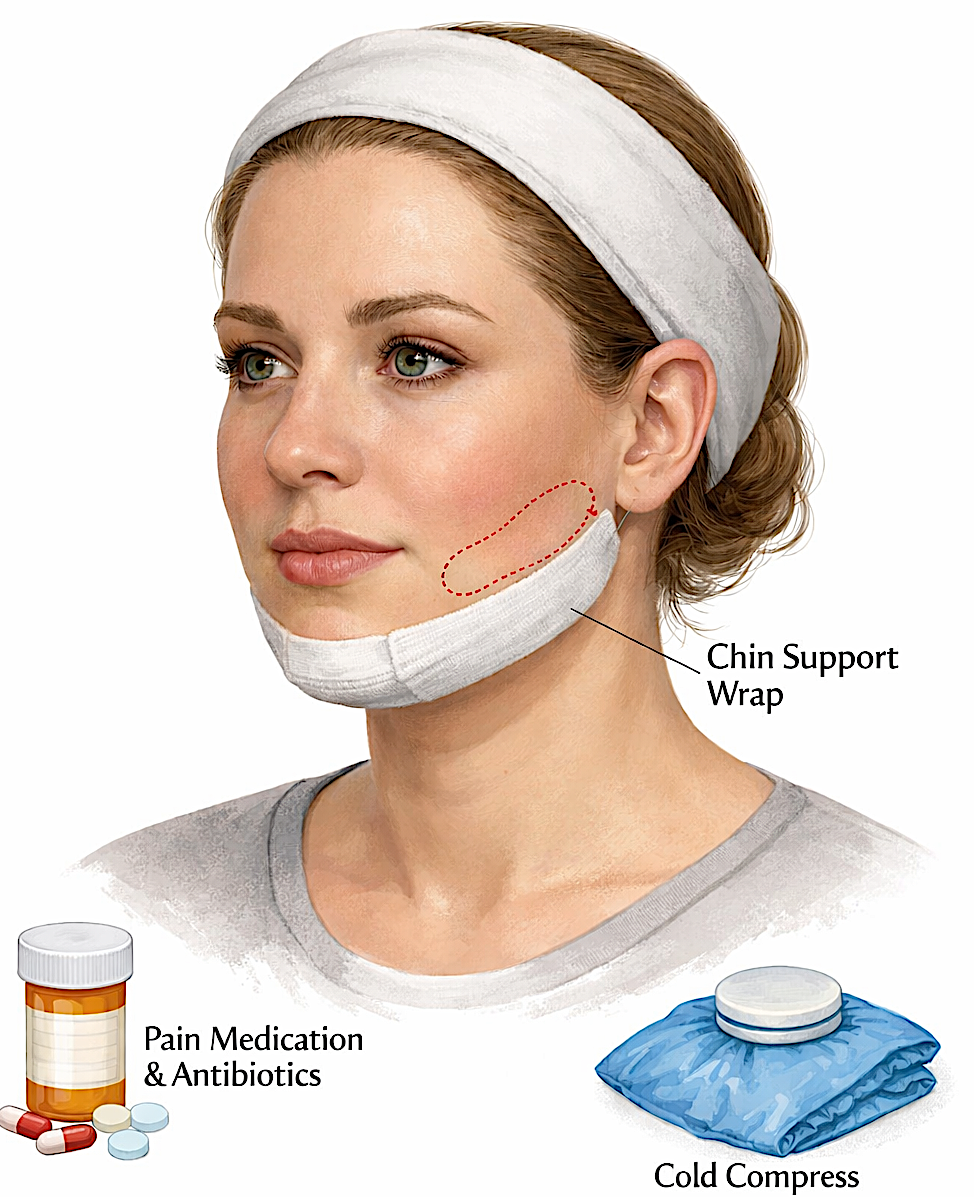
The most common question after surgery is not:
“Will it hurt?”
It is:
“When will I look normal?”
Pain is usually much less significant than patients anticipate.
Swelling is the dominant feature of recovery.
Understanding the normal healing timeline helps reduce unnecessary anxiety during the postoperative period.
Week One
The first week is characterized by:
- Peak swelling
- Bruising
- Tightness
- Temporary numbness
- Mild discomfort
Patients undergoing jaw procedures often follow a soft diet during this period.
Sleeping with the head elevated and applying cold compresses (when appropriate) help reduce swelling.
Weeks Two Through Four
By the second week:
- Bruising has largely resolved.
- Swelling steadily decreases.
- Most patients return to work and social activities.
- Light exercise is gradually resumed.
Although patients often look much better, the face still appears fuller than the final result.
Months Two Through Three
Approximately 70–80% of swelling has resolved.
The new skeletal contours become increasingly apparent.
Patients begin noticing:
- Better jawline definition
- Improved chin projection
- Enhanced cheek contour
- Greater facial balance
Residual numbness continues to improve.
Six Months to One Year
Final refinement continues.
Minor residual swelling disappears.
Soft tissues fully adapt to the implant.
Scars continue maturing.
At this stage, the facial skeleton has permanently acquired its new contours.
Clinical Insight
Recovery Is More Emotional Than Physical
Most patients are pleasantly surprised by how manageable postoperative discomfort is.
What challenges many patients is waiting for swelling to resolve. During the first several weeks, the final result is often hidden by normal postoperative edema.
Patience is one of the most important parts of successful recovery.
Dr. Eppley’s Bottom Line
Swelling heals on biology’s timetable, not the patient’s timetable. The best advice during recovery is often the simplest: give the tissues time to reveal the result that was carefully planned before surgery.
Advantages of Custom Facial Implants
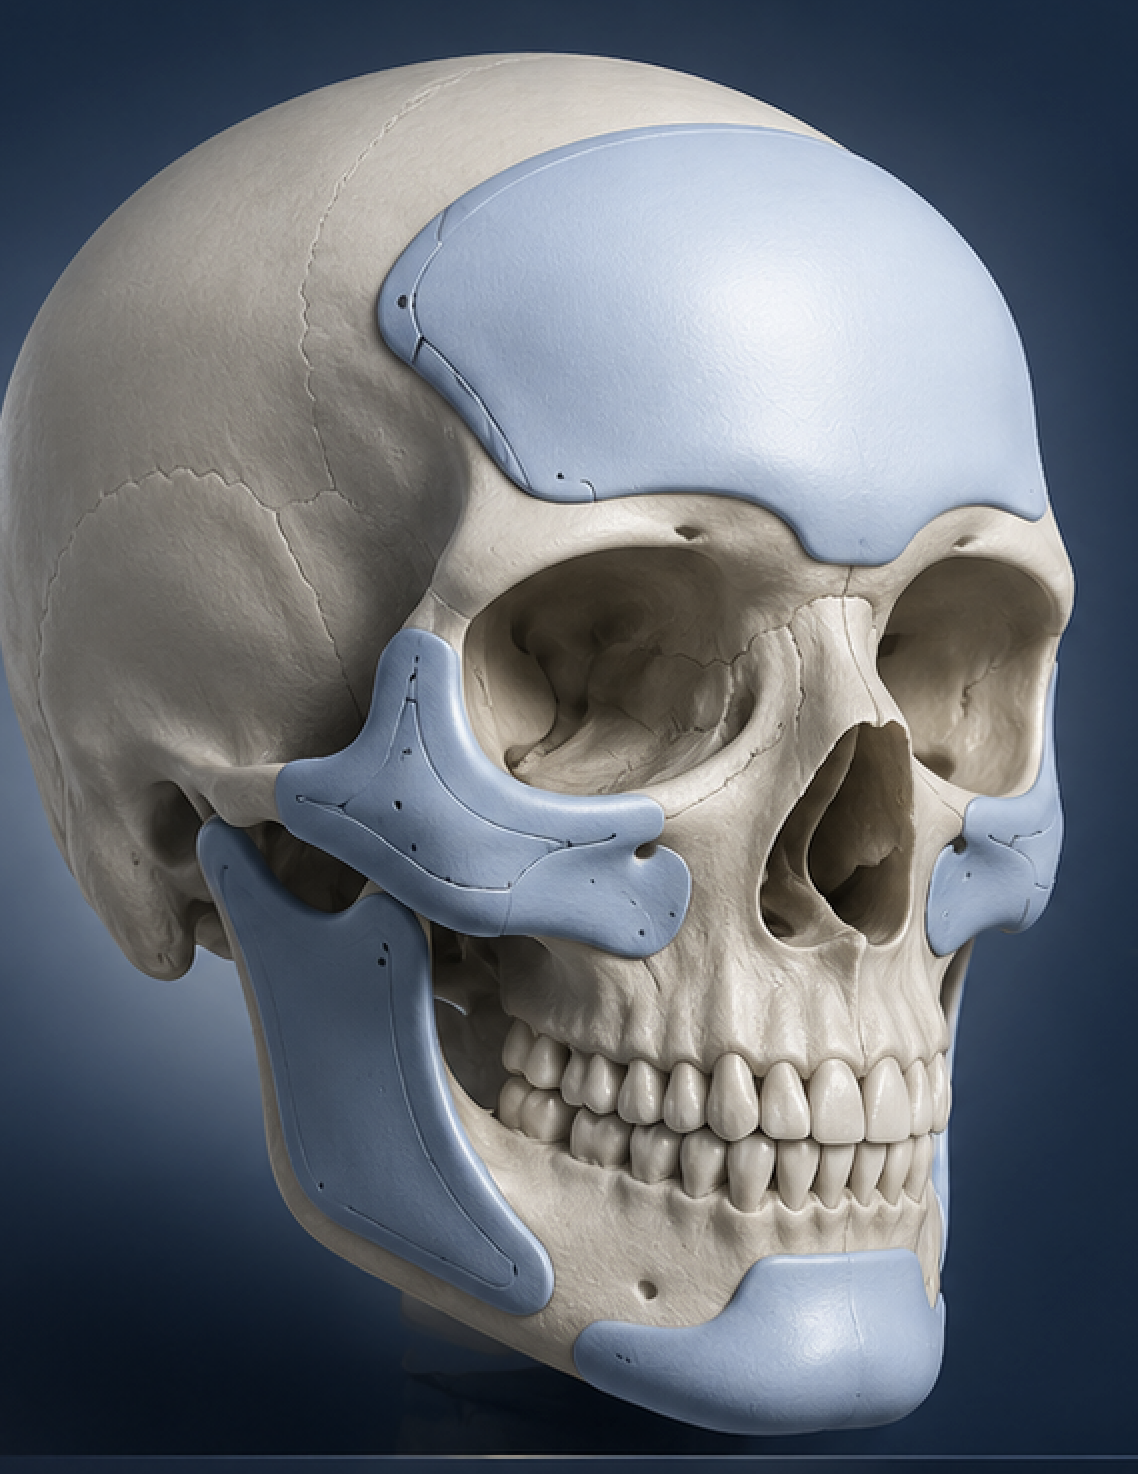
Custom implants offer several important advantages over standard implants and temporary fillers.
Precise Anatomical Fit
Every implant matches the patient’s unique skeletal anatomy.
Unlimited Design Flexibility
Projection, width, height, contour, and asymmetry can all be independently controlled.
Better Correction of Asymmetry
Each side of the face may receive a completely different design when necessary.
Comprehensive Facial Planning
Multiple facial regions can be coordinated into one harmonious treatment plan.
Permanent Structural Change
Unlike fillers, custom implants create long-lasting skeletal enhancement.
Limitations
Despite their advantages, custom facial implants are not appropriate for every patient.
Limitations include:
- Higher cost than standard implants
- Requirement for CT imaging
- Longer planning period
- Manufacturing time
- Greater reliance on surgeon experience
Most importantly, custom implants improve skeletal anatomy. They do not replace procedures that address skin quality, wrinkles, or facial aging.
Risks and Potential Complications
Every surgical procedure carries risk.
Fortunately, serious complications after custom facial implant surgery are uncommon, particularly when careful planning and meticulous technique are combined.
Potential risks include:
Infection
Usually uncommon and often successfully treated with antibiotics.
Temporary Numbness
Common during early recovery and generally improves over time.
Swelling
Universal but temporary.
Implant Malposition/Asymmetries
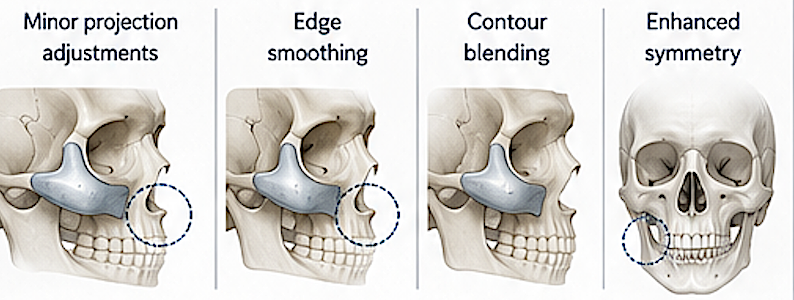
These are the most common surgical risk sand need for revision.
Asymmetry
The goal is improved balance—not mathematical perfection.
Aesthetic Revision
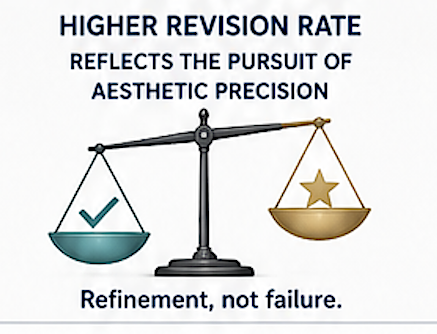
Occasionally performed to further refine an already successful result.
Dr. Eppley’s Bottom Line
The most common reason for revision is not implant failure—it is the pursuit of greater aesthetic precision. That reflects the remarkable accuracy that custom implant surgery makes possible.
Long-Term Expectations
One of the greatest strengths of custom facial implants is their durability.
They:
- Do not dissolve
- Do not wear out
- Do not require routine replacement
- Maintain their shape indefinitely
The surrounding face continues to age naturally.
Skin loses elasticity.
Fat distribution changes.
Muscles continue functioning normally.
The implants simply provide a stronger structural foundation beneath those tissues.
Dr. Eppley’s Bottom Line:
Custom facial implants are designed to become a permanent part of your facial architecture. The implants do not age, but your face will continue to age naturally around them. A well-designed implant should still look balanced decades later because it restores proportion rather than creating an exaggerated appearance.
Aging with Custom Facial Implants
Patients often ask whether implants “age.”
The answer is straightforward.
People age.
Implants do not.
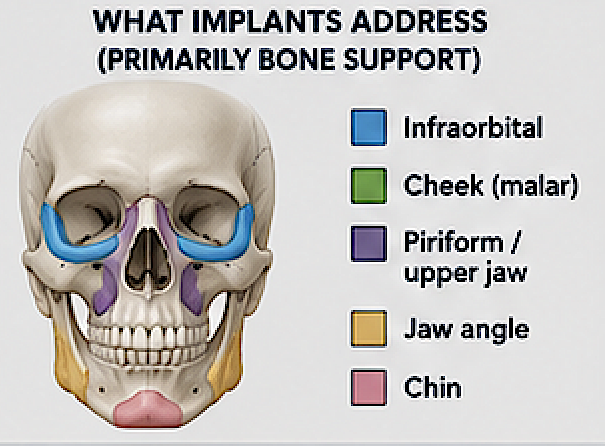
Well-designed implants continue supporting facial proportions throughout life and often help preserve skeletal definition as the overlying soft tissues age.
Dr. Eppley’s Bottom Line
A custom facial implant should never fight the aging process. Instead, it should provide a stronger skeletal foundation that allows the face to age naturally while maintaining better balance and definition over time.
Key Takeaways
- Surgery is the execution of a carefully developed digital treatment plan.
- Most custom facial implant procedures are performed as outpatient surgery under general anesthesia.
- Hidden incisions and screw fixation allow accurate placement with minimal visible scarring.
- Swelling—not pain—is the primary factor influencing recovery.
- Custom implants provide permanent skeletal enhancement while allowing the face to continue aging naturally.
- Long-term success depends on thoughtful design, meticulous surgical technique, and realistic patient expectations.
Part 4: Clinical Pearls, Frequently Asked Questions, and Final Takeaways
Dr. Eppley’s Clinical Pearls
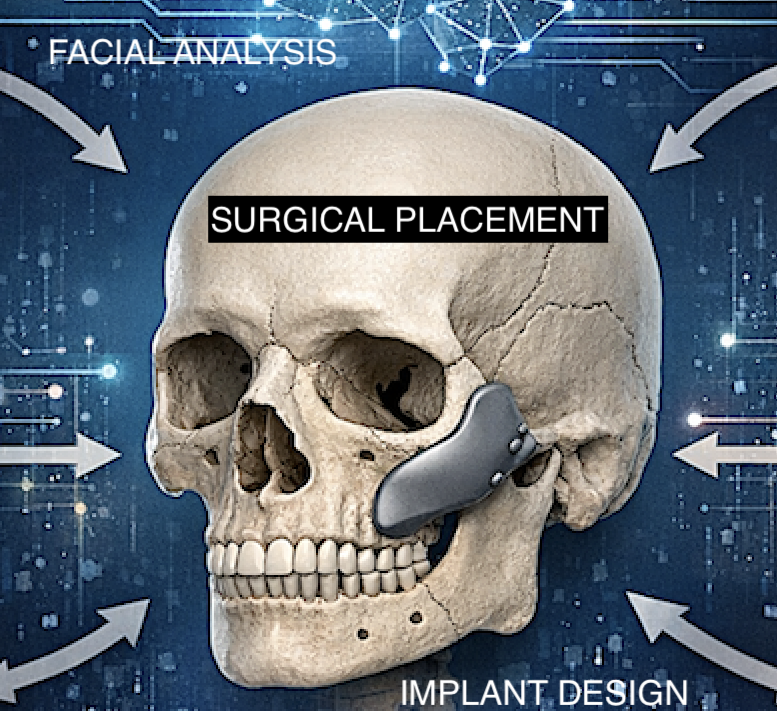
Custom facial implant surgery combines three separate disciplines:
- Facial analysis
- Digital skeletal design
- Surgical placement
The best results occur when all three are handled as one continuous process rather than as unrelated steps.
The following clinical pearls summarize the principles that most consistently influence long-term outcomes.
Clinical Pearl #1
The Implant Does Not Create the Result—the Design Does
A custom implant is a physical reproduction of decisions made before surgery.
Its width, projection, angularity, vertical height, edge shape, and transitions are built into it during the design process.
Manufacturing can reproduce a design with extraordinary accuracy, but it cannot determine whether the design is aesthetically appropriate.
If the design is wrong, the manufacturer may simply create the wrong implant very precisely.
For that reason, implant design is not a technical formality. It is the central aesthetic part of the operation.
Clinical Insight
The First Design Is Rarely the Best Design
Initial implant proposals are often useful starting points, but they commonly require refinement.
Small changes may include:
- Reducing posterior jaw width
- Increasing chin length
- Softening an infraorbital edge
- Extending a cheek implant farther laterally
- Changing the location of maximum projection
These adjustments may appear minor on the computer, but they can meaningfully affect the healed result.
Dr. Eppley’s Bottom Line
The quality of a custom facial implant is determined long before the operation begins. The design phase is where the facial result is created; surgery is where that design is transferred to the patient.
Clinical Pearl #2
Bigger Is Not Automatically Better
Patients often arrive with the understandable goal of making a deficient feature stronger.
A weak jaw should become wider.
A small chin should become more projected.
Flat cheeks should become more prominent.
The difficulty is determining when enough becomes too much.
Facial attractiveness depends on relationships among features rather than the size of any one feature. A very wide jaw may overpower the cheekbones. Excessive chin projection may make the lips appear recessed. Overly strong infraorbital augmentation may make the lower eyelids appear heavy.
The best implant is therefore not the largest implant the tissues can accommodate.
It is the implant that creates the best overall proportion.
Clinical Insight
Patients Often Judge the Implant, While Others Judge the Face
During design review, patients may focus on a single measurement or area of thickness.
Other people will never see the implant or its dimensions.
They will see how the entire face appears after the tissues have healed.
The design must therefore be judged by its effect on the whole face, not by whether one feature has been maximized.
Dr. Eppley’s Bottom Line
The goal is not maximum augmentation. The goal is maximum improvement while preserving facial harmony.
Clinical Pearl #3
Every Millimeter Can Matter
One or two millimeters may sound insignificant.
On the face, those differences can be clearly visible.
Small changes may alter:
- Chin projection
- Jaw-angle width
- Lower facial taper
- Cheek prominence
- Eyelid-to-cheek transition
- Forehead curvature
- Side-to-side balance
This sensitivity is one reason custom implant planning can be so exacting. The face is continuously viewed from close range, under changing light, and from multiple angles.
Small differences that might be irrelevant elsewhere in the body can become meaningful on the face.
Clinical Pearl #4
Symmetry and Balance Are Not the Same
Natural faces are not perfectly symmetrical.
The right and left sides differ in bone shape, muscle volume, fat distribution, and skin thickness.
Custom implants can substantially improve skeletal asymmetry, but the goal should not always be to create identical measurements on both sides.
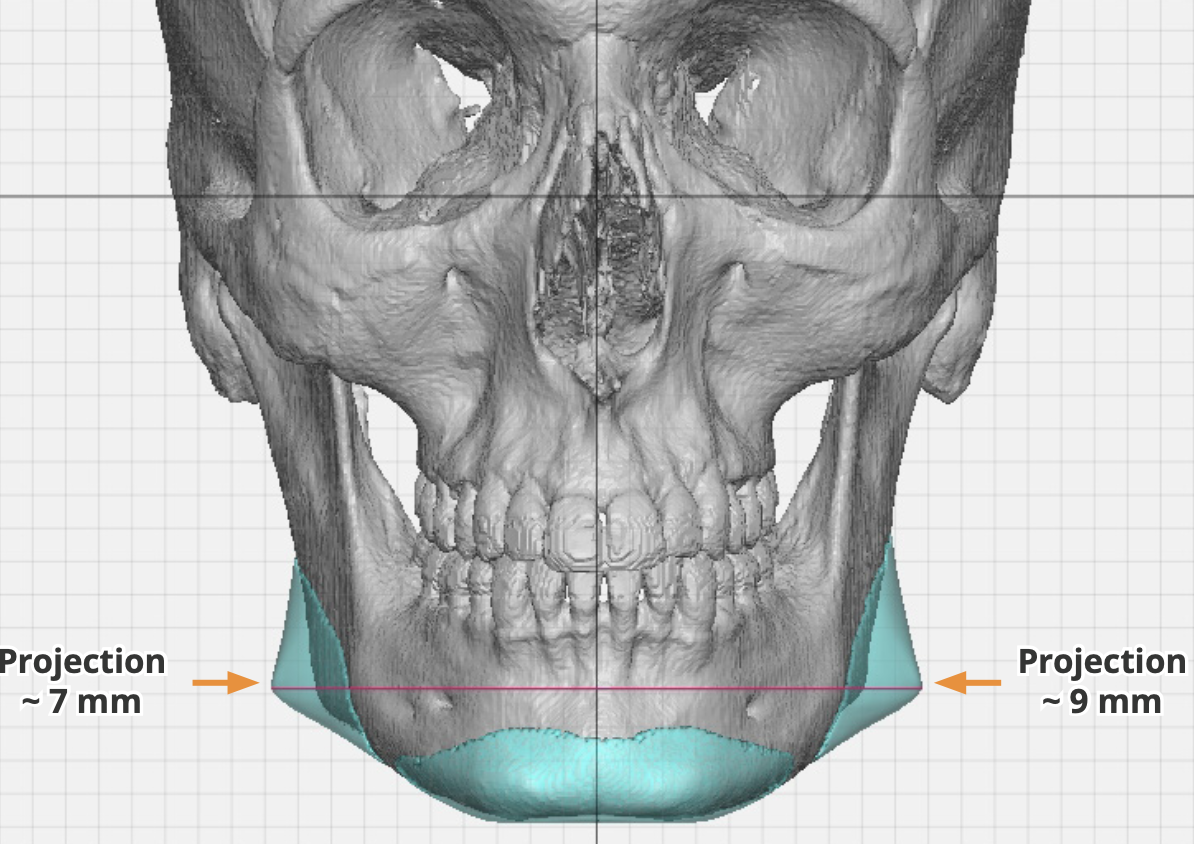
Sometimes different implant dimensions are required to produce a more balanced external appearance.
A mathematically symmetrical skeleton may still appear asymmetrical if the overlying soft tissues differ.
Successful treatment therefore aims for perceived balance, not rigid numerical equality.
Dr. Eppley’s Bottom Line
Custom implants can improve asymmetry more precisely than stock implants, but no operation can make two biologically different sides of the face completely identical.
Clinical Pearl #5
The CT Scan Shows Bone, Not the Final Face
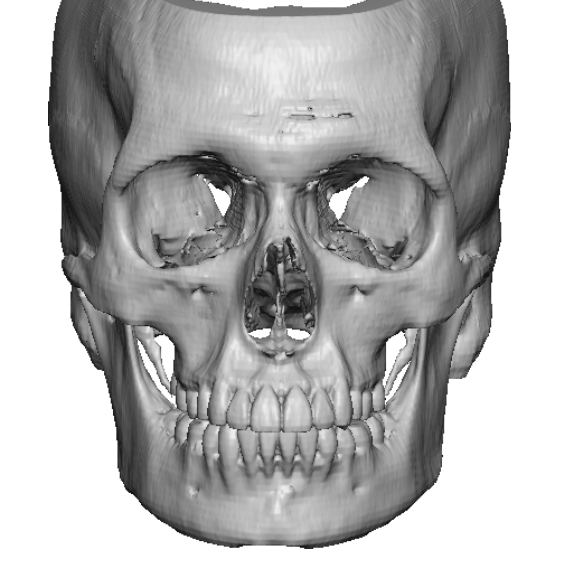
The CT scan is indispensable because it shows the facial skeleton accurately.
However, the result is seen through:
- Skin
- Fat
- Muscle
- Scar tissue
- Facial expression
A five-millimeter implant may appear very strong in a thin face and comparatively subtle beneath thicker tissues.
This is why implant dimensions cannot be selected from skeletal measurements alone.
The surgeon must predict how the new bone contour will translate through the soft-tissue envelope.
That judgment develops through experience with both design and long-term healed results.
Clinical Insight
Identical Implant Thickness Does Not Create Identical Visible Change
Two patients may receive implants with similar maximum projection and obtain very different external results.
Factors include:
- Tissue thickness
- Muscle size
- Facial fat
- Skin elasticity
- Implant location
- Baseline skeletal shape
This biological variability is the main reason a computer simulation should be treated as a planning aid rather than a guarantee or assured outcome.
Clinical Pearl #6
Edge Design Often Determines Naturalness
Patients naturally focus on the center of the implant, where the greatest augmentation occurs.
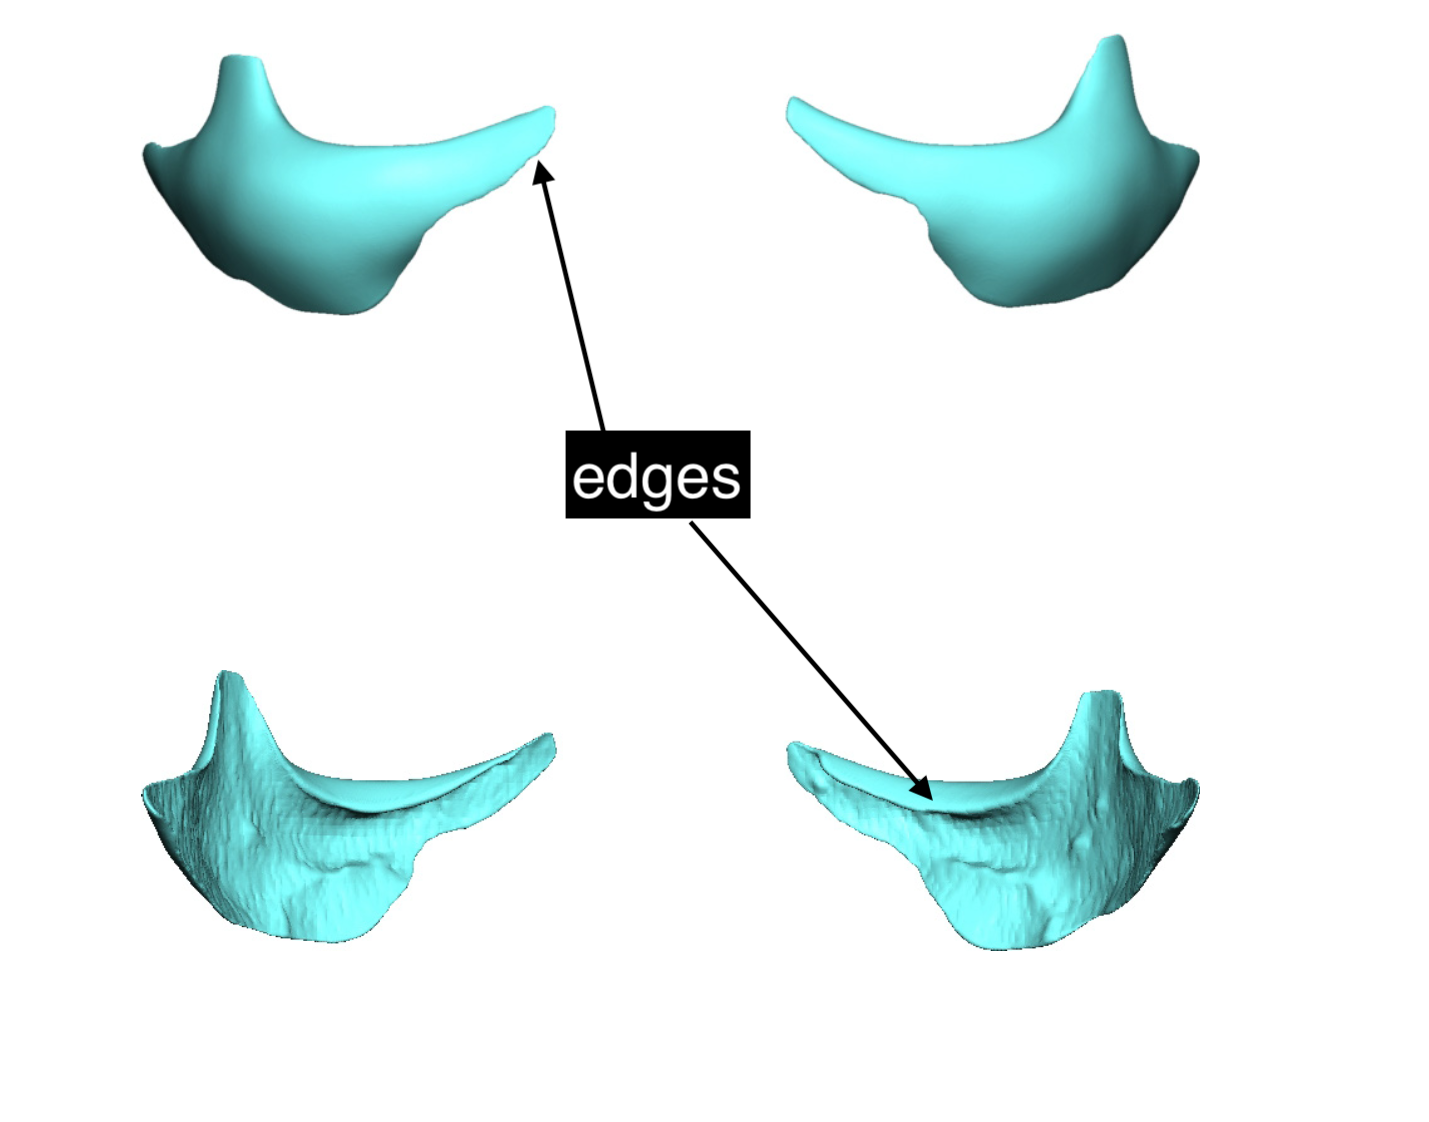
The surgeon must also focus on where the implant ends.
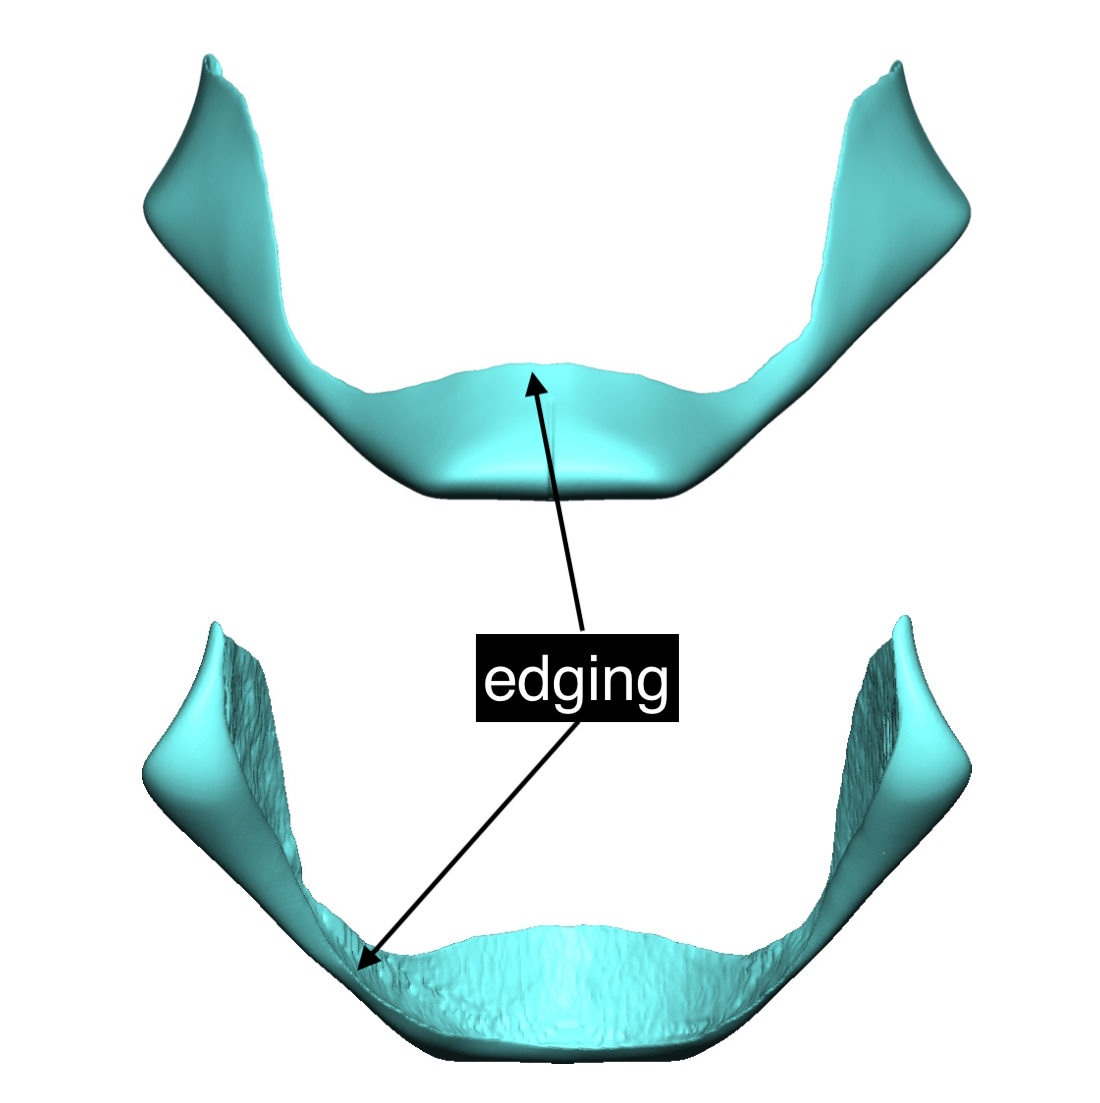
A well-designed border gradually becomes thinner until it blends into the surrounding bone. An abrupt edge may create a visible transition or a palpable step-off.
This is especially important in areas with thin tissue coverage, including:
- Infraorbital rims
- Forehead
- Temples
- Lateral cheeks
- Chin borders
The central projection creates the change.
The edges determine whether that change looks natural.
Dr. Eppley’s Bottom Line
A natural implant should strengthen the skeleton without revealing where the implant begins or ends.
Clinical Pearl #7
A Custom Implant Does Not Truly Snap into Place
The CT-derived undersurface can fit the facial bone very closely, but both the implant and bone are smooth surfaces.
The implant must still be:
- Inserted correctly
- Oriented precisely
- Fully seated
- Checked for soft-tissue interposition
- Secured with screws
A close anatomical fit helps guide placement, but it does not eliminate the need for surgical judgment or fixation.
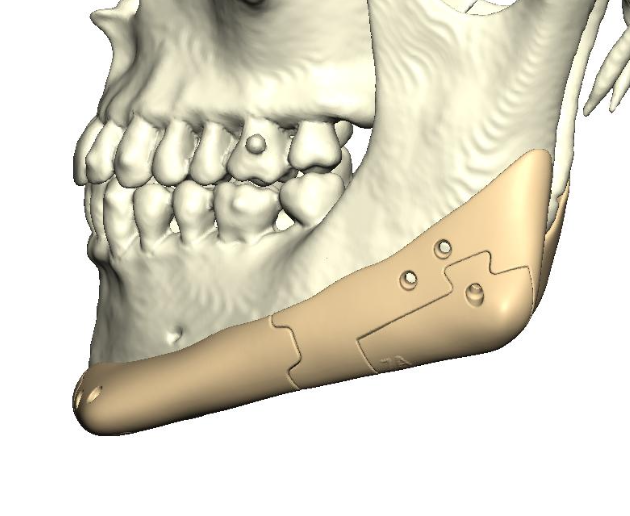
The idea that an implant automatically locks itself into position oversimplifies the operation. It may look like it does so on a design file but in actual surgery that is a very different matter.
Clinical Pearl #8
Screw Fixation Is Part of Precision
Screws do more than prevent later movement.
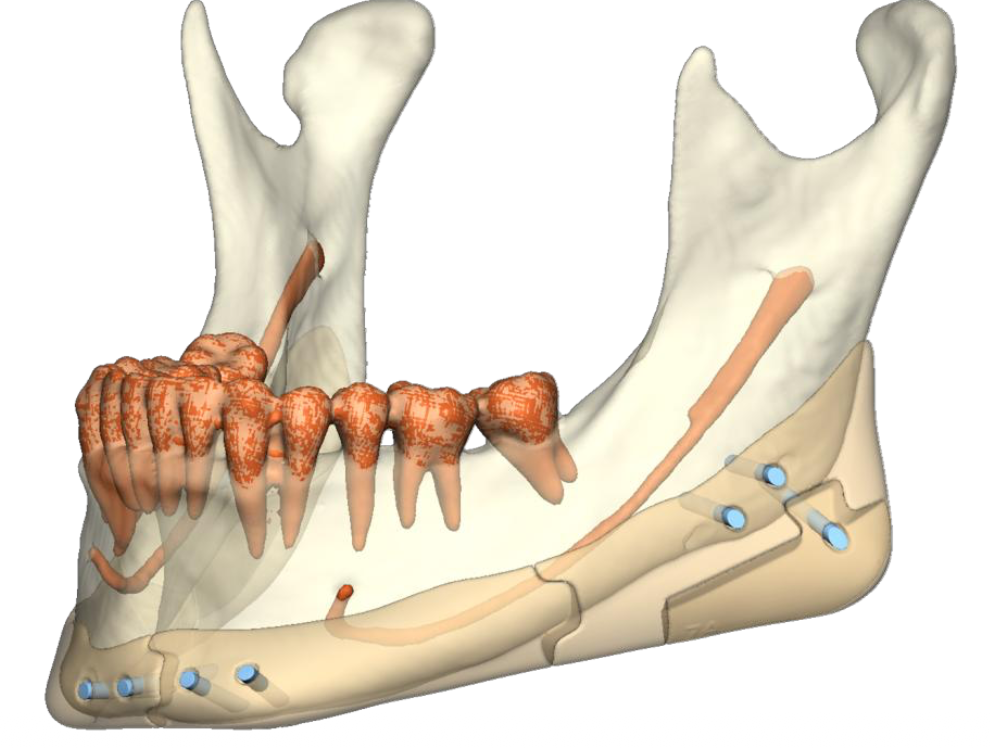
They help preserve the exact position established during surgery.
The first screw is particularly important because it can stabilize the implant like a hinge. If that first screw is placed while the implant is not fully seated, it may secure the implant in the wrong position.
Proper fixation requires:
- Complete implant seating
- Safe screw trajectories
- Adequate bone thickness
- Protection of nerves and tooth roots
- Control of rotation
Screw fixation is therefore not an afterthought. It is part of reproducing the digital plan accurately.
Dr. Eppley’s Bottom Line
A perfectly designed implant can still produce a poor result if it is not fully seated and accurately fixated. Design and placement must work together.
Clinical Pearl #9
Revision Does Not Always Mean Failure
Revision surgery in custom facial implants is often interpreted too simply.
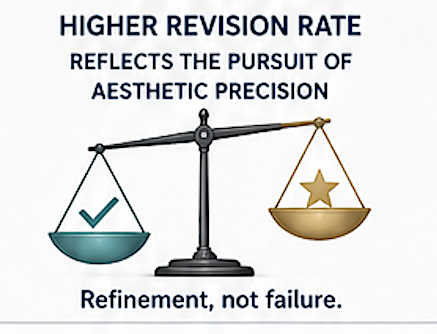
Some revisions are necessary because of infection, movement, or true malposition. Most however are performed because the patient wants a more refined aesthetic result after seeing the real soft-tissue response.
Typical refinements may involve:
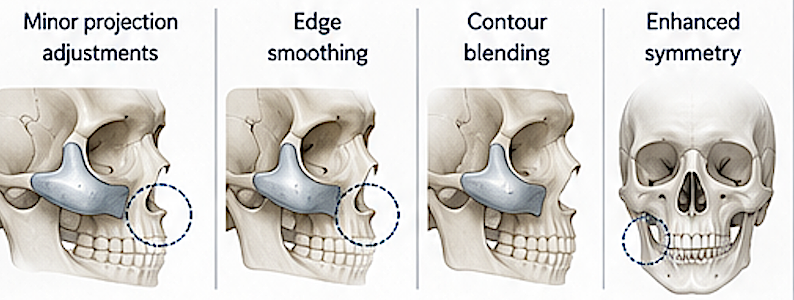
- Slightly reducing projection
- Increasing one localized area
- Smoothing an edge
- Improving side-to-side balance
- Replacing an implant with a revised design
Because patients selecting custom implants often have highly specific goals, their threshold for refinement may be lower than that of patients seeking a more general improvement.
A revision can therefore represent further optimization rather than correction of a failed operation.
Clinical Insight
The Final Result Sometimes Clarifies the Patient’s Goal
Before surgery, patients make decisions using photographs, simulations, and descriptions.
After healing, they can see the actual relationship between the new skeletal contour and their soft tissues.
Occasionally that real-world result helps them identify a small change they could not have anticipated before surgery…and may spur them on to consider a replacement implant design.
Dr. Eppley’s Bottom Line
A higher aesthetic revision rate does not necessarily mean a higher complication rate. In many cases, it reflects the pursuit of greater precision.
Clinical Pearl #10
The Best Result Does Not Look Like an Implant
A technically impressive implant is not necessarily an aesthetically successful implant.
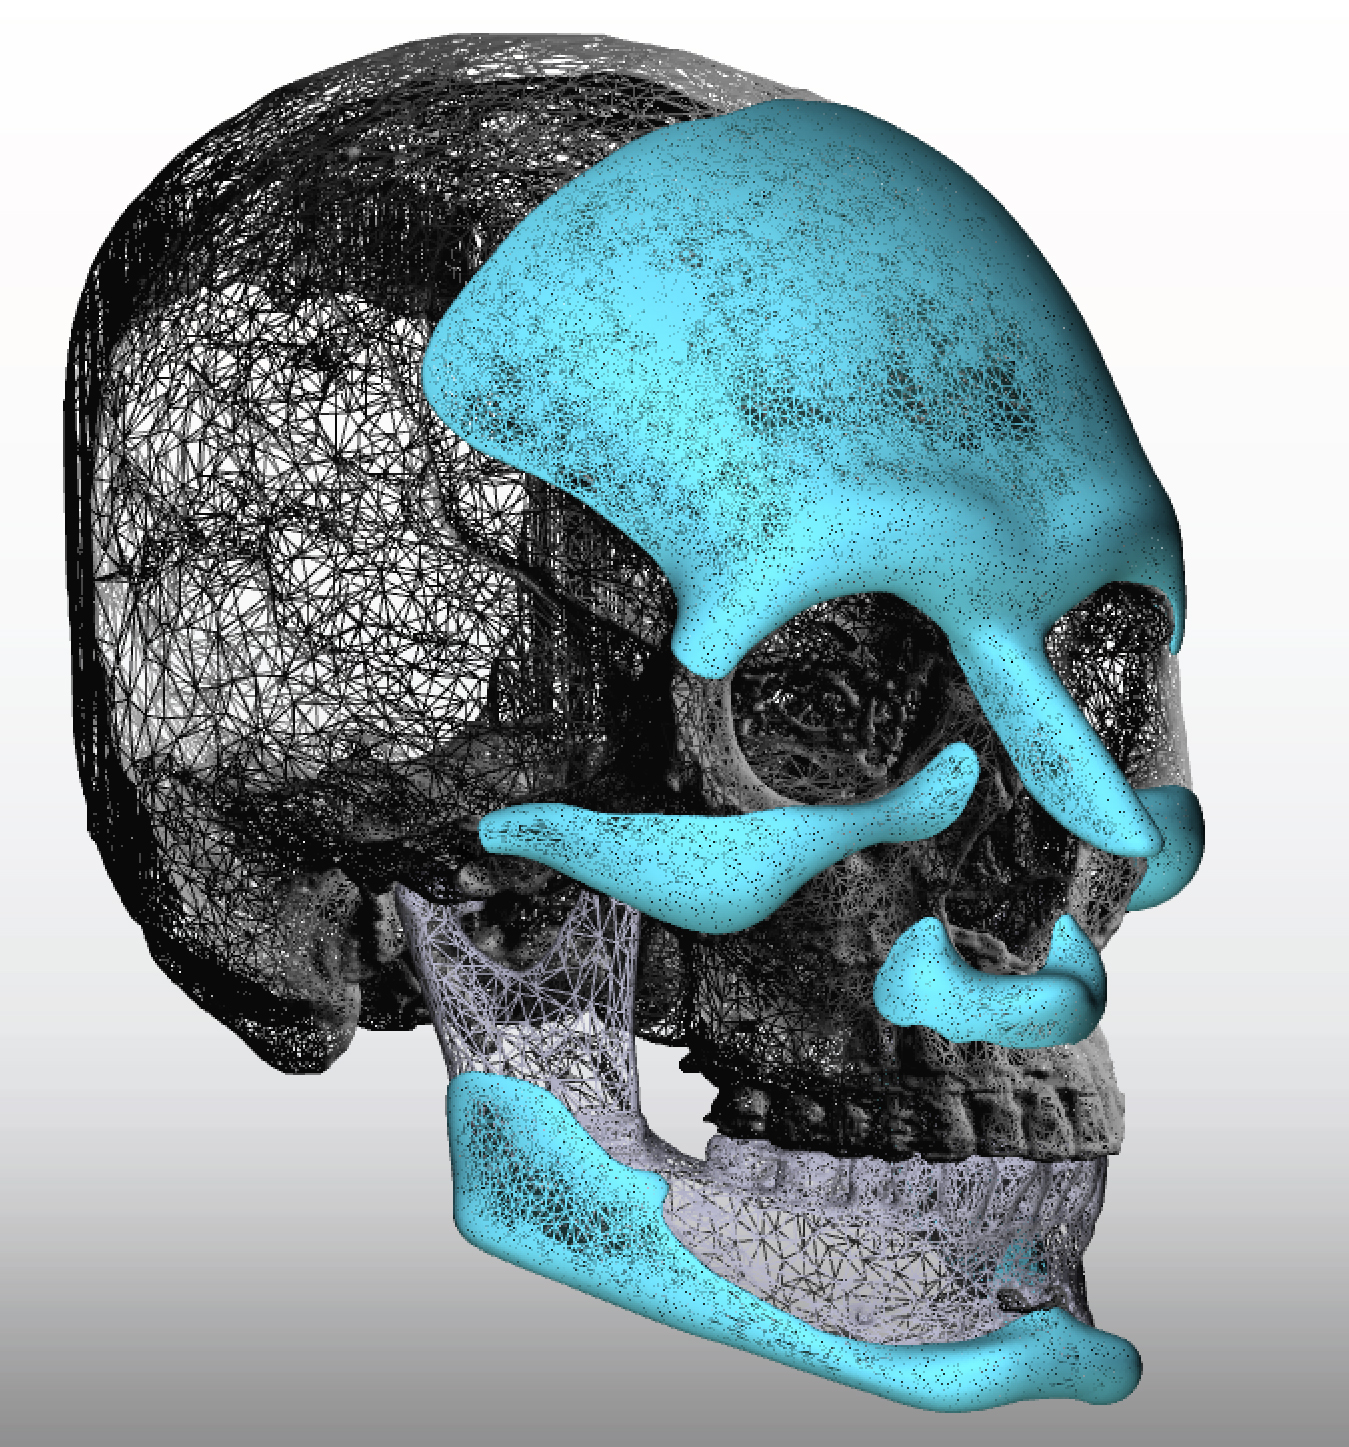
The goal is not for other people to notice the jaw implant, cheek implant, or forehead implant.
The goal is for the face to appear:
- Better balanced
- More structurally complete
- More symmetrical
- Stronger or softer as intended
- Natural for the individual
The most successful result looks as though the patient’s skeleton naturally developed that way.
Frequently Asked Questions
Are custom facial implants truly made for one person?
Yes. A true custom facial implant is designed from the patient’s own CT scan. Its bone-contacting surface matches that patient’s anatomy, while its outer surface is designed to create the planned aesthetic change.
A digital design from another patient may occasionally serve as a general reference, but the final implant must be adapted to the new patient’s skeleton and goals.
Are custom facial implants better than standard implants?
They are better for certain problems, but not necessary for every patient.
Standard implants may work very well for straightforward chin or cheek augmentation when the available shape closely matches the patient’s needs.
Custom implants are especially useful for:
- Complex anatomy
- Significant asymmetry
- Large augmentations
- Wraparound designs
- Revision surgery
- Multiple coordinated facial regions
- Goals not achievable with stock shapes
The correct choice depends on the problem being treated.
Is a CT scan always required?
A high-resolution CT scan is generally required for a true patient-specific implant because the implant must be designed to fit the facial skeleton.
Photographs remain important for aesthetic analysis, but they cannot show the exact bone surface required for manufacturing.
MRI may occasionally supplement CT for soft-tissue analysis, but CT remains the standard imaging method for most bone-based implant designs.
Can I participate in the implant design?
Yes. Patients should clearly communicate their goals and may review the virtual design with the surgeon.
Useful input can include:
- Desired degree of change
- Preference for subtle or strong augmentation
- Concerns about width or projection
- Reference photographs
- Features the patient does not want changed
The patient defines the aesthetic goal. The surgeon translates that goal into an anatomically safe and surgically practical design.
Can artificial intelligence design my implant?
AI can assist with several technical tasks, including:
- CT segmentation
- Three-dimensional reconstruction
- Asymmetry measurement
- Mirroring anatomy
- Preliminary implant generation
- Smoothing transitions
AI is less reliable when determining:
- Ideal aesthetic proportions
- The appropriate strength of augmentation
- Soft-tissue response
- Surgical insertion
- Muscle and nerve considerations
- Long-term aesthetic balance
AI is currently most useful as a design assistant rather than an independent final decision-maker.
How long does the design and manufacturing process take?
A typical timeline may require approximately six to eight weeks from receipt of an acceptable CT scan to a surgery-ready implant.
The design phase may take one to three weeks, depending on:
- Complexity
- Number of implants
- Surgeon review
- Patient input
- Number of revisions
Manufacturing may require another two to six weeks.
Very complex or multi-piece designs may take longer.
Which implant material is best?
There is no single best material for every patient and every facial region.
Solid silicone is widely used for cosmetic augmentation because it is flexible, can be inserted through smaller incisions, allows smooth edge design, and is relatively straightforward to revise or remove.
PEEK is rigid and highly precise but may require larger access and offers less intraoperative flexibility.
Porous polyethylene allows tissue ingrowth but can be more difficult to remove.
Titanium is extremely strong and is used more often in reconstruction than routine aesthetic augmentation.
Design, location, surgical goals, and future revisability are usually more important than choosing the hardest or most expensive material.
Are custom facial implants permanent?
Yes. They are intended to remain indefinitely and do not dissolve or require routine replacement.
They can still be removed, revised, or replaced if necessary.
For this reason, they are best described as permanent but revisable.
Can custom facial implants shift?
They can, but movement is uncommon when the implant is accurately positioned and secured with screws.
The highest-risk period is during the first several weeks before healing stabilizes the implant.
Potential causes of movement include:
- Inadequate fixation
- An oversized surgical pocket
- External pressure
- Facial trauma
- Failure to follow activity restrictions
Some cases that appear to have shifted actually represent initial malposition that becomes noticeable only after swelling resolves.
Can custom implants be removed?
Yes. Removal is generally possible, although the difficulty varies by material and duration.
Solid silicone is typically easier to remove because it forms a capsule rather than allowing tissue ingrowth.
Porous polyethylene may be more difficult because surrounding tissues grow into it.
After removal, the face may not return perfectly to its original appearance because of:
- Tissue stretching
- Scar formation
- Bone remodeling
- Long-term adaptation
Removal is therefore possible, but not always perfectly reversible.
Will the implant edges be visible or palpable?
Well-designed implants should have thin, tapered borders that blend into surrounding bone.
Visibility or palpability is more likely when:
- The tissues are very thin
- The implant is excessively large
- The borders are abrupt
- The implant is malpositioned
- Significant weight loss occurs
- The implant lies in an anatomically unforgiving region
Minor palpability does not always require treatment, but visible contour transitions may benefit from revision, edge modification, or soft-tissue camouflage.
How painful is the recovery?
Most patients describe pressure, tightness, and swelling rather than severe pain.
Discomfort is generally manageable with prescribed medication.
Recovery varies by implant location and number. A small chin implant usually produces less swelling than a complete jawline, midface, or multi-implant procedure.
Swelling is usually the main factor determining how quickly the patient feels comfortable returning to social activities.
When can I return to work?
Many patients with desk-based work return in approximately seven to ten days, although visible swelling may remain.
Patients undergoing larger jawline, orbital, forehead, or multiple-implant procedures may prefer two weeks or longer.
Remote work may be possible earlier if the patient is comfortable and not concerned about appearance on video.
When can I exercise again?
Walking is encouraged early.
Light exercise often resumes after the first few weeks, depending on the procedure.
Heavy lifting and strenuous exercise are usually restricted longer because they can increase swelling, bleeding, and pressure.
Contact sports and activities with facial impact risk require a more cautious return, often around ten to twelve weeks or longer.
The operating surgeon’s instructions should take priority over any general timeline.
Can I have Botox or fillers after implants?
Usually, yes.
Botox is injected into muscles and generally does not interfere with facial implants.
Fillers require more caution because they may be placed in tissues over or near the implant. The injector should know:
- The implant’s location
- Its extent
- When it was placed
- Whether there were prior complications
Ultrasound guidance may be useful in complex cases.
Will other people know I have facial implants?
Most people do not identify a well-designed implant result as surgery.
They may notice that the patient appears:
- Better balanced
- More defined
- Stronger
- Healthier
- Slimmer through the face
Implants become more detectable when the change is very large, the tissue is thin, or the design creates proportions outside the normal anatomical range.
Do custom facial implants slow aging?
They do not stop biological aging.
Skin, fat, ligaments, and bone continue to change with time.
However, implants may provide stronger skeletal support beneath the aging soft tissues. Cheek, infraorbital, pyriform, chin, and jawline implants can help preserve structural definition and may allow the face to age from a more favorable foundation.
They should be considered structural support rather than true anti-aging treatment.
Can custom implants be combined with other facial procedures?
Yes. Common combinations include:
- Rhinoplasty
- Facelift
- Neck lift
- Neck liposuction
- Blepharoplasty
- Fat grafting
- Buccal fat reduction
- Skin resurfacing
Combined surgery may improve overall facial harmony and reduce the number of recovery periods.
However, it also increases operative complexity, swelling, and the need for careful blood-supply and infection planning.
Can custom implants correct every facial asymmetry?
No.
They are most effective for skeletal contour and volume deficiencies.
They do not fully correct asymmetry caused by:
- Jaw misalignment
- Malocclusion
- Muscle differences
- Fat distribution
- Skin differences
- Facial nerve weakness
Some patients require a combined approach involving orthognathic surgery, custom implants, fat grafting, or soft-tissue procedures.
Are custom facial implants safe?
They have a generally favorable safety profile when appropriately designed, manufactured, and placed.
Potential complications include:
- Infection
- Malposition
- Nerve symptoms
- Asymmetry
- Edge visibility
- Exposure
- Aesthetic undercorrection or overcorrection
- Revision surgery
Safety depends heavily on patient selection, sterile technique, implant location, fixation, and surgeon experience.
Dr. Eppley’s Bottom Line
Custom facial implants are powerful because they allow extremely specific skeletal changes. That same precision makes careful planning essential. A custom implant is not inherently successful merely because it fits the bone; it must also be aesthetically appropriate, surgically practical, and compatible with the patient’s soft tissues.
Key Takeaways
- Custom facial implants are designed from the patient’s own CT scan and manufactured specifically for that individual.
- The quality of the implant design is one of the strongest determinants of the final aesthetic result.
- Precise skeletal fit does not eliminate the need for experienced surgical placement and screw fixation.
- Soft-tissue thickness and healing determine how the implant appears externally.
- Natural facial balance is more important than maximum size or perfect mathematical symmetry.
- Custom implants are permanent but can be revised, replaced, or removed.
- Revision surgery is sometimes performed for aesthetic refinement rather than implant failure.
- The best result strengthens facial architecture without making the patient look implanted.
Final Perspective
Custom facial implants represent the most individualized form of permanent facial skeletal augmentation currently available. They allow the surgeon to move beyond the limitations of preset implant sizes and shapes and instead design a solution around the patient’s actual anatomy.
Their greatest strength is precision.
That precision, however, does not make the procedure automatic.
The CT scan shows the skeleton. The design determines the intended change. Manufacturing reproduces the approved design. Surgery positions and secures it. Healing reveals how the patient’s tissues respond.
Every stage matters.
The technology makes sophisticated facial changes possible, but technology alone does not determine whether those changes will look natural. Successful outcomes still depend on careful patient selection, realistic goals, restraint, anatomical understanding, surgical experience, and a design philosophy that treats the face as one integrated structure.
Dr. Eppley’s Bottom Line
The greatest misconception about custom facial implants is that they are simply improved versions of standard implants. They are not. They represent a different philosophy of facial surgery—one in which the patient’s anatomy is studied first, the desired skeletal change is designed second, and the physical implant is manufactured only after those decisions have been carefully refined.
CORNERSTONE ARTICLE #2
How Are Custom Facial Implants Made from a 3D CT Scan?
The Role of CT Imaging in Custom Implant Design
Quick Answer
Custom facial implants are made by converting a patient’s high-resolution CT scan into a three-dimensional digital model of the facial skeleton. That model is then used to design an implant whose inner surface matches the patient’s bone and whose outer surface creates the desired facial contour.
The process generally follows five steps:
- A thin-cut CT scan is obtained.
- The scan data are converted into a 3D skull model.
- The patient’s skeletal anatomy and asymmetries are analyzed.
- The implant is digitally designed and refined.
- The approved design is manufactured, sterilized, and prepared for surgery.
The CT scan provides the anatomical foundation for the process, but it does not automatically determine what the implant should look like. The final design still depends on the surgeon’s analysis, the patient’s goals, soft-tissue considerations, and the planned surgical approach.
Part 1: Why the CT Scan Is the Starting Point
A true custom facial implant must be designed around the patient’s own skeletal anatomy.
That requires a detailed three-dimensional representation of the facial bones.
Photographs are valuable for evaluating:
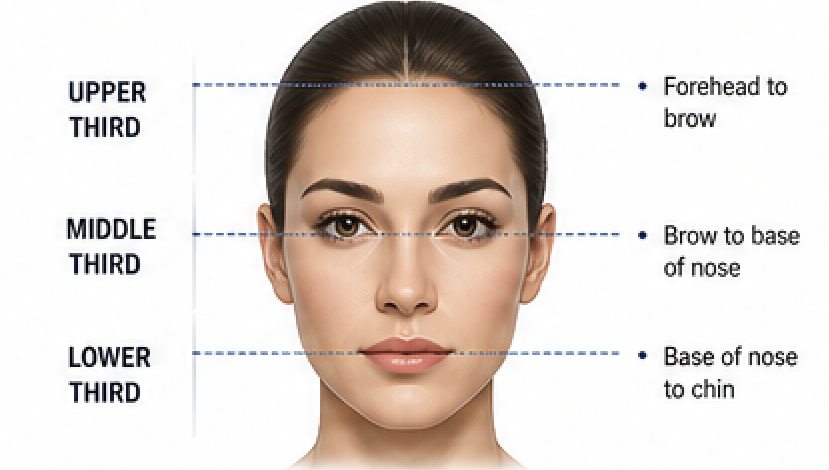
- Facial proportions
- Soft-tissue thickness
- Skin quality
- Facial expression
- Front, oblique, and side-view appearance
- The patient’s aesthetic goals
However, photographs cannot show the exact shape of the underlying bone.
They cannot reliably reveal:
- The precise contour of the jawline
- The thickness and shape of the chin
- The position of the infraorbital rims
- The contour of the cheekbones
- The shape of the forehead
- The three-dimensional pattern of facial asymmetry
- The location of previous implants or fixation hardware
- The exact bone surface on which an implant must rest
The CT scan fills that gap.
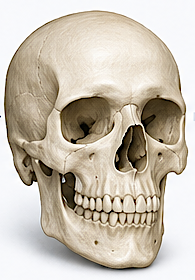
It provides the digital skeletal anatomy needed to create an implant that is truly patient-specific.
Dr. Eppley’s Bottom Line
Photographs show what the face looks like. The CT scan shows why it looks that way. Custom implant design requires both.
What the CT Scan Actually Provides
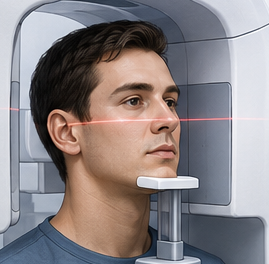
A CT scan creates a series of cross-sectional images through the face or skull.
These images are then processed by specialized software to create a three-dimensional model.
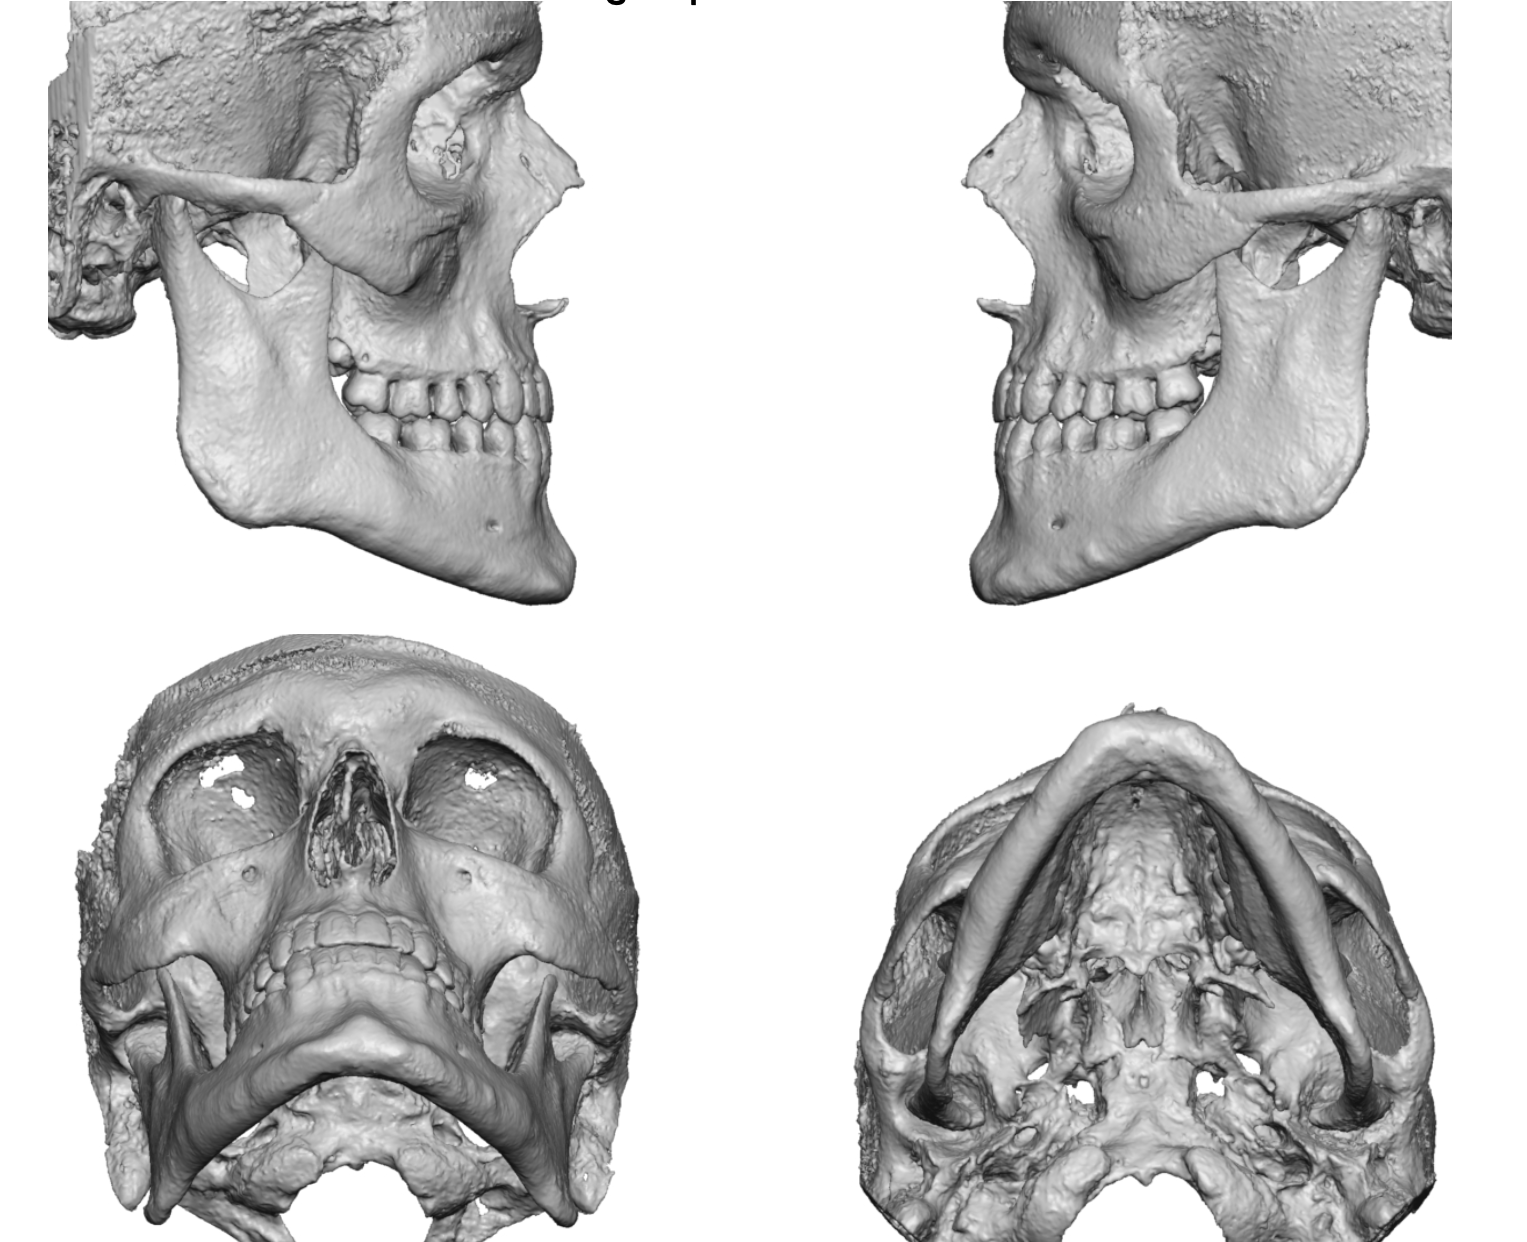
The resulting model allows the surgeon and o examine the facial skeleton from virtually any angle.
It can be:
- Rotated
- Enlarged
- Viewed from above or below
- Examined from the front, side, or oblique angles
- Made partially transparent
- Compared side to side
- Used to measure distances, angles, and surface differences
This is very different from looking at a conventional two-dimensional X-ray.
A standard X-ray compresses multiple anatomical structures into one flat image. A 3D CT reconstruction separates those structures and allows the actual surface anatomy to be studied.
That surface anatomy becomes the foundation for the implant.
The CT Scan Does Not Design the Implant
One of the most common misconceptions is that the CT scan is entered into software and the computer automatically produces the ideal implant.
That is not how the process works.
The scan provides anatomical information.
It does not determine:
- How much projection the chin should have
- Whether the jawline should be wider or more angular
- How much cheek projection is aesthetically appropriate
- Whether asymmetry should be fully or partially corrected
- Whether the desired result should be subtle, moderate, or dramatic
- How the implant should transition into adjacent skeletal areas
- How the soft tissues will respond to the new contour
These decisions require clinical judgment.
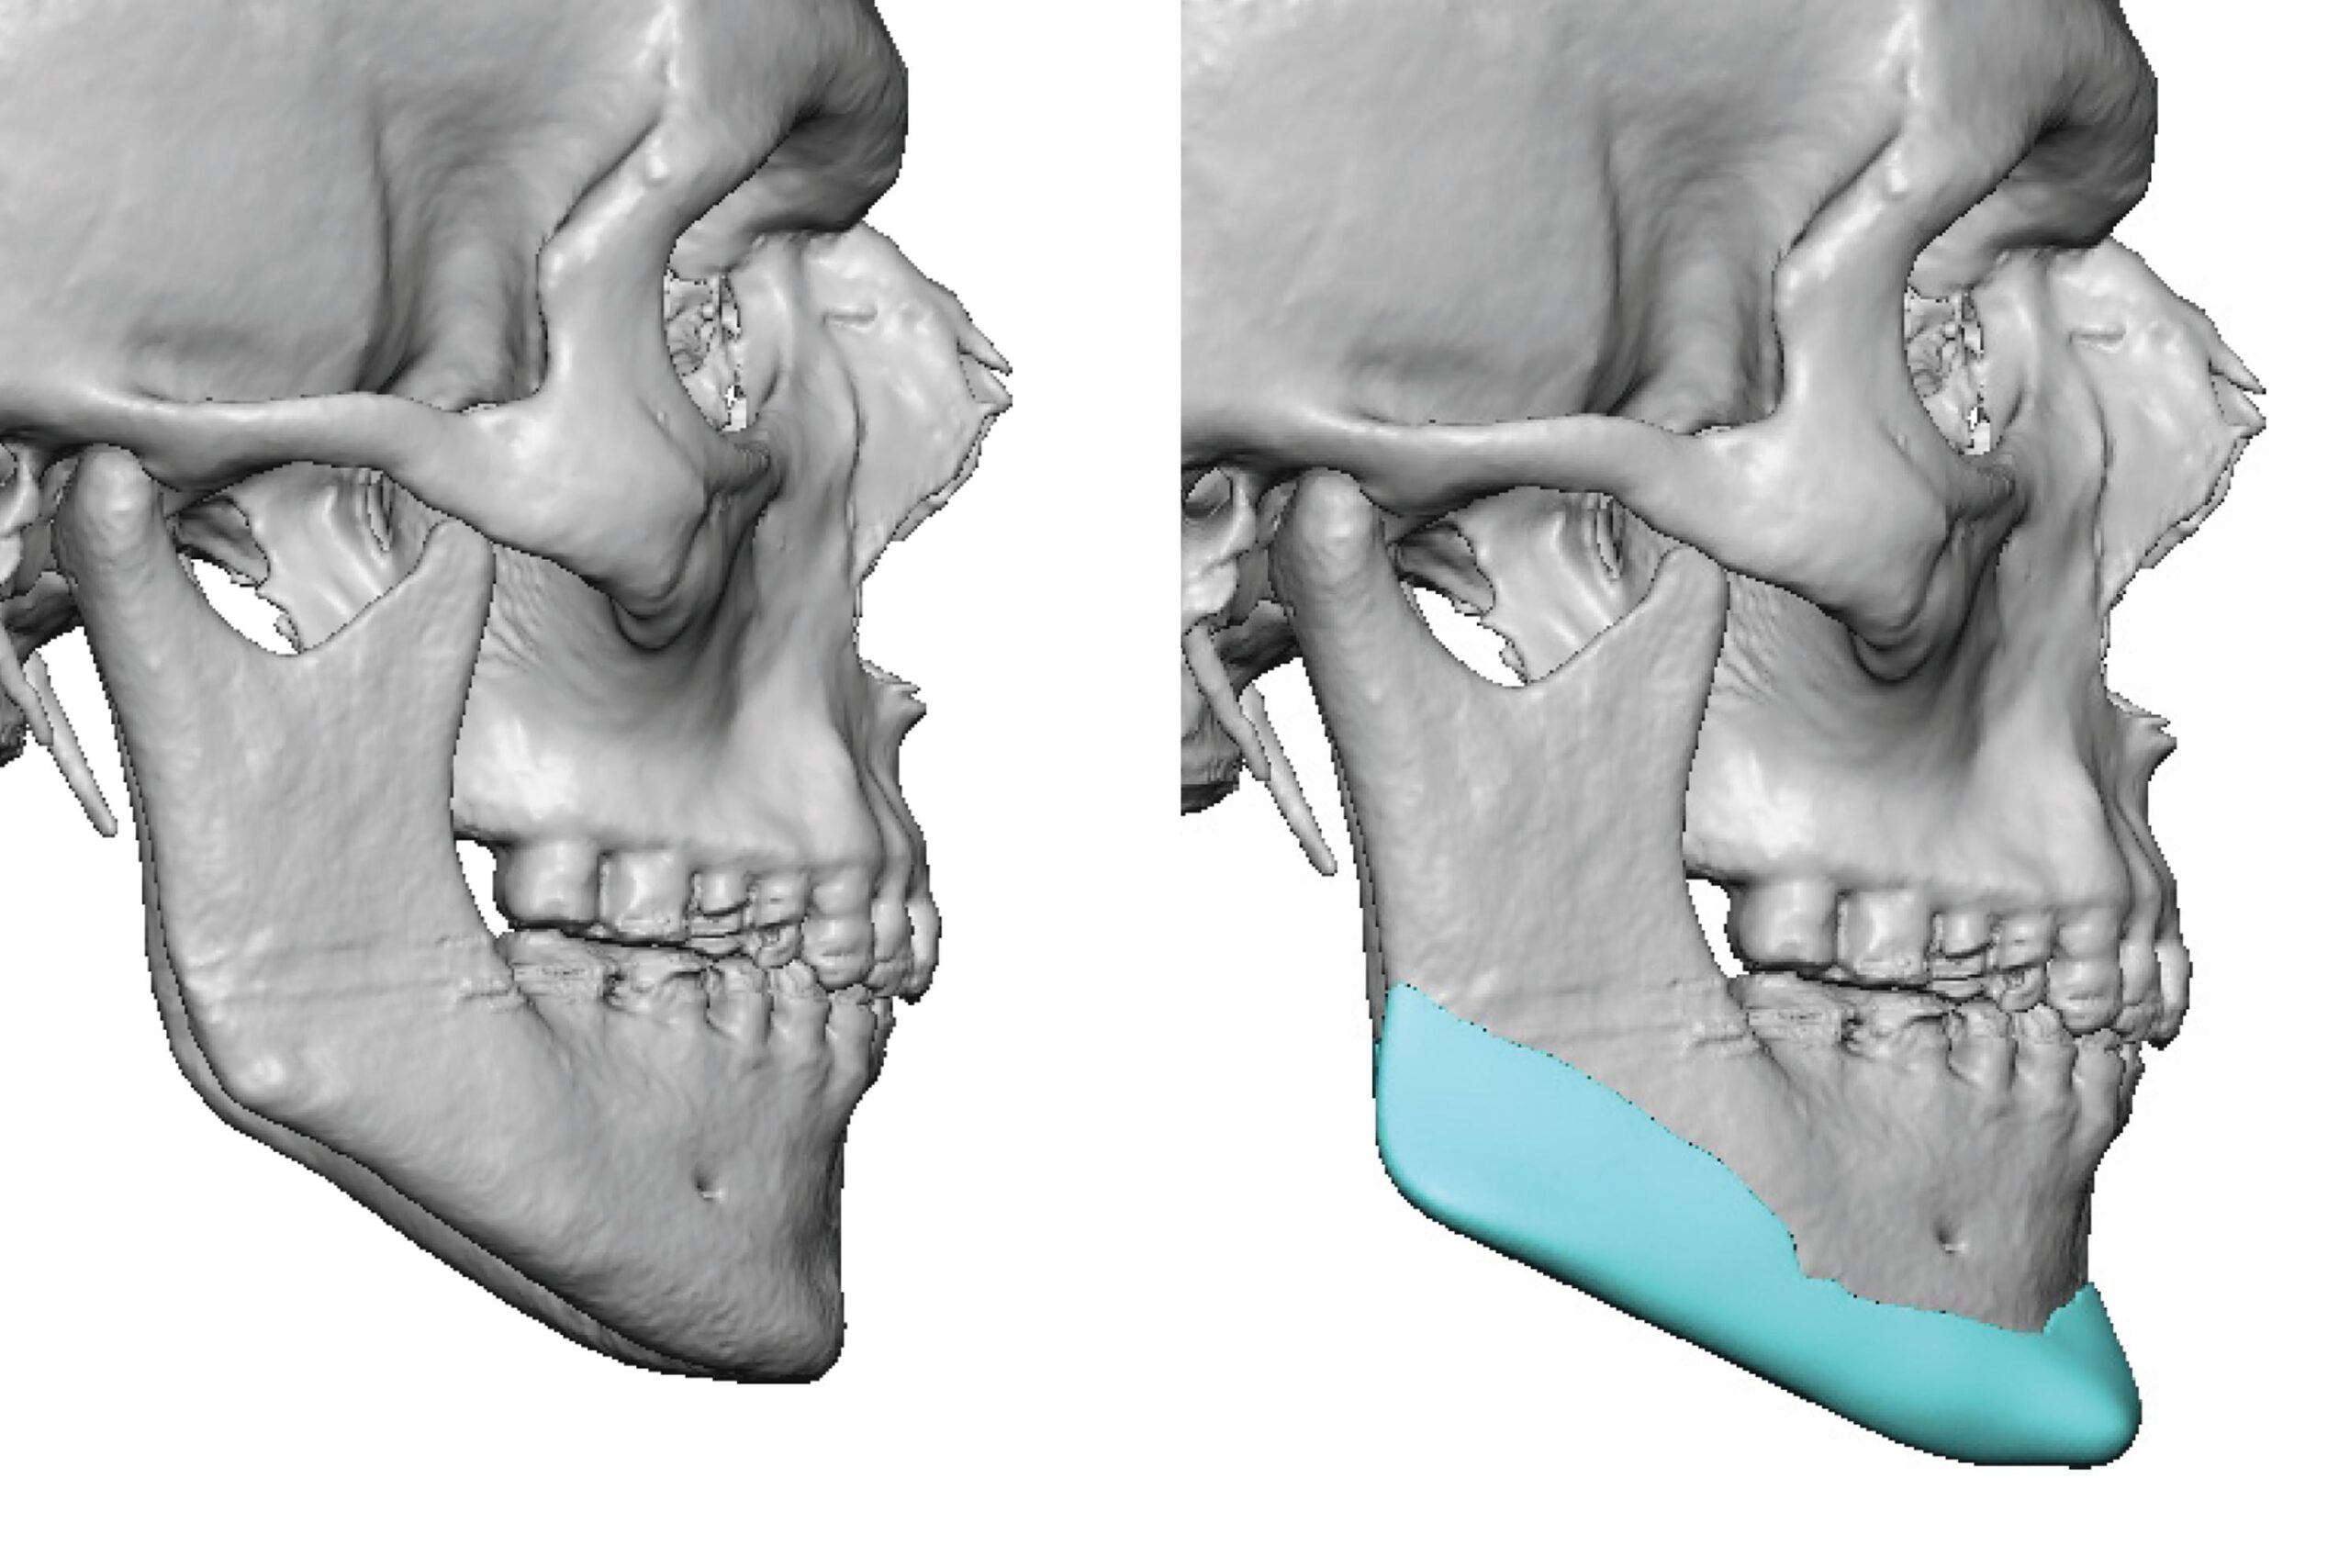
The CT scan tells the surgeon where the patient is starting.
The design process determines where the patient is intended to go.
Clinical Insight
Anatomical Accuracy Is Not the Same as Aesthetic Accuracy
A computer can reproduce the patient’s bone with tremendous precision.
That does not mean it can determine the most attractive implant shape.
The software may measure the face accurately, but the surgeon must still interpret what those measurements mean for the patient’s appearance.
Dr. Eppley’s Bottom Line
The CT scan creates the map. It does not choose the destination.
Why a Custom Implant Needs an Exact Bone Model
The inner surface of a custom facial implant is designed to rest against the patient’s bone.
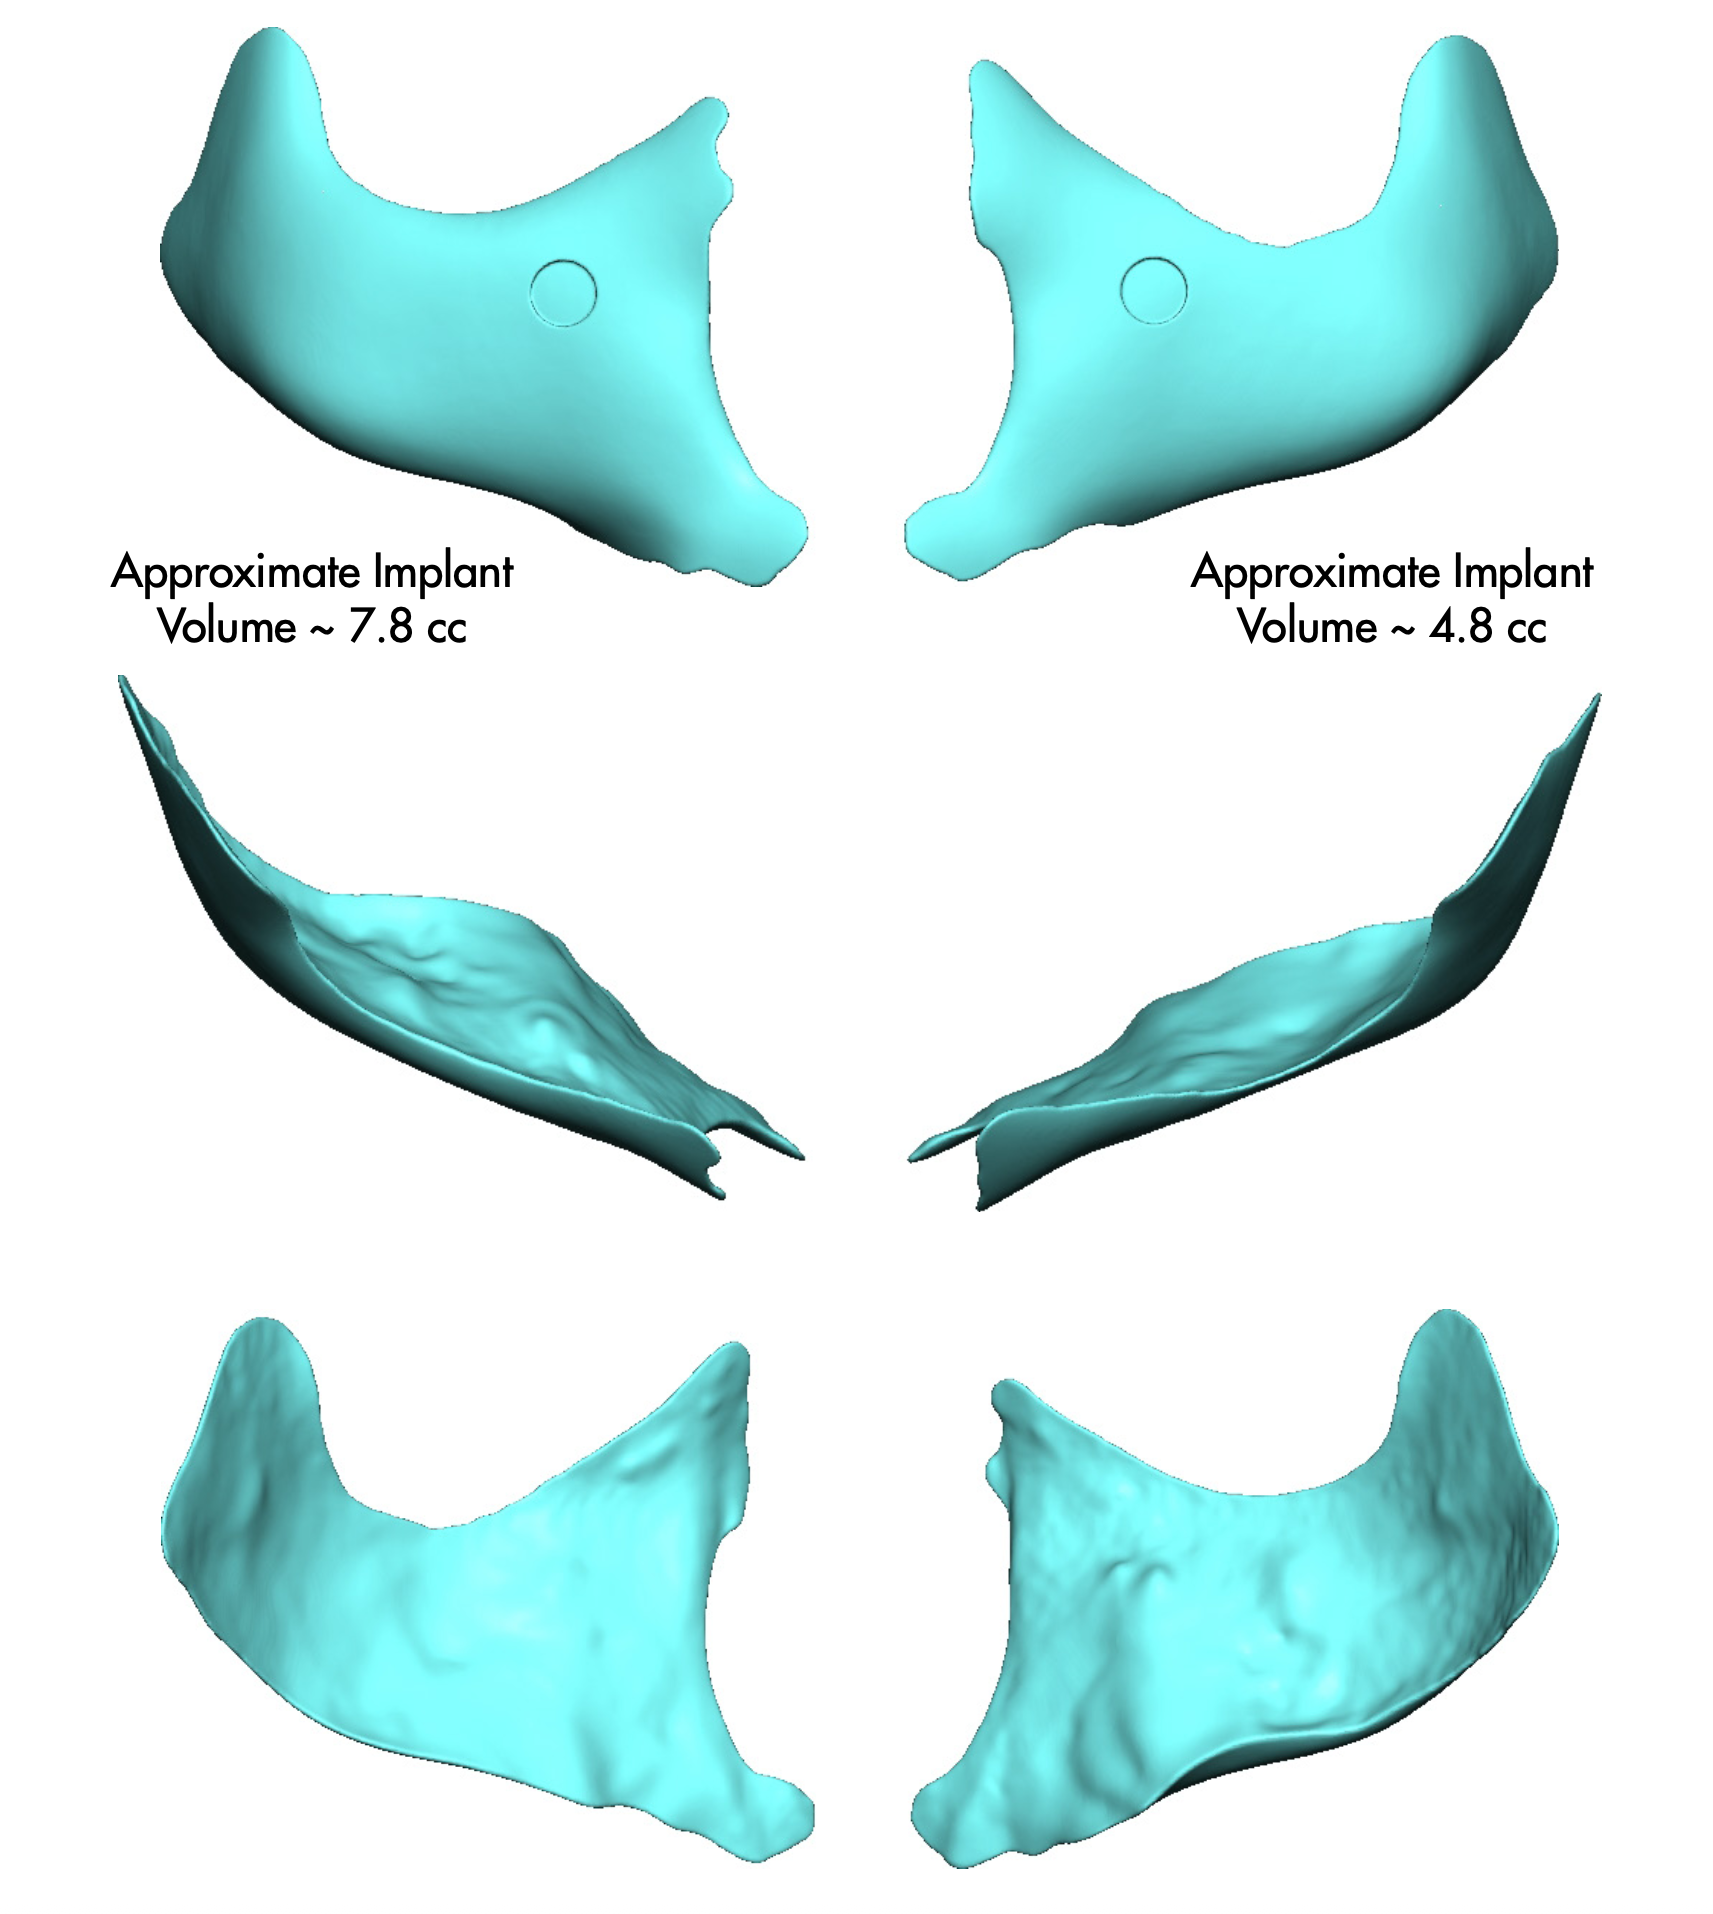
This contact surface should match the planned skeletal region as closely as possible.
An accurate fit offers several advantages:
- It helps guide implant positioning.
- It improves contact between the implant and bone.
- It reduces unwanted rocking or rotation.
- It makes the intended position easier to reproduce during surgery.
- It helps the surgeon recognize when the implant is fully seated.
- It supports accurate screw fixation.
This close fit is one of the major differences between a custom implant and a standard implant.
A standard implant is designed to fit a broad range of patients. The surgeon must adapt the surgical pocket, modify the implant, or accept an imperfect match.
A custom implant begins with the individual anatomy.
Why Facial Asymmetry Makes CT Imaging Especially Important
Nearly every face has some degree of asymmetry.
One side of the jaw may be:
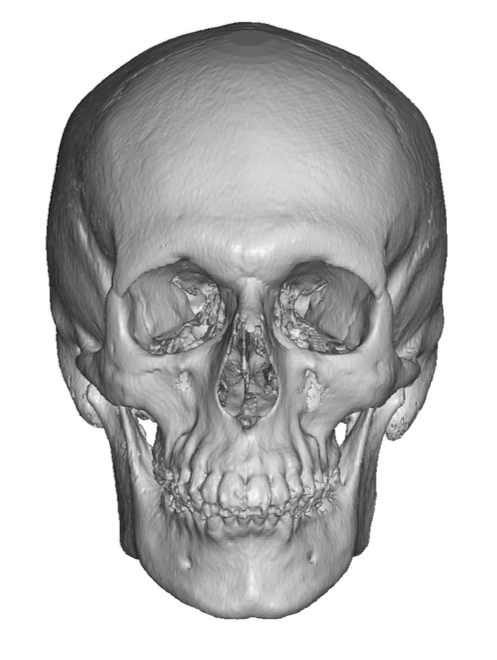
- Wider
- Longer
- More vertically developed
- More angular
- More projected
One cheekbone may be positioned differently from the other.
The orbital rims, forehead, chin, and skull can also differ from side to side.
Some asymmetries are visible in photographs, but the CT scan helps determine whether they arise from:
- Bone shape
- Bone position
- Previous surgery
- Previous implants
- Soft-tissue differences
- A combination of factors
This distinction matters because custom implants can correct skeletal asymmetry, but they cannot completely eliminate asymmetry caused by muscles, fat, skin, or facial nerve function.
Clinical Insight
Mirroring Is Useful, but Not Always the Answer
Design software can mirror one side of the face onto the other.
This may help identify skeletal differences, but it does not automatically create the correct treatment plan.
The “better” side may not be ideal.
The face may require improvement on both sides rather than copying one side exactly.
What Type of CT Scan Is Needed?
The exact imaging protocol may vary depending on the facial region being treated and the implant manufacturer’s requirements.
In general, a custom facial implant scan should provide:
- Thin image slices
- Complete coverage of the treatment area
- Minimal patient movement
- High-quality bone detail
- Proper DICOM data
- Limited metal or dental artifact when possible
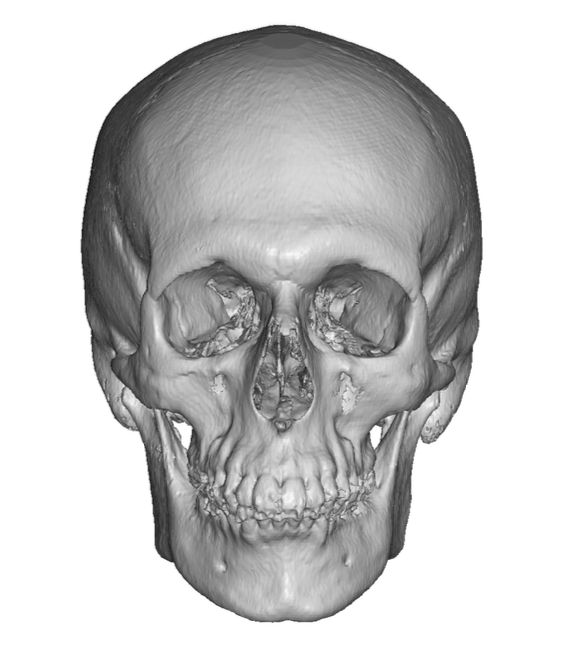
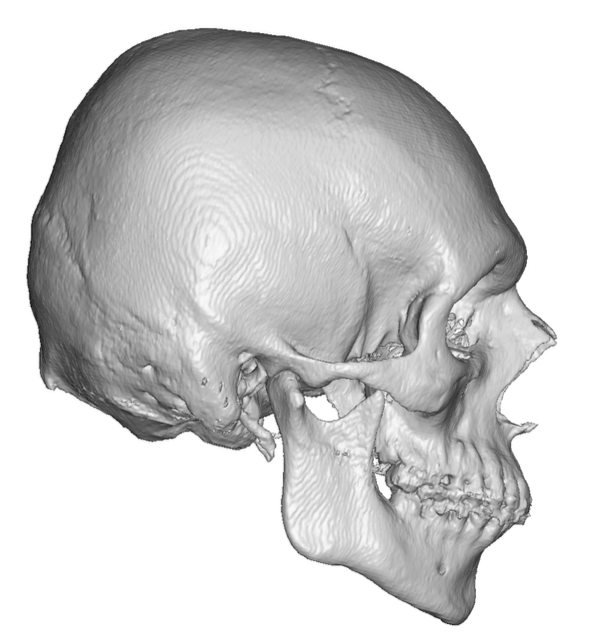
The scan must be suitable for accurate three-dimensional reconstruction.
Thin-Cut CT Imaging
For most custom facial implant designs, thin image slices are preferred.
A commonly requested slice thickness is approximately:
- 1 millimeter or less
Thinner slices provide more detailed skeletal information and smoother 3D reconstruction.
Thicker slices may produce:
- Stair-step artifacts
- Loss of fine anatomical detail
- Less accurate surface contours
- Poorer definition around thin bones
- More difficulty designing subtle implant transitions
This is especially important in areas such as:
- Infraorbital rims
- Forehead
- Brow bones
- Thin mandibular borders
- Zygomatic arches
- Skull contour irregularities
The larger the slice thickness, the more the software must estimate what lies between the images.
Dr. Eppley’s Bottom Line
A custom implant can only be as anatomically accurate as the scan used to create it. Poor imaging cannot be corrected by sophisticated design software.
What Are DICOM Files?
CT scanners generate medical image data in a format known as DICOM.
DICOM stands for:
Digital Imaging and Communications in Medicine
These files contain the actual imaging information used to reconstruct the patient’s anatomy.
They are different from:
- JPEG images
- Screenshots
- Printed films
- PDF reports
- Photographs of a computer screen
A radiology report may describe the scan, but it does not contain the three-dimensional imaging data required for implant design.
The manufacturer or design team usually needs the original DICOM file set.
Why Screenshots Are Not Enough
Patients sometimes receive selected CT images or screenshots from the imaging center and assume these can be used for implant design.
They generally cannot.
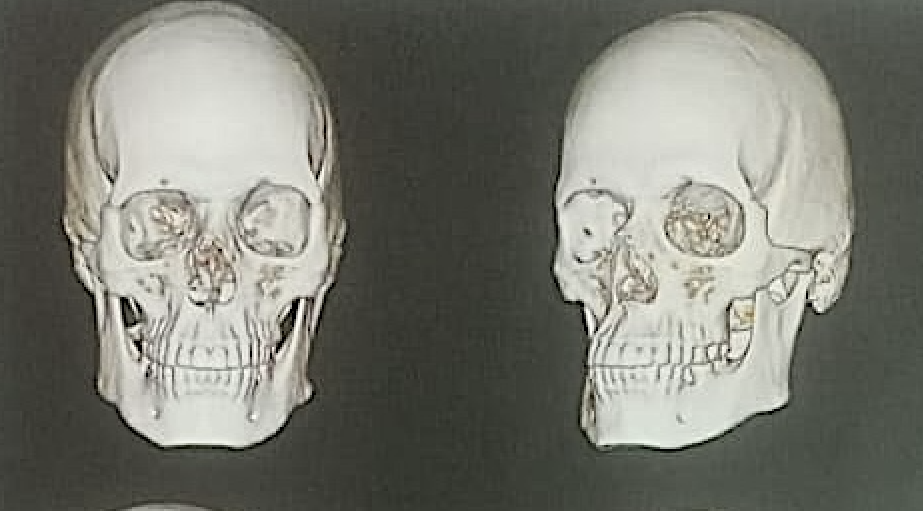
A screenshot is only one flattened image.
It does not contain:
- The full scan volume
- The original image resolution
- Slice spacing
- Orientation data
- The complete anatomical series
- The information required to create a true 3D model
The design team needs the complete DICOM data set rather than selected pictures.
Scan Coverage
The scan must include the entire area involved in the planned implant.
For example:
Chin or Jawline Implant
The scan should include:
- Entire mandible
- Chin
- Jaw angles
- Lower facial skeleton
- Relevant tooth roots and nerve anatomy
Cheek or Infraorbital Implant
The scan should include:
- Orbits
- Cheekbones
- Maxilla
- Nasal region
- Zygomatic arches when relevant
Forehead or Brow Implant
The scan should include:
- Forehead
- Frontal sinus
- Brow ridges
- Upper orbits
- Relevant scalp and skull anatomy
Skull Implant
The scan must include the entire skull region being treated, and often the whole skull.
An incomplete scan may force the patient to repeat the study.
Why the Entire Relevant Anatomy Matters
The implant is rarely designed in isolation from surrounding structures.
A jawline implant must relate to:
- Chin projection
- Mandibular body
- Jaw-angle width
- Lower border contour
- Tooth roots
- Inferior alveolar nerve
A cheek implant must relate to:
- Orbital rim
- Maxilla
- Zygomatic arch
- Infraorbital nerve
- Existing facial width
If the scan excludes these neighboring structures, the design may be incomplete or unsafe.
Patient Position and Movement
The patient must remain still during scanning.
Movement can create:
- Blurred bone margins
- Double contours
- Distorted anatomy
- Inaccurate 3D reconstruction
Most facial CT scans are completed quickly, so significant motion is uncommon.
However, even small errors can become important when the implant design depends on millimeter-level accuracy.
The head should also be positioned as neutrally as possible.
Although digital models can be reoriented later, severe head tilt or rotation may make analysis more difficult.
Dental and Metal Artifacts
Dental fillings, crowns, orthodontic appliances, and surgical hardware can create streaking artifacts on CT images.
These artifacts may obscure nearby anatomy, particularly around:
- Chin
- Mandibular body
- Maxilla
- Tooth roots
- Inferior alveolar nerve
- `Previous fixation plates
Mild artifact is common and can often be managed.
Severe artifact may interfere with segmentation and design accuracy.
Patients with braces or extensive dental hardware should notify the surgical team before obtaining the scan.
Clinical Insight
A Technically Completed Scan Is Not Always a Usable Scan
An imaging center may consider the CT scan successful because it is adequate for routine diagnosis.
Custom implant planning may demand a higher level of surface accuracy.
The scan must not only show the bone; it must show it clearly enough to reproduce its shape.
Can a Cone-Beam CT Scan Be Used?
Cone-beam CT, often called CBCT, is commonly used in dentistry and oral surgery.
It can provide excellent detail of the teeth, jaws, and parts of the facial skeleton while often using less radiation than a conventional medical CT scan.
CBCT may be suitable for certain custom implant designs, particularly:
- Chin implants
- Jawline implants
- Jaw-angle implants
- Some cheek or midface implants
- Selected forehead applications
However, its usefulness depends on:
- Field of view
- Image quality
- Slice thickness
- Degree of artifact
- Whether the full anatomical region is captured
- Manufacturer compatibility
A limited-field dental scan may not include enough of the face or skull.
For larger implants, multi-region designs, or skull implants, a conventional medical CT scan may be more reliable.
The imaging protocol should therefore be confirmed before the scan is obtained.
Medical CT Versus Cone-Beam CT
| Feature | Medical CT | Cone-Beam CT |
| Bone detail | Excellent | Often excellent |
| Soft-tissue detail | Better | Limited |
| Field of view | Usually large | Variable |
| Dental artifact | Can occur | Can also occur |
| Availability | Hospitals and radiology centers | Dental and oral surgery centers |
| Suitability for large skull implants | Usually better | Often limited |
| Radiation exposure | Generally higher | Often lower, depending on protocol |
The best scan is not determined by the name of the technology alone.
It is determined by whether the imaging data meet the needs of the specific design.
Is Contrast Dye Needed?
Contrast dye is usually not required for routine custom facial implant planning.
The primary goal is to visualize bone, and non-contrast CT generally provides the necessary detail.
Contrast may be needed when evaluating a separate medical concern, but it is not typically necessary simply to design a facial implant.
Should the Scan Be Obtained Before or After Consultation?
This depends on the surgeon’s process and the patient’s situation.
Obtaining the scan before consultation may be helpful when:
- The patient has previous facial surgery
- Significant asymmetry is present
- Previous implants or hardware need evaluation
- The consultation will involve detailed design planning
- The patient is traveling from a long distance
In other cases, the surgeon may prefer to evaluate photographs and goals first, then provide a specific scan protocol.
The safest approach is to confirm the required scan before scheduling it.
This helps avoid:
- Incorrect slice thickness
- Incomplete coverage
- Missing DICOM files
- An unusable cone-beam study
- The need to repeat imaging
Dr. Eppley’s Bottom Line
The best time to verify the scan protocol is before the scan is performed, not after the design team discovers that the anatomy is incomplete.
What Can Make a CT Scan Unusable?
A scan may need to be repeated when it has:
- Slices that are too thick
- Incomplete anatomical coverage
- Excessive motion
- Severe metal artifact
- Missing DICOM data
- Only screenshots or printed films
- Excessive gaps between image slices
- A field of view that excludes part of the planned implant area
- Reconstruction settings that obscure fine bone detail
Repeating the scan is inconvenient, but attempting to design from inadequate data creates greater risk.
Radiation Considerations
Patients sometimes worry about radiation exposure from CT imaging.
A CT scan does involve ionizing radiation, but the amount varies according to:
- Scan type
- Anatomical area
- Field of view
- Imaging protocol
- Medical CT versus CBCT
- Equipment used
The scan should be obtained only when it is clinically justified and should use a protocol appropriate for the required anatomy.
For most patients pursuing a permanent custom implant, the value of accurate skeletal imaging outweighs the limited radiation exposure from a properly performed scan.
Patients who are pregnant or may be pregnant should inform both the surgeon and imaging center before undergoing CT imaging.
Key Takeaways
- A true custom facial implant begins with the patient’s own CT scan.
- Photographs show external appearance, while CT imaging shows the underlying skeletal anatomy.
- The scan provides the anatomical model but does not automatically determine the ideal implant shape.
- Thin image slices are important for accurate 3D reconstruction.
- The complete DICOM file set is required; screenshots and radiology reports are not sufficient.
- The scan must include the entire planned treatment area and neighboring anatomy.
- Cone-beam CT may be suitable for some designs, but not every CBCT scan has an adequate field of view.
- Movement, metal artifact, incomplete coverage, and poor image quality can delay the design process.
- Confirming the imaging protocol in advance can prevent the need for a repeat scan.
Dr. Eppley’s Bottom Line
The CT scan is the foundation of the custom implant process. It must accurately capture the anatomy, but the scan itself is only the beginning. The real design work starts after the three-dimensional skull has been created.
Part 2: How DICOM Files Become a 3D Skull and How Facial Asymmetry Is Measured
From Thousands of Images to One Digital Skull
When your CT scan is completed, it does not produce a single three-dimensional image.
Instead, it generates hundreds or even thousands of individual cross-sectional images, each representing a very thin slice through your face.
Think of it like slicing a loaf of bread.
Each slice reveals only a small portion of the whole loaf.
Viewed individually, these images have limited value for implant design.
When stacked together in the correct order, however, they recreate the entire facial skeleton with remarkable precision.
This collection of images is stored as DICOM data and serves as the raw material from which the virtual skull is built.
Dr. Eppley’s Bottom Line
A CT scan is not one image—it is a complete digital map of your facial skeleton. The three-dimensional skull is created only after hundreds of individual images are assembled by specialized software.
What Happens to the DICOM Files?
Once the DICOM files are received, they are imported into medical imaging software specifically designed for three-dimensional reconstruction.
The software reads every CT slice and identifies differences in tissue density.
Because bone is much denser than muscle, fat, skin, and air, the software can distinguish the facial skeleton from surrounding tissues.
The first step is called segmentation.
What Is Segmentation?
Segmentation is the process of separating one anatomical structure from another.
For custom facial implant planning, the software identifies:
- Skull
- Facial bones
- Mandible
- Maxilla
- Orbits
- Zygomatic arches
- Nasal bones
- Frontal bone
while excluding:
- Skin
- Fat
- Muscles
- Eyes
- Brain
- Air spaces
The result is a clean digital model of the patient’s skeleton.
Although much of this process is automated, it is rarely completely automatic.
Areas affected by:
- Dental fillings
- Orthodontic braces
- Previous surgical hardware
- Motion artifact
- Thin bone
may require manual refinement.
“Specialized software separates bone from surrounding tissues to create an accurate three-dimensional model of the facial skeleton.”
Why Segmentation Matters
If the segmentation is inaccurate, the implant will also be inaccurate.
For example:
If a thin area of bone is mistakenly removed during segmentation, the implant may fit incorrectly.
If metal artifact is interpreted as bone, the implant may develop an inaccurate internal surface.
If the border of the orbit is incompletely segmented, an infraorbital implant may not seat properly.
For this reason, high-quality segmentation is every bit as important as obtaining a high-quality CT scan.
Clinical Insight
Computers Work Quickly—But Not Perfectly
Modern software can process CT data in minutes.
That speed should not be confused with perfection.
Experienced designers routinely inspect and refine segmented models before implant design begins.
The computer performs the repetitive work.
The human verifies the anatomy.
Building the Three-Dimensional Skull
Once segmentation is complete, the software reconstructs the facial skeleton into a fully interactive three-dimensional model.
Unlike a photograph, the digital skull can be:
- Rotated in every direction
- Enlarged without losing detail
- Viewed from inside or outside
- Made transparent
- Cross-sectioned
- Measured in three dimensions
This allows the surgeon to study areas that are impossible to appreciate using conventional photographs.
For example:
A jawline that appears symmetrical from the front may reveal significant differences when viewed from below.
Likewise, a forehead that appears smooth externally may contain subtle skeletal irregularities that become obvious on the digital model.
“The reconstructed skull can be viewed from any angle, allowing detailed evaluation of skeletal anatomy and asymmetry.”
More Than a Pretty Picture
Patients are often fascinated when they first see their digital skull.
It resembles a highly detailed three-dimensional model that can be rotated freely on the computer screen.
However, the digital skull is much more than a visualization.
It is an engineering model.
Every point on its surface can be measured.
Every curve can be analyzed.
Every contour can become the foundation for implant design.
Unlike a plastic anatomical model, this digital version contains precise numerical information.
The software knows exactly where every surface lies in three-dimensional space.
Dr. Eppley’s Bottom Line
The virtual skull is not simply a picture of the patient’s anatomy—it is an exact digital model that can be measured, analyzed, and used to manufacture a patient-specific implant.
Understanding Facial Asymmetry
One of the greatest advantages of three-dimensional imaging is the ability to evaluate asymmetry objectively.
Nearly every patient has some degree of facial asymmetry.
This is normal.
Perfect skeletal symmetry does not exist.
The important question is not whether asymmetry is present.
The important question is:
Which asymmetries actually matter?
Types of Skeletal Asymmetry
The digital skull commonly reveals differences in:
Width
One side of the jaw may be wider.
One cheekbone may project farther laterally.
One temporal region may be flatter.
Projection
One side may sit farther forward.
The opposite side may appear recessed.
Vertical Height
The jaw angle may sit lower on one side.
The orbital rims may differ slightly in height.
The forehead may slope differently.
Shape
Sometimes both sides occupy similar positions but have different contours.
Examples include:
- Rounded versus angular jaw angles
- Flat versus convex cheekbones
- Different forehead curvature
- Irregular skull contours
Position
Occasionally the bones themselves are positioned differently.
This is commonly seen after:
- Trauma
- Previous surgery
- Congenital conditions
- Orthognathic surgery
- Craniofacial disorders
These patients require a different planning strategy than patients with simple contour deficiencies.
“Facial asymmetry may involve differences in width, projection, height, shape, or overall skeletal position.”
Measuring Asymmetry
The digital model allows precise numerical measurements.
Examples include:
- Chin deviation
- Jaw width
- Jaw angle flare
- Cheek projection
- Forehead prominence
- Orbital position
- Facial height
- Midline deviation
Measurements can often be made with submillimeter precision.
These objective numbers help quantify differences that may only be suspected during a physical examination.
Mirror Analysis
One of the most powerful tools available is mirror imaging.
The software can create a mirrored version of one side of the skull.
That mirrored surface can then be compared with the opposite side.
This produces a color map showing where the skeleton differs.
Areas of greater difference appear as warmer colors.
Areas with minimal difference appear as cooler colors.
Mirror analysis provides an objective method for identifying skeletal asymmetry.
“Mirror analysis compares one side of the skeleton with the other, allowing precise visualization of asymmetry.”
Clinical Insight
Mirror Imaging Is a Measurement Tool, Not a Treatment Plan
Patients sometimes assume the surgeon simply copies the better side of the face.
That is rarely appropriate.
The “better” side may itself be underdeveloped.
Or both sides may require improvement.
Mirror analysis helps identify asymmetry.
It does not determine the ideal correction.
Color Mapping
Advanced planning software can generate surface deviation maps.
These maps calculate thousands of measurements across the facial skeleton simultaneously.
Instead of showing individual distances, they display the amount of asymmetry using colors.
For example:
- Green = nearly symmetrical
- Yellow = mild difference
- Orange = moderate difference
- Red = greater difference
These maps are especially useful for:
- Skull implants
- Forehead implants
- Complex jawline implants
- Revision surgery
- Congenital asymmetry
- Post-traumatic reconstruction
They allow the surgeon to visualize asymmetry over the entire skeletal surface rather than relying on isolated measurements.
Why Numbers Alone Are Not Enough
The software may reveal that one jaw angle is:
4.2 mm wider.
Should it be reduced by exactly 4.2 mm?
Not necessarily.
Perhaps the opposite jaw angle is also too narrow.
Perhaps the soft tissues are thicker on one side.
Perhaps correcting only part of the difference will create a more natural appearance.
The measurements describe anatomy.
They do not define beauty.
Dr. Eppley’s Bottom Line
Computers measure asymmetry extremely well. They do not determine how much asymmetry should be corrected. That decision remains a matter of surgical judgment and facial aesthetics.
Skeletal Asymmetry Versus Facial Asymmetry
One of the most important concepts patients must understand is that bone is only one component of facial appearance.
The face is also shaped by:
- Skin
- Fat
- Muscles
- Fascia
- Facial expression
- Previous scars
A perfectly symmetrical skeleton can still produce a mildly asymmetrical face.
Likewise, significant skeletal asymmetry may be almost invisible beneath thicker soft tissues.
Custom implants primarily improve the skeleton.
The visible facial result depends upon how the soft tissues adapt to that new framework.
Clinical Insight
Patients See the Face—The Surgeon Sees the Skeleton
Patients naturally focus on the external appearance.
The surgeon must understand the underlying anatomy producing that appearance.
Successful treatment comes from connecting these two perspectives rather than treating them as separate problems.
The Goal Is Balance, Not Mathematical Perfection
Modern software can measure asymmetry with extraordinary precision.
That precision is valuable.
But facial attractiveness is not determined by numerical equality.
Some of the world’s most attractive faces possess measurable asymmetry.
The objective is therefore not:
Perfect symmetry.
The objective is:
Improved facial harmony.
Many custom implant designs intentionally leave small differences untouched because eliminating them would provide little visible benefit while increasing surgical complexity.
Dr. Eppley’s Bottom Line
Patients do not live as digital skulls. They live as people with skin, muscles, expressions, and personality. The goal is not a perfectly symmetrical CT scan—it is a naturally balanced face.
Preparing for Implant Design
Once the three-dimensional skull has been completed and skeletal asymmetry has been analyzed, the surgeon has all of the anatomical information needed to begin designing the implant.
The next phase is no longer about measuring the patient’s anatomy.
It is about deciding how that anatomy should be changed.
This transition—from analysis to design—is where engineering becomes aesthetic surgery.
Key Takeaways
- DICOM files contain hundreds or thousands of CT images that are reconstructed into a precise three-dimensional skull.
- Segmentation separates bone from soft tissues and creates the digital skeletal model used for implant design.
- The virtual skull is an engineering model that allows precise measurement, rotation, and analysis.
- Mirror imaging and color mapping help quantify skeletal asymmetry but do not determine the ideal treatment.
- Skeletal asymmetry and visible facial asymmetry are not always the same because soft tissues influence appearance.
- The purpose of digital analysis is to improve facial harmony, not to achieve perfect mathematical symmetry.
- Once the anatomy has been analyzed, the design process can begin.
How Are Custom Facial Implants Made from a 3D CT Scan?
Part 3: How the Surgeon Determines the Desired Change and How CAD Software Creates the Implant
From Anatomical Analysis to Aesthetic Design
Once the CT scan has been converted into a three-dimensional skull, the anatomy is no longer a mystery.
The surgeon can see:
- Where the skeleton is deficient
- How the two sides differ
- Which contours are underdeveloped
- Where previous surgery has altered the bone
- Which areas can safely support an implant
The next question is more difficult:
What should the new skeletal contour look like?
This is the point where custom implant planning moves beyond anatomy.
The CT scan shows the patient’s existing structure.
The surgeon must determine the amount, direction, and character of the desired change.
Dr. Eppley’s Bottom Line
The CT scan defines the starting point. Implant design defines the intended destination. The difference between the two is where surgical judgment becomes most important.
The Patient Defines the Goal
The design process begins with the patient’s concerns.
Patients may describe their goals in terms such as:
- “My chin looks too short.”
- “My jawline is not visible.”
- “My cheeks are flat.”
- “My eyes look prominent.”
- “My forehead slopes backward.”
- “One side of my face is smaller.”
- “I want a stronger but natural appearance.”
- “I want a more masculine or feminine facial shape.”
These descriptions are valuable because they identify what the patient notices and what matters most to them.
However, they are not yet implant specifications.
The surgeon must translate those concerns into measurable skeletal changes.
Translating Appearance into Anatomy
A patient who asks for a stronger jawline may need one or more of the following:
- Greater chin projection
- Increased mandibular body width
- Lower-border augmentation
- More jaw-angle flare
- Additional vertical jaw-angle length
- Improved continuity between the chin and jaw angles
A patient who describes “flat cheeks” may actually have a deficiency involving:
- The central cheekbone
- The lateral cheekbone
- The zygomatic arch
- The infraorbital rim
- The anterior maxilla
- Several of these regions together
The patient describes the visible problem.
The surgeon identifies the anatomical cause.
Clinical Insight
The Area a Patient Names Is Not Always the Area That Needs Treatment
Patients naturally identify the feature they see externally.
The underlying skeletal deficiency may begin in a neighboring region.
For example, under-eye hollowing may be related more to infraorbital rim and upper maxillary deficiency than to the cheek itself.
Correct diagnosis is therefore the first step in good implant design.
Photographs and CT Scans Serve Different Purposes
The CT scan shows the bone.
Photographs show how that bone is expressed through the soft tissues.
Both are necessary.
The surgeon typically compares the digital skull with standardized photographs taken from:
- Frontal view
- Right and left profile
- Right and left oblique views
- Basal or upward-facing view when relevant
- Three-quarter views
- Smiling and relaxed positions when appropriate
The photographs help answer questions the CT scan cannot.
For example:
- How thick are the soft tissues?
- How visible is the skeletal deficiency?
- Does the face already appear wide?
- Will additional projection overpower another feature?
- Is the asymmetry noticeable in normal social views?
- Does facial expression exaggerate or conceal the problem?
Dr. Eppley’s Bottom Line
The CT scan tells us what the bone looks like. Photographs tell us how that bone affects the face. A successful design must make sense in both worlds.
The Four Dimensions of Implant Design
Patients often think of implant size as a single number.
In reality, custom facial implants are three-dimensional structures with several independently controlled design variables.
The four most important are:
- Projection
- Width
- Vertical height
- Surface contour
Each influences the face differently.
Projection
Projection refers to how far the implant moves a facial contour outward or forward.
Examples include:
- Forward chin projection
- Anterior cheek projection
- Infraorbital rim advancement
- Forehead prominence
- Posterior skull augmentation
Projection is often the easiest change to understand in profile views.
However, increasing projection may also affect:
- Facial length
- Lip balance
- Nasal appearance
- Jawline continuity
- Lower-eyelid support
Projection cannot be planned in isolation.
Width
Width refers to how far the implant extends laterally.
This is especially important for:
- Jaw angles
- Mandibular body
- Cheekbones
- Zygomatic arches
- Temples
- Skull widening implants
Additional width can make the face appear:
- Stronger
- More angular
- More masculine
- More structurally balanced
Too much width can make the face appear heavy or disproportionate.
The correct amount depends on the relationship between the upper, middle, and lower thirds of the face.
Vertical Height
Vertical height affects how long or low a facial region appears.
Examples include:
- Lengthening the chin
- Lowering the jaw angle
- Increasing forehead height
- Extending a skull implant inferiorly
- Supporting the lower orbital rim
Vertical changes can significantly influence facial proportions even when projection remains unchanged.
A jaw angle can become more visible by being lowered without becoming much wider.
A chin can become more proportionate by gaining vertical length rather than forward projection.
Surface Contour
Surface contour determines the shape and character of the augmentation.
Two implants may have the same maximum thickness but produce very different results.
One may be:
- Smooth and rounded
The other may be:
- Angular and sharply defined
Contour decisions influence whether the result appears:
- Masculine or feminine
- Strong or subtle
- Youthful or mature
- Natural or exaggerated
This is where digital sculpting becomes especially important.
“Custom implant size is not one measurement. Projection, width, height, and contour can be controlled independently.”
Design Is Based on Relationships
A facial feature is never judged alone.
The chin relates to:
- Lips
- Nose
- Jawline
- Neck
- Lower facial height
The jaw angles relate to:
- Cheekbone width
- Chin width
- Neck width
- Facial taper
The cheeks relate to:
- Infraorbital rims
- Eyes
- Nose
- Temples
- Lower face
The forehead relates to:
- Brow bones
- Nose
- Hairline
- Upper orbital rims
An implant that improves one isolated feature but disrupts these relationships may not improve the overall face.
Clinical Insight
Facial Harmony Is a Ratio Problem, Not a Size Problem
Patients often ask how many millimeters of augmentation they need.
The more important question is how that change relates to the rest of the face.
A five-millimeter augmentation may be excessive in one patient and insufficient in another.
Masculine and Feminine Design Goals
Custom implants can enhance or soften gender-associated skeletal characteristics.
Masculine facial design often emphasizes:
- Greater jaw width
- More visible jaw angles
- A broader or more projected chin
- Stronger brow contours
- Flatter or more angular cheek contours
Feminine facial design often favors:
- Smoother transitions
- A narrower lower face
- More tapered chin contours
- Softer brow shapes
- Controlled cheek projection
- Less jaw-angle flare
These are general patterns, not rigid rules.
Patients may prefer characteristics that do not conform to traditional gender categories.
The design should reflect the individual’s goals rather than a fixed template.
Ethnicity and Facial Identity
Ethnicity may influence:
- Baseline skeletal proportions
- Soft-tissue thickness
- Cheek projection
- Midface position
- Jaw width
- Forehead shape
- Nasal and paranasal relationships
The purpose of custom implant surgery should not be to erase ethnic identity unless that is specifically the patient’s goal.
More commonly, the objective is to strengthen deficient areas while preserving the proportions that make the face recognizable and authentic.
Dr. Eppley’s Bottom Line
Custom design should individualize the face, not force it into a universal template. The best result respects the patient’s existing identity while improving the areas that concern them.
How Soft-Tissue Thickness Influences Design
The CT scan primarily shows bone.
The final result is viewed through skin, fat, and muscle.
A thin patient may show small implant changes very clearly.
A patient with thicker tissues may require more skeletal augmentation to produce the same visible effect.
Soft-tissue thickness varies by region.
It is generally thinner over:
- Infraorbital rims
- Forehead
- Brow bones
- Chin border
- Zygomatic arch
It is often thicker over:
- Central cheeks
- Jaw angles
- Mandibular body
- Posterior skull
This affects both implant thickness and edge design.
How CAD Software Creates the Implant
Once the surgeon has defined the intended change, a biomedical engineer or digital designer begins creating the implant using computer-aided design software.
The implant is constructed directly on the patient’s three-dimensional skull.
The design typically has two main surfaces:
- An inner surface that fits the bone
- An outer surface that creates the new contour
These two surfaces serve completely different purposes.
The Inner Surface: Fitting the Bone
The inner surface is generated from the patient’s actual skeletal anatomy.
Its purpose is to:
- Match the bone
- Guide positioning
- Minimize rocking
- Improve stability
- Help the surgeon recognize proper seating
The designer may offset the surface slightly to account for:
- Periosteum
- Small anatomical irregularities
- Surgical tolerance
- Manufacturing limitations
The inner surface is not simply a copy of the skull.
It is a controlled fit designed for surgical use.
The Outer Surface: Creating the Result
The outer surface determines the visible facial change.
It is digitally sculpted to control:
- Maximum thickness
- Direction of projection
- Width
- Height
- Angularity
- Curvature
- Transition into surrounding bone
The designer can add or subtract fractions of a millimeter in specific areas.
This allows the implant to be refined far more precisely than a standard implant modified during surgery.
“The inner surface fits the patient’s bone. The outer surface creates the intended facial contour.”
Creating the Implant Boundary
The surgeon must determine where the implant should begin and end.
This boundary affects:
- Visible contour
- Edge blending
- Surgical access
- Stability
- Risk to nearby nerves and teeth
- The ability to insert the implant
A chin implant may extend onto the mandibular body.
A jawline implant may span from one jaw angle to the other.
An infraorbital-malar implant may cross from the lower orbital rim onto the cheekbone.
A forehead implant may extend into the temples or brow region.
The implant should cover enough anatomy to create a smooth transition without becoming unnecessarily large.
Edge Feathering
Once the boundary is defined, the edges are gradually thinned.
This process is called feathering.
A well-feathered edge:
- Becomes progressively thinner
- Blends into adjacent bone
- Reduces visible step-offs
- Decreases palpability
- Produces a more natural transition
The thickness may taper to less than one millimeter in selected areas.
However, an edge that is too thin may be difficult to manufacture or handle surgically.
The final design must balance aesthetic refinement with practical durability.
Clinical Insight
The Center Creates the Change; the Borders Conceal It
The thickest portion of the implant produces the visible augmentation.
The thinnest portions determine whether that augmentation appears to belong naturally to the skeleton.
Controlling Where Maximum Projection Occurs
Maximum implant thickness is not always placed at the center.
Its location depends on the desired effect.
For example:
Chin Implant
Maximum projection may be placed:
- Centrally
- Inferiorly
- Laterally
- Along the prejowl region
Cheek Implant
Maximum projection may be placed:
- Anteriorly
- Superolaterally
- Along the zygomatic arch
- Near the infraorbital rim
Jawline Implant
Maximum width may be placed:
- At the jaw angle
- Along the mandibular body
- Near the chin
- Across several zones
Moving the point of maximum projection by only a few millimeters can alter the character of the result.
Correcting Asymmetry
If the patient has skeletal asymmetry, the right and left sides of the implant may be completely different.
One side may require:
- Greater thickness
- More width
- Additional vertical length
- A different edge shape
- A different fixation position
The implant does not have to be symmetrical in order to create a more symmetrical appearance.
This is one of the major advantages of custom design.
Dr. Eppley’s Bottom Line
A symmetrical implant placed on an asymmetrical skeleton usually preserves asymmetry. Custom correction often requires deliberately different designs on the two sides.
Why Complete Correction May Not Be Appropriate
The digital model may show a measurable difference of several millimeters.
Correcting the entire difference is not always necessary.
Reasons for partial correction include:
- Soft-tissue asymmetry
- Muscle-size differences
- Surgical access limitations
- Risk to nerves
- The desire to preserve natural variation
- Concern that complete correction may look excessive
The surgeon may intentionally correct only the portion of asymmetry that is likely to be visible.
Designing Around Nerves and Tooth Roots
The implant must fit the skeleton without interfering with important anatomy.
Relevant structures may include:
- Mental nerve
- Infraorbital nerve
- Inferior alveolar nerve
- Tooth roots
- Frontal sinus
- Orbital contents
- Temporal muscle
- Previous plates and screws
The implant boundary and screw locations must be planned around these structures.
This is one reason the implant cannot be designed solely for appearance.
It must also be surgically safe.
Designing for Surgical Access
An implant can look ideal on the computer but be difficult or impossible to insert through the planned incision.
The surgeon must consider:
- Implant size
- Material flexibility
- Incision length
- Pocket direction
- Nearby nerves
- Ability to visualize the implant
- Whether the implant can be folded or compressed
- Whether the design should be divided into sections
Large silicone implants may be flexible enough to pass through relatively small incisions.
Rigid PEEK or titanium implants may require larger access or a multi-piece design.
Clinical Insight
A Design Is Not Successful Unless It Can Be Placed Accurately
Digital planning must anticipate the real operation.
An implant that cannot be inserted, oriented, seated, or fixated reliably is not a good design, regardless of how attractive it appears on the screen.
One-Piece Versus Multi-Piece Designs
Some implants are manufactured as one continuous structure.
Others are divided into two or more pieces.
A one-piece implant may offer:
- Better continuity
- Fewer junctions
- More consistent contour
A multi-piece implant may offer:
- Easier insertion
- Smaller incisions
- Better access around nerves
- Simpler positioning in complex anatomy
Examples include:
- Two-piece jawline implants
- Separate right and left cheek implants
- Modular forehead and temporal components
- Multi-part skull implants
The choice depends on anatomy, material, and surgical approach.
Planning Screw Fixation
Screw fixation should be considered during the design phase rather than after the implant is manufactured.
The surgeon evaluates:
- Where the bone is thick enough
- Where screws can be inserted safely
- Whether screw heads will remain covered
- Whether fixation will control rotation
- Whether the implant requires one, two, or several screws
Some implants include designated screw recesses or fixation tabs.
Others are fixated through the implant during surgery.
The fixation plan should stabilize the implant without creating unnecessary bulk or risk.
“A successful digital design must account for how the implant will be inserted, positioned, and secured during surgery.”
The First Design Proposal
After the engineer completes the initial implant model, the surgeon receives a digital proposal.
This usually includes:
- Multiple skull views
- Implant thickness maps
- Measurements
- Transparent overlays
- Right and left comparisons
- Cross-sectional images
- Screw-position options
The first design is a starting point.
It allows the surgeon to evaluate how well the proposal matches the intended goals.
Why the First Design Is Rarely Final
The initial design commonly requires changes.
Typical revisions include:
- Increasing or reducing projection
- Changing jaw-angle width
- Adjusting chin length
- Moving the area of maximum cheek projection
- Extending an implant farther along the bone
- Thinning a border
- Smoothing a transition
- Altering one side to improve asymmetry
Each revision brings the design closer to the final plan.
Dr. Eppley’s Bottom Line
The first design shows what is possible. The revision process determines what is appropriate.
How Much Patient Input Is Appropriate?
Patients should participate in defining the desired result.
They can provide valuable guidance regarding:
- Preferred degree of change
- Features they like or dislike
- Subtle versus dramatic goals
- Reference photographs
- Concerns about width or projection
However, patients may find it difficult to interpret a digital implant because they are viewing bone rather than a healed face.
A thicker implant does not always produce a proportionally larger visible change.
For this reason, patient input should guide the aesthetic direction while the surgeon determines the safest and most anatomically appropriate design.
Can the CAD Design Predict the Final Appearance?
The digital implant can accurately show the planned skeletal change.
It cannot perfectly predict the final soft-tissue appearance.
Limitations include:
- Skin thickness
- Fat distribution
- Muscle volume
- Scar tissue
- Swelling
- Tissue elasticity
- Facial expression
- Aging
Some software can simulate soft-tissue changes, but these simulations remain estimates.
They are useful for communication, not guarantees.
Clinical Insight
Skeletal Precision Does Not Eliminate Biological Variability
The implant may be manufactured with submillimeter accuracy.
The human tissues covering it do not respond with submillimeter predictability.
This is why clinical experience remains essential even in a highly digital process.
When the Design Is Ready for Approval
A design is generally ready for approval when:
- The skeletal deficiency has been addressed
- The implant dimensions match the patient’s goals
- Right-left differences have been considered
- Borders blend smoothly
- Nerves and tooth roots are protected
- Surgical access is practical
- Fixation is feasible
- The design can be manufactured reliably
Only after these criteria are satisfied should manufacturing begin.
Key Takeaways
- Implant design begins by translating the patient’s visible concerns into specific skeletal changes.
- CT scans and photographs must be evaluated together because bone and soft tissue provide different information.
- Projection, width, vertical height, and contour are independent design variables.
- The inner implant surface fits the bone, while the outer surface creates the visible change.
- Implant boundaries and feathered edges are critical to natural contour transitions.
- Asymmetrical faces often require deliberately asymmetrical implant designs.
- The design must account for nerves, tooth roots, surgical access, and screw fixation.
- The first CAD proposal is usually refined through one or more revisions.
- CAD can reproduce the planned skeletal change accurately, but it cannot perfectly predict soft-tissue response.
- Manufacturing should begin only after the design is aesthetically appropriate, surgically practical, and anatomically safe.
Dr. Eppley’s Bottom Line
A custom facial implant is not simply drawn onto a CT scan. It is developed through a series of anatomical, aesthetic, engineering, and surgical decisions. The software provides precision, but the design becomes successful only when those decisions work together.
How Are Custom Facial Implants Made from a 3D CT Scan?
Part 4: Why the First Design Is Rarely the Final Design, How Screw Holes and Surgical Access Are Planned, and How the Implant Is Approved for Manufacturing
The First Design Is a Proposal, Not a Finished Implant
Once the surgeon’s goals have been translated into a digital plan, the design engineer creates the first CAD model.
This initial design is important because it converts abstract ideas into a visible three-dimensional object.
The surgeon can now evaluate:
- Overall implant shape
- Maximum thickness
- Width and height
- Right-left differences
- Border placement
- Areas of transition
- Relationship to nearby anatomy
- Planned fixation points
However, the first design is rarely considered final.
It is better understood as a working proposal.
The design may be anatomically accurate and technically manufacturable while still requiring important aesthetic or surgical refinements.
Dr. Eppley’s Bottom Line
The first design proves that an implant can be created. The review process determines whether it should be created in that form.
Why the First Design Usually Needs Revision
Custom implant design involves several layers of judgment.
The engineer may accurately follow the initial instructions, but the three-dimensional result may reveal issues that were not obvious before the implant was visualized.
Common reasons for revision include:
- Excessive projection
- Insufficient projection
- Too much width
- Inadequate extension
- Abrupt borders
- Poor transition into adjacent bone
- Incorrect location of maximum thickness
- Overcorrection of asymmetry
- Insufficient correction of asymmetry
- Difficult surgical access
- Unsafe fixation options
The first CAD model allows these problems to be corrected before they become physical.
That is one of the greatest advantages of digital planning.
Small Changes Can Produce Large Visual Differences
A revision does not need to be dramatic to matter.
Changes of one or two millimeters may alter:
- Chin prominence
- Jaw-angle width
- Lower-face taper
- Cheek fullness
- Infraorbital support
- Forehead curvature
- Side-to-side balance
The visible effect depends on where the change is made.
For example, adding two millimeters to the central chin may affect the profile.
Adding the same amount laterally may broaden the chin from the front.
The amount is identical.
The visual result is not.
Clinical Insight
Implant Design Is About Location, Not Just Thickness
The question is rarely only:
“How thick should the implant be?”
The more important questions are:
- Where should it be thickest?
- How quickly should it taper?
- In which direction should it extend?
- Where should the contour become angular or rounded?
Reviewing the Implant from Multiple Views
A design that looks appropriate from one angle may look excessive or incomplete from another.
For that reason, the implant is reviewed from:
- Frontal view
- Profile view
- Oblique views
- Inferior view
- Superior view
- Posterior view when relevant
This is especially important for jawline, cheek, forehead, and skull implants.
A jawline implant may look balanced from the side but too wide from below.
A cheek implant may look appropriate from the front but project too far laterally in the oblique view.
A forehead implant may appear smooth from the side while creating excessive width from above.
Three-dimensional review prevents the design from being optimized for only one photograph or viewpoint.
“A custom implant must be evaluated from every relevant angle because a contour that appears appropriate in one view may be excessive in another.”
Thickness Maps
Many CAD systems display the implant using a color-coded thickness map.
The map shows how far the implant projects from the underlying bone at thousands of surface points.
A typical map may use:
- Cooler colors for thinner regions
- Warmer colors for thicker regions
This allows the surgeon to see:
- Maximum projection
- Areas of gradual taper
- Sudden thickness changes
- Side-to-side differences
- Whether borders are sufficiently thin
- Whether a localized area is overbuilt
Thickness maps are particularly useful for broad implants that cannot be understood from a single maximum measurement.
Why a Single Maximum Measurement Can Be Misleading
Two implants may both have a maximum thickness of 8 millimeters.
One may reach that thickness only in a small central area.
The other may maintain nearly 8 millimeters across a broad surface.
The second implant will generally create a much larger visible change.
Maximum thickness alone does not describe:
- Implant volume
- Surface distribution
- Width of augmentation
- Degree of taper
- Overall visual effect
The complete thickness pattern matters.
Dr. Eppley’s Bottom Line
A custom implant should never be judged by its maximum thickness alone. The shape and distribution of that thickness determine the actual result.
Refining Projection, Width, and Height
During review, the surgeon may change each design variable independently.
Projection Refinement
Projection may be reduced to avoid:
- An overly strong profile
- Lip imbalance
- Excessive orbital support
- An unnatural forehead contour
It may be increased when the first design appears too subtle.
Width Refinement
Width may be reduced when:
- The jawline looks too broad
- The cheek extends too laterally
- The forehead becomes too wide
- The implant overwhelms neighboring structures
It may be increased to improve:
- Lower-face strength
- Cheekbone balance
- Temporal or skull width
- Side-to-side symmetry
Height Refinement
Vertical extension may be modified to:
- Lengthen the chin
- Lower the jaw angle
- Extend an implant beneath a contour deficiency
- Improve forehead or skull continuity
- Avoid extending too close to a nerve or incision
Each revision must be reassessed in relation to the entire face.
Refining the Borders
Border refinement is one of the most common reasons for multiple design revisions.
The surgeon may request that a border be:
- Extended farther
- Shortened
- Thinned
- Rounded
- Made more gradual
- Redirected around a nerve
- Adjusted to avoid a visible transition
A border that ends in the wrong location may create a contour step even if the central implant thickness is correct.
For example:
- A jawline implant may need to extend farther toward the chin to avoid a prejowl depression.
- An infraorbital implant may need to blend farther onto the cheek.
- A forehead implant may need temporal extensions to avoid a visible lateral edge.
- A skull implant may require a wider taper to blend into the surrounding cranium.
Clinical Insight
Many Design Revisions Occur at the Edge, Not the Center
The main augmentation is usually established early.
The later revisions often focus on how the implant disappears into the surrounding anatomy.
That is where naturalness is created.
Reassessing Asymmetry
The initial design may correct asymmetry mathematically.
The surgeon must then decide whether that correction is aesthetically appropriate.
Questions include:
- Is one side now too large?
- Does the correction account for soft-tissue differences?
- Should both sides be augmented, but by different amounts?
- Is complete correction likely to look unnatural?
- Does the implant improve the frontal view while worsening another angle?
The goal is not to create identical implants.
The goal is to create the most balanced external appearance possible.
Planning the Surgical Approach
Before approving the design, the surgeon must know how the implant will be inserted.
The planned incision influences:
- Implant size
- Implant flexibility
- Number of implant pieces
- Direction of insertion
- Location of fixation
- Extent of surgical exposure
A digital implant cannot be approved simply because it looks good on the skull model.
It must also be surgically practical.
Common Surgical Approaches
Depending on the implant location, access may be obtained through:
- Submental incision
- Intraoral incision
- Lower-eyelid incision
- Hairline incision
- Scalp incision
- Existing surgical scar
- A combination of approaches
Each has advantages and limitations.
Implant Size Versus Incision Size
Large implants do not always require equally large incisions.
Flexible silicone implants may be temporarily folded or compressed for insertion.
Rigid materials such as PEEK or titanium cannot be manipulated in the same way.
Therefore, the design may need to change according to material.
A large rigid implant may require:
- A longer incision
- A wider surgical exposure
- Division into multiple pieces
- A different insertion path
The surgeon must anticipate this before the implant is manufactured.
Dr. Eppley’s Bottom Line
A design is not complete until the surgeon knows how the implant will pass through the incision and reach its final position without damaging surrounding tissues.
Planning the Insertion Path
The insertion path is the route the implant follows from the incision to the bone.
This path may be limited by:
- Nerves
- Muscles
- Tooth roots
- Orbital contents
- Blood vessels
- Tight soft-tissue spaces
- The curvature of the skeleton
The implant must be able to pass through this corridor without excessive force.
A design that is too wide, too rigid, or poorly shaped may be difficult to orient once inside the pocket.
“The implant must be designed not only for its final position but also for the path required to place it safely.”
One-Piece or Multi-Piece Implant?
The decision to use one piece or multiple pieces is often finalized during design review.
One-Piece Design
Advantages may include:
- Continuous contour
- Fewer junctions
- Easier overall alignment
- Greater structural continuity
Disadvantages may include:
- More difficult insertion
- Larger incision requirement
- Greater difficulty navigating around nerves
- Less flexibility with rigid materials
Multi-Piece Design
Advantages may include:
- Smaller surgical access
- Easier insertion
- Better control of individual components
- Ability to work around anatomical obstacles
Disadvantages may include:
- More components to position
- Potential junction irregularities
- Greater dependence on fixation
- Need for careful alignment
The correct choice depends on anatomy, material, and surgical technique.
How Screw Fixation Is Planned
Once the implant shape and insertion method are acceptable, fixation must be planned.
The purpose of screws is to:
- Maintain the intended position
- Prevent rotation
- Prevent migration
- Eliminate unwanted movement
- Preserve symmetry during healing
The surgeon must decide:
- How many screws are needed
- Where they should be placed
- In which direction they should travel
- Whether the bone is thick enough
- Whether a screw could injure nearby anatomy
Choosing Screw Locations
Safe screw placement depends on the implant region.
Chin and Jawline
The surgeon must consider:
- Mental nerve
- Inferior alveolar nerve
- Tooth roots
- Mandibular thickness
- Lower-border position
Cheek and Infraorbital Region
Important structures include:
- Infraorbital nerve
- Orbital contents
- Maxillary sinus
- Thin orbital bone
Forehead and Brow
Considerations include:
- Frontal sinus
- Supraorbital and supratrochlear nerves
- Thin bone regions
- Incision access
Skull
Fixation planning considers:
- Skull thickness
- Implant size
- Edge location
- Scalp access
Screw Number
The number of screws depends on:
- Implant size
- Implant shape
- Material rigidity
- Risk of rotation
- Amount of bone contact
- Surgical access
A small chin implant may require one or two screws.
A large jawline or skull implant may require several fixation points.
More screws are not automatically better.
Each screw adds:
- Drilling
- Operative time
- Anatomical risk
- Potential difficulty during future removal
The goal is adequate fixation, not maximum fixation.
Clinical Insight
The Best Screw Is the One That Controls Movement Safely
Screws should be placed strategically.
A well-positioned screw may provide more stability than several poorly chosen screws.
The key is to control the directions in which the implant could rotate or shift.
The Importance of the First Screw
The first screw often determines the implant’s final orientation.
Once inserted, it may act as a pivot point.
If the implant is fully seated, the first screw can help preserve accurate positioning while additional screws are placed.
If the implant is not fully seated, the first screw may lock it into an incorrect position.
For that reason, the surgeon must confirm:
- Bone contact
- Implant orientation
- Border position
- Soft-tissue clearance
before fixation begins.
. Eppley’s Bottom Line
Screw fixation preserves the position achieved during surgery. It cannot correct an implant that was incorrectly seated before the first screw was placed.
Screw Holes, Recesses, and Fixation Tabs
Depending on the implant and manufacturing method, the design may include:
- Preplanned screw holes
- Countersunk screw recesses
- Fixation tabs
- Thicker zones for intraoperative drilling
- External markings to guide screw placement
These features may improve accuracy and prevent screw heads from projecting above the implant surface.
However, they must be designed carefully.
A fixation feature that is too bulky may become visible or palpable.
A preplanned hole may be unusable if surgical access does not allow the drill to approach at the required angle.
Screw Direction Matters
A safe screw location may still be unusable if the surgeon cannot reach it with the drill.
The screw trajectory must account for:
- Incision position
- Drill angle
- Soft-tissue retraction
- Nearby nerves
- Tooth roots
- Bone thickness
The CAD model may show a screw entering the ideal point on the implant.
The surgeon must confirm that the same trajectory can be achieved during the actual operation.
“Screw position must be safe in the bone and reachable through the planned surgical approach.”
Planning Around Previous Hardware
Patients undergoing revision surgery may already have:
- Plates
- Screws
- Mesh
- Standard implants
- Bone grafts
- Orthognathic fixation hardware
The new implant may be designed to:
- Avoid the existing hardware
- Cover it
- Fit around it
- Replace it
- Incorporate planned hardware removal
The CT scan is especially valuable in these cases because the implant can be designed before surgery with the hardware location in mind.
Metal artifact may limit accuracy, but careful review often allows a practical plan to be developed.
Implant Thickness at Screw Sites
The implant must be thick enough at fixation sites to tolerate drilling and screw placement.
If it is too thin:
- The screw may tear through the implant
- The material may deform
- The screw head may not seat properly
If it is too thick:
- A visible or palpable bump may result
- The implant may create unnecessary contour
- Screw removal may become more difficult
A localized increase in thickness may be added to support fixation without changing the visible contour.
Final Design Review
Before approval, the surgeon performs a final systematic review.
This is essentially a digital preoperative checklist.
The design should be evaluated for:
- Aesthetic goals
- Anatomical fit
- Symmetry correction
- Maximum projection
- Width
- Vertical height
- Edge taper
- Implant volume
- Relationship to nerves and tooth roots
- Surgical access
- Insertion path
- Fixation
- Material compatibility
- Manufacturability
No single factor should be reviewed in isolation.
The Final Approval Checklist
A design is generally ready for manufacturing when the following questions can be answered satisfactorily:
Aesthetic
- Does the design address the patient’s main concern?
- Is the degree of change appropriate?
- Does it preserve facial harmony?
- Does it avoid excessive width or projection?
- Are the contours natural?
Anatomical
- Does the inner surface fit the intended bone?
- Are the implant borders correctly positioned?
- Are nerves, tooth roots, sinuses, and orbital structures protected?
- Has asymmetry been addressed appropriately?
Surgical
- Can the implant be inserted through the planned incision?
- Can it be oriented and fully seated?
- Is the implant one piece or should it be divided?
- Can all fixation points be reached safely?
Technical
- Can the selected material reproduce the design?
- Are the borders manufacturable?
- Is the implant thick enough to handle safely?
- Are fixation features appropriate?
- Are all design files complete?
Dr. Eppley’s Bottom Line
Final approval should mean more than “the implant looks good.” It should mean the design is aesthetically appropriate, anatomically safe, surgically placeable, and technically manufacturable.
Surgeon Approval and Design Lock
Once the surgeon is satisfied, the design is formally approved.
This is sometimes described as:
- Design release
- Final approval
- Design lock
- Manufacturing authorization
After this point, the manufacturer proceeds using the approved digital file.
Changes should generally not be made after release unless the design is formally reopened and reapproved.
This prevents confusion over which version is considered final.
Patient Review
The amount of patient involvement in final approval varies.
Patients may be shown:
- Implant renderings
- Thickness maps
- Skull overlays
- Side-to-side comparisons
- Selected measurements
This can help confirm that the planned change matches their goals.
However, the patient is viewing a skeletal model rather than a fully healed face.
The surgeon remains responsible for interpreting:
- Soft-tissue effects
- Surgical feasibility
- Anatomical safety
- Appropriate implant dimensions
Patient review should improve communication without transferring complex surgical decisions entirely to the patient.
What Happens After Approval?
After the design is released, the manufacturer prepares the files for production.
Depending on the material, the implant may be:
- Molded
- Machined
- Milled
- 3D printed
- Cast through an intermediate process
The implant is then:
- Inspected
- Cleaned
- Packaged
- Sterilized
- Labeled for the specific patient
In some workflows, a physical skull model or surgical guide may also be produced.
Quality Control Before Manufacturing
Before production begins, the manufacturer may verify:
- File integrity
- Implant dimensions
- Minimum thickness
- Material compatibility
- Surface continuity
- Manufacturing tolerances
- Identification information
- Laterality
- Number of implant components
This review is intended to identify technical problems before the implant enters production.
It does not replace the surgeon’s aesthetic and surgical approval.
Can the Implant Be Changed After Manufacturing?
Yes, but it may require:
- A new digital revision
- Remanufacturing
- Additional cost
- A delay in surgery
Minor modifications to silicone may sometimes be performed during surgery.
However, extensive intraoperative modification defeats much of the purpose of custom design.
Rigid implants are generally less forgiving.
The objective is to finalize important decisions before manufacturing.
Clinical Insight
Digital Revision Is Easier Than Physical Revision
Changing the implant on a computer may take minutes or hours.
Changing it after manufacturing may take weeks and require additional expense.
The design process is the safest and most efficient place to make corrections.
Why Approval Should Not Be Rushed
Patients may be eager to schedule surgery.
Manufacturing deadlines may create pressure.
However, rushing approval can result in:
- Excessive implant size
- Poor edge transitions
- Inadequate asymmetry correction
- Difficult insertion
- Unsafe screw positioning
- Avoidable revision surgery
A small delay during planning is usually preferable to correcting a preventable design problem after surgery.
Dr. Eppley’s Bottom Line
The design phase is the least invasive and least expensive time to correct a problem. Every important question should be answered before the implant is manufactured.
Key Takeaways
- The first CAD design is a working proposal and commonly requires refinement.
- Small changes in thickness, width, height, or the location of maximum projection can significantly affect the final result.
- Thickness maps and multiple viewing angles help the surgeon assess the complete implant rather than relying on one measurement.
- Implant borders often require the greatest degree of refinement.
- Surgical access, insertion path, material flexibility, and implant size must be considered before approval.
- One-piece and multi-piece designs each have advantages and limitations.
- Screw number, location, and trajectory should be planned around bone thickness, nerves, tooth roots, and surgical access.
- The first screw may determine the implant’s final orientation, making complete seating essential before fixation.
- Final approval should confirm aesthetic appropriateness, anatomical safety, surgical feasibility, and manufacturability.
- Once approved, the design is locked and released for production.
Dr. Eppley’s Bottom Line
A custom implant is ready for manufacturing only when it works in four dimensions at once: it must fit the anatomy, create the desired appearance, pass through the planned surgical approach, and remain stable after fixation.
How Are Custom Facial Implants Made From A 3D CT Scan?
Part 5: How Different Implant Materials Are Manufactured, Quality-Controlled, Sterilized, and Prepared for Surgery.
From Digital Design to Physical Implant
Once the surgeon gives final approval, the implant design is locked and released for manufacturing.
Until this point, the implant has existed only as a digital file.
That file contains the exact geometry of:
- The bone-contacting surface
- The outer augmentation surface
- Implant borders
- Areas of maximum thickness
- Right-left differences
- Fixation features
- Separate components when the implant is multi-piece
The manufacturer then converts that digital geometry into a physical implant using a process appropriate for the selected material.
This is not the same as simply printing an ordinary plastic object.
A permanent facial implant must be produced from implantable medical-grade material using controlled manufacturing, cleaning, inspection, packaging, and sterilization processes.
Dr. Eppley’s Bottom Line
Design determines the shape of the implant. Manufacturing must reproduce that shape accurately without compromising the material, surface, sterility, or structural integrity of the device.
Why Different Materials Require Different Manufacturing Methods
Custom facial implants can be made from several materials, including:
- Solid silicone
- PEEK
- Porous polyethylene
- Titanium
Each material behaves differently.
They vary in:
- Flexibility
- Rigidity
- Surface texture
- Machinability
- Response to heat and radiation
- Ability to be molded or printed
- Minimum practical thickness
- Ease of insertion
- Method of fixation
For this reason, the manufacturing process must be selected around the material rather than applying one production method to every implant.
The same digital design may also require modification if the material changes.
A design suitable for flexible silicone may not be practical as a rigid PEEK or titanium implant.
Manufacturing Custom Solid Silicone Implants
Solid silicone is one of the most frequently used materials for custom facial and skull implants.
It offers several useful characteristics:
- Flexibility
- Smooth surface
- Ability to be manufactured in complex shapes
- Relative ease of insertion through limited incisions
- Ability to be trimmed if necessary
- Long history of use in facial implantation
A custom silicone implant is generally created through a molding process rather than being carved by hand.
Step 1: Creating the Manufacturing Geometry
The approved CAD design is used to produce the components needed to form the implant.
Depending on the manufacturer’s process, this may involve creating:
- A physical master model
- A negative mold
- A multi-part mold
- Temporary manufacturing components
- A matched model of the underlying bone
The manufacturing tooling must reproduce both:
- The detailed inner surface that contacts the bone
- The aesthetic outer contour approved by the surgeon
Complex implants may require a mold with several parts so the finished device can be removed without distortion.
Step 2: Preparing the Silicone Material
Medical-grade silicone elastomer is prepared according to a controlled formulation.
The material may begin as components that are:
- Measured
- Mixed
- Degassed
- Introduced into the mold
- Cured under controlled conditions
Degassing helps remove trapped air that could otherwise create:
- Internal bubbles
- Surface pits
- Weak points
- Irregularities
The goal is a uniform implant without voids or incomplete areas.
Step 3: Molding and Curing
The silicone is placed into the mold and cured.
Curing converts the material into its stable elastomeric form.
Time, temperature, pressure, and material ratios may all influence the finished implant.
After curing, the implant is removed from the mold and examined.
Any manufacturing flash—the thin excess material that may form along a mold junction—must be carefully removed without changing the approved border.
“Custom silicone implants are typically formed in patient-specific molds that reproduce both the bone-fitting surface and the planned external contour.”
Advantages of Silicone Manufacturing
The molding process can create:
- Broad, smooth implants
- Very thin tapered borders
- Flexible one-piece designs
- Complex asymmetrical contours
- Large skull or jawline implants
The flexibility of silicone may allow a large implant to be temporarily folded or compressed for insertion.
This can make it possible to place the implant through an incision considerably smaller than the implant’s full dimensions.
Manufacturing Considerations for Silicone
Silicone’s flexibility is valuable, but it creates specific manufacturing and surgical considerations.
The implant must be firm enough to:
- Maintain its designed shape
- Resist unwanted folding after placement
- Accept screw fixation
- Avoid tearing at thin edges
Very thin extensions may be difficult to produce consistently.
Very thick implants may become less flexible and more difficult to insert.
The design must therefore balance:
- Edge thinness
- Structural durability
- Flexibility
- Surgical handling
Clinical Insight
Flexibility Does Not Mean Lack of Precision
A silicone implant may feel flexible in the surgeon’s hand, but its resting three-dimensional shape can still reproduce the approved CAD design with a high degree of accuracy.
Its flexibility primarily changes how it is inserted and handled—not what contour it is intended to create.
Manufacturing PEEK Implants
PEEK stands for:
Polyetheretherketone
It is a high-performance thermoplastic used in a variety of implantable medical devices.
PEEK is much more rigid than silicone and is often selected when a firm, bone-like structural implant is desired.
Implant-grade PEEK is covered by material specifications for surgical applications, and processing methods can influence the properties of the finished device.
How a PEEK Implant Is Produced
Custom PEEK implants are commonly manufactured by computer-controlled machining.
The general process includes:
- Starting with a solid block or blank of implant-grade PEEK
- Loading the approved CAD geometry into manufacturing software
- Using computer numerical control equipment to remove material
- Gradually forming the inner and outer implant surfaces
- Finishing the borders and fixation features
- Inspecting the final implant
This is called subtractive manufacturing because the implant is created by removing material from a larger solid piece.
CNC Machining
CNC stands for:
Computer Numerical Control
The cutting instruments follow digitally programmed paths based on the approved implant design.
Machining may involve several cutting tools and multiple orientations to reproduce:
- Curved internal surfaces
- Thin borders
- Screw holes
- Fixation tabs
- Complex asymmetric contours
The implant may be repositioned several times so that all surfaces can be accessed.
“A custom PEEK implant may be milled from a solid block using computer-controlled cutting instruments guided by the approved CAD design.”
Advantages of PEEK Manufacturing
Machined PEEK implants can provide:
- High dimensional consistency
- Stable rigid geometry
- Smooth or selectively textured surfaces
- Precisely placed fixation holes
- Structural strength
- Resistance to deformation during insertion
Because PEEK is rigid, the implant’s manufactured form closely maintains its shape during surgery.
This may be valuable for:
- Cranial reconstruction
- Larger skeletal defects
- Areas requiring firm structural support
- Selected forehead, orbital, or midface reconstructions
Limitations of Rigid PEEK Implants
Rigid implants cannot generally be folded through a small incision.
The design must account for:
- Incision length
- Surgical exposure
- Insertion angle
- Nearby nerves
- Whether the implant must be divided into pieces
Extremely thin edges may also be more difficult to manufacture and handle than comparable flexible silicone borders.
Minor intraoperative modification is possible with appropriate instruments, but extensive modification can be time-consuming and may alter the intended fit.
Dr. Eppley’s Bottom Line
PEEK offers rigid and precise reconstruction, but its lack of flexibility must be considered before the design is approved—not after the operation has begun.
Manufacturing Porous Polyethylene Implants
Porous polyethylene is a firm polymer with an interconnected porous surface.
Its pores allow soft-tissue attachment and, under some conditions, tissue ingrowth.
Custom porous polyethylene implants may be created through proprietary manufacturing or machining processes, depending on:
- The specific material
- The manufacturer
- Implant geometry
- Intended clinical application
Because manufacturing methods vary, it is not accurate to assume that all porous polyethylene implants are produced in exactly the same way.
Design Considerations for Porous Polyethylene
Porous polyethylene is relatively firm and less flexible than silicone.
This affects:
- Incision size
- Implant insertion
- Border thickness
- Screw fixation
- Ease of removal during revision surgery
The porous structure may make the implant more difficult to trim smoothly than solid silicone.
The implant must also retain its pore structure without creating:
- Weak margins
- Loose surface particles
- Irregular borders
- Excessive surface roughness
Surface Porosity and Tissue Attachment
The porous surface is one of the material’s distinguishing features.
After implantation, tissue may attach to or grow into the surface.
This can help stabilize the implant.
However, it can also make later removal more involved because surrounding tissues may become firmly attached.
The manufacturing process must preserve the intended porous structure while maintaining the accuracy of the custom shape.
Manufacturing Custom Titanium Implants
Titanium is a strong, rigid metal widely used in craniofacial plates, screws, meshes, and reconstructive implants.
Custom titanium implants may be produced using:
- Additive manufacturing
- Milling
- Forming
- A combination of manufacturing methods
For geometrically complex patient-specific implants, additive manufacturing is particularly useful.
What Is Additive Manufacturing?
Additive manufacturing builds the implant layer by layer from the digital design.
Unlike milling, which removes material from a solid block, additive manufacturing adds material only where it is needed.
The process may use a focused energy source to fuse thin layers of metal powder according to the CAD geometry.
The sequence is generally:
- A thin layer of titanium powder is spread.
- Selected areas are fused according to the digital design.
- Another layer of powder is added.
- The process repeats until the complete implant is formed.
The unfinished implant is then removed from the surrounding powder and undergoes additional processing.
“Additive manufacturing creates a titanium implant layer by layer, making it possible to produce complex patient-specific shapes.”
Post-Processing Titanium
A titanium implant is not necessarily ready for implantation when it first leaves the printer.
Post-processing may include:
- Removal of manufacturing supports
- Heat treatment
- Surface finishing
- Machining of screw holes
- Polishing selected areas
- Cleaning
- Inspection
Some surfaces may be intentionally smooth.
Others may be designed with:
- Texture
- Porosity
- Mesh-like structures
- Reduced-weight internal geometry
The final surface depends on the implant’s purpose and the manufacturer’s validated process.
Advantages of Titanium Manufacturing
Titanium offers:
- High strength
- Structural rigidity
- Ability to create thin but strong components
- Precise fixation features
- Compatibility with screws and plates
- Potential for complex porous or mesh structures
It is especially valuable when reconstruction requires:
- Structural support
- Thin rigid contour restoration
- Replacement of missing bone
- Integrated fixation
- Complex craniofacial reconstruction
Limitations of Titanium
Titanium is rigid and cannot be folded for insertion.
It may also:
- Require greater surgical exposure
- Be more palpable in thin tissue regions
- Create imaging artifact on some studies
- Require specialized instruments for modification
- Conduct heat and cold differently from polymers
The choice of titanium should therefore reflect the clinical need rather than a belief that a stronger material is automatically a better material.
Clinical Insight
Manufacturing Capability Does Not Determine Material Selection
Modern manufacturing can create highly precise implants from multiple materials.
The question is not simply which material can reproduce the CAD file.
The question is which material best fits the anatomy, surgical approach, tissue thickness, fixation requirements, and possibility of future revision.
Direct Printing Does Not Mean Immediate Use
The term “3D printed implant” can create the impression that the device leaves the printer ready for surgery.
That is generally not the case.
A printed implant may still require:
- Removal of supports
- Cleaning
- Surface treatment
- Dimensional inspection
- Material testing
- Packaging
- Validated sterilization
The printer is only one part of the manufacturing system.
Patient-Specific Does Not Mean Unregulated
A custom implant is manufactured for one patient, but that does not eliminate the need for controlled medical-device processes.
Patient-specific production still requires attention to:
- Material identity
- Design control
- Manufacturing accuracy
- Biological safety
- Cleaning
- Packaging
- Sterilization
- Traceability
Biocompatibility evaluation for medical devices is performed within a risk-management framework that considers the material, tissue contact, exposure duration, manufacturing residues, and other biological hazards.
Quality Control Begins Before Manufacturing
Quality control does not begin after the implant is finished.
It begins with the approved digital file.
The manufacturer should confirm:
- Correct patient identification
- Correct implant region
- Correct laterality
- Correct number of components
- Correct material
- Correct design revision
- Complete digital geometry
- Acceptable minimum thickness
- Manufacturable borders
- Appropriate fixation features
This prevents an outdated or incorrect design file from entering production.
Dimensional Verification
After manufacturing, the physical implant must be compared with the approved design.
This may be done through:
- Mechanical measurements
- Calipers
- Coordinate-measuring equipment
- Optical scanning
- Laser scanning
- CT scanning
- Comparison with a physical anatomical model
The manufacturer may inspect:
- Overall dimensions
- Maximum thickness
- Border location
- Screw-hole position
- Surface contour
- Fit of multi-piece components
The exact inspection method depends on the implant material, complexity, and manufacturing process.
“The manufactured implant can be digitally compared with the approved CAD design to identify dimensional differences.”
Acceptable Manufacturing Tolerance
No manufacturing process reproduces a digital object with absolute mathematical perfection.
Every process has a validated tolerance.
The important questions are:
- How large is the deviation?
- Where does it occur?
- Could it affect fit or contour?
- Is it within the manufacturer’s accepted specification?
A tiny deviation in a noncritical surface may have no clinical significance.
A similar deviation along:
- A thin orbital border
- A screw hole
- A critical bone-contact surface
- A multi-piece junction
may be more important.
Manufacturing accuracy must therefore be interpreted in relation to implant function.
Fit Testing
Some manufacturers test the finished implant against:
- A physical skull model
- A printed section of the patient’s anatomy
- A digital comparison model
- A custom inspection fixture
Fit testing helps identify:
- Rocking
- Gaps
- Incomplete seating
- Incorrect orientation
- Interference from a border
- Mismatch at a multi-piece junction
A good fit does not mean that the implant adheres to the skull like a vacuum seal.
It means that it seats reproducibly in the intended position without an unexpected obstruction.
Dr. Eppley’s Bottom Line
The goal of quality control is not merely to prove that an implant was manufactured. It is to confirm that the correct implant was manufactured in the correct material, shape, dimensions, and orientation.
Visual Inspection
Every implant should undergo visual inspection.
The inspector looks for:
- Cracks
- Tears
- Bubbles
- Voids
- Surface contamination
- Rough edges
- Incomplete borders
- Residual manufacturing material
- Deformed screw holes
- Unexpected discoloration
- Loose particles
Material-specific defects vary.
For example:
Silicone
Potential concerns include:
- Air bubbles
- Surface pits
- Mold-line irregularities
- Tears along thin borders
PEEK
Potential concerns include:
- Machining marks
- Burrs
- Sharp edges
- Incomplete tool access
Porous Polyethylene
Potential concerns include:
- Loose particles
- Damaged pore structure
- Irregular margins
Titanium
Potential concerns include:
- Residual supports
- Unfused particles
- Surface irregularity
- Incomplete screw-hole finishing
Cleaning the Implant
Manufacturing can leave behind:
- Cutting fluid
- Lubricants
- Powder
- Particles
- Mold-release substances
- Handling contamination
- Processing residues
The implant must undergo a validated cleaning process before sterilization.
Cleaning may involve combinations of:
- Rinsing
- Detergent cleaning
- Ultrasonic cleaning
- Purified water
- Controlled drying
- Particle removal
The exact process depends on the material and manufacturing method.
Cleaning and sterilization are separate steps.
Sterilization may kill microorganisms, but it does not necessarily remove manufacturing debris or chemical residue.
Clinical Insight
Sterile Does Not Automatically Mean Clean
A device can theoretically be free of viable microorganisms while still carrying unwanted particles or processing residues.
Proper preparation therefore requires both validated cleaning and validated sterilization.
Packaging Before Sterilization
The cleaned implant is placed into packaging designed to:
- Protect the implant
- Permit the selected sterilization method
- Maintain sterility afterward
- Prevent contamination during transport
- Allow handling without damaging the device
Packaging may include:
- Inner sterile barrier
- Protective tray
- Double pouch
- Outer carton
- Patient-specific labeling
The packaging system is part of the sterile device.
It must remain intact until the implant is opened in the operating room.
How Custom Facial Implants Are Sterilized
There is no single sterilization method appropriate for every implant.
Medical devices may be sterilized using methods that include:
- Ethylene oxide gas
- Radiation
- Moist heat
- Dry heat
- Vaporized hydrogen peroxide
- Other validated processes
The selected method must be compatible with the material, packaging, and device geometry. FDA-recognized guidance specifically addresses the compatibility of polymers, metals, and other medical-device materials with different sterilization modalities.
Ethylene Oxide Sterilization
Ethylene oxide, often abbreviated EtO, is a low-temperature gas sterilization method.
It is commonly used for medical devices that:
- Cannot tolerate high heat
- Have complex shapes
- Contain polymers
- Are packaged before sterilization
The gas penetrates the packaging and reaches the device surfaces.
After exposure, the device undergoes aeration so residual gas and by-products are reduced to acceptable levels.
EtO remains widely used for medical devices, although the FDA and industry continue to evaluate ways to reduce reliance on it while maintaining access to safely sterilized products.
Radiation Sterilization
Radiation methods may include:
- Gamma radiation
- Electron beam
- X-ray irradiation
Radiation can sterilize devices after they have been placed in their final packaging.
However, radiation can affect some polymers by changing:
- Strength
- Flexibility
- Color
- Molecular structure
- Long-term performance
A material’s response to sterilization must therefore be evaluated rather than assumed.
Steam Sterilization
Steam sterilization uses moist heat under pressure.
It is effective and widely available in hospitals.
However, not every custom implant or package is designed for steam sterilization.
Potential concerns include:
- Heat-related deformation
- Changes in polymer properties
- Moisture retention
- Packaging incompatibility
A device should not be steam sterilized merely because an autoclave is available.
The manufacturer’s validated instructions must be followed.
Other Low-Temperature Methods
Some devices may be compatible with low-temperature systems such as vaporized hydrogen peroxide.
Compatibility depends on:
- Material
- Device geometry
- Packaging
- Surface characteristics
- Manufacturer validation
The surgical facility should never substitute a different sterilization method without confirming that it is appropriate for that specific implant.
Dr. Eppley’s Bottom Line
Sterilization is not interchangeable. The method must be validated for the implant material, manufacturing process, packaging system, and intended shelf life.
What Does “Sterile” Mean?
Sterility cannot be proven by examining every individual implant for microorganisms.
Instead, sterilization is established through a validated process designed to achieve a defined sterility assurance level.
Validation evaluates factors such as:
- Sterilization exposure
- Device configuration
- Packaging
- Microbial resistance
- Process consistency
- Residual chemicals when applicable
Regulatory review of sterile medical devices considers the sterilization method, validation, sterile barrier packaging, and the sterility assurance level.
Sterilization Does Not Correct Manufacturing Problems
Sterilization cannot fix:
- Incorrect dimensions
- Surface defects
- Loose particles
- Wrong laterality
- Poor implant fit
- Contamination trapped beneath manufacturing residue
- Packaging damage
The implant must pass manufacturing and cleaning inspection before sterilization.
Sterility is the final protective step, not a substitute for quality control.
Sterile Barrier Integrity
After sterilization, the packaging must maintain the sterile barrier during:
- Storage
- Shipping
- Handling
- Transport to the surgical facility
Potential signs of compromised packaging include:
- Tears
- Punctures
- Open seals
- Moisture
- Crushed trays
- Missing labels
- Broken tamper indicators
A package that appears damaged should be treated as potentially nonsterile until evaluated.
Patient-Specific Labeling and Traceability
A custom implant should be clearly identified for the intended patient.
Labeling may include:
- Patient identifier
- Implant description
- Right or left designation
- Number of components
- Material
- Manufacturing lot
- Serial number
- Sterilization information
- Expiration or use-by date when applicable
- Manufacturer information
Traceability allows the implant to be linked to:
- The approved design
- Material batch
- Manufacturing records
- Sterilization cycle
- Quality-control documentation
This is particularly important because the implant cannot simply be substituted for another patient’s device.
Preparing the Implant for Shipment
Before shipment, the manufacturer confirms that:
- The design was approved
- The correct material was used
- Quality-control inspection is complete
- Cleaning is complete
- Sterilization is complete when supplied sterile
- Packaging is intact
- Labeling is correct
- All components are included
The implant may then be shipped directly to:
- The surgeon
- The surgical facility
- A hospital
- An authorized distributor
The package should be stored according to the manufacturer’s instructions until surgery.
What the Surgical Team Should Verify
When the implant arrives, the surgical team should verify:
- Patient name or identifier
- Planned implant location
- Right-left designation
- Number of implant components
- Implant material
- Package integrity
- Sterilization status
- Expiration date when provided
- Compatibility with the scheduled procedure
- Availability of any required instruments or models
This review should occur before the day of surgery whenever possible.
Discovering a discrepancy after the patient has entered the operating room can result in cancellation or delay.
The Role of a Physical Skull Model
A physical anatomical model may sometimes accompany the implant.
It can be useful for:
- Confirming implant fit
- Understanding orientation
- Demonstrating right and left components
- Planning the insertion sequence
- Selecting screw positions
- Rehearsing complex reconstruction
However, not every custom facial implant requires a full physical skull model.
Digital review may be sufficient for many routine cases.
The need for a model depends on:
- Implant complexity
- Material
- Anatomy
- Revision history
- Surgeon preference
“Before surgery, the implant identity, material, laterality, component count, packaging, and sterilization status should be confirmed.”
Should the Implant Package Be Opened Before Surgery?
The sterile package should generally remain sealed until the surgical team is ready to introduce the implant into the sterile field.
Opening it too early creates unnecessary risk of:
- Contamination
- Handling damage
- Loss of a small component
- Confusion between right and left sides
The external labeling and available design files should be reviewed before opening.
Once opened, the implant should be inspected again under sterile conditions.
Final Inspection in the Operating Room
Before placement, the surgeon should confirm:
- Implant shape
- Orientation
- Right-left designation
- Border integrity
- Screw-hole location
- Absence of visible damage
- Presence of every component
The implant can also be compared with:
- The digital design
- Printed renderings
- Physical anatomical model
- Intraoperative bone anatomy
This final inspection does not replace manufacturer quality control.
It provides an additional safeguard immediately before implantation.
Clinical Insight
Patient-Specific Devices Require Patient-Specific Verification
A standard implant may be replaced with another implant of the same model and size.
A custom implant has no identical substitute.
Verifying the patient, side, component, and orientation is therefore especially important.
What Happens if the Implant Does Not Fit?
An unexpected fit problem may result from:
- Incomplete surgical exposure
- Soft tissue caught beneath the implant
- Residual periosteum or scar tissue
- Bone changes after the CT scan
- Previous hardware
- Incorrect implant orientation
- Manufacturing error
- Segmentation error
- Design error
The surgeon should first determine whether the implant is truly mismatched or simply not fully seated.
Forcing an implant into place can:
- Damage nerves
- Fracture thin bone
- Deform the implant
- Create malposition
- Prevent proper fixation
Minor silicone adjustments may sometimes be possible.
Major discrepancies may require abandoning implantation and investigating the cause.
Can the Anatomy Change Between the CT Scan and Surgery?
Yes.
This is most relevant when the patient undergoes another skeletal procedure after the design CT, such as:
- Genioplasty
- Orthognathic surgery
- Bone reduction
- Fracture repair
- Removal of existing implants
- Hardware revision
Significant weight change does not alter the bone-contact surface, but it may influence visible soft-tissue results.
If the skeletal anatomy changes after the CT scan, the custom implant may no longer fit as designed.
The surgeon must decide whether:
- The implant can still be used
- The design should be updated
- A new CT scan is necessary
- Implant manufacturing should be postponed
Dr. Eppley’s Bottom Line
Once a custom implant has been designed, the supporting bone should remain unchanged. Any intervening skeletal surgery may invalidate the fit and require a new design.
How Long Does Manufacturing Take?
Manufacturing time varies according to:
- Implant material
- Design complexity
- Number of components
- Need for physical models
- Manufacturer workflow
- Sterilization method
- Quality-control requirements
- Shipping distance
A simple implant may move through production more quickly than:
- A multi-piece jawline implant
- A large skull implant
- A complex titanium reconstruction
- A revision implant designed around existing hardware
Patients should not assume that manufacturing begins with the CT scan.
Production begins only after:
- The scan is processed
- The implant is designed
- Revisions are completed
- The final design is approved
Why Manufacturing Should Not Be Rushed
A shorter manufacturing timeline is not necessarily better.
Time is required for:
- Material preparation
- Production
- Curing or machining
- Surface finishing
- Inspection
- Cleaning
- Packaging
- Sterilization
- Shipping
Skipping or compressing validated steps may compromise quality.
The surgery date should allow sufficient time for the implant to arrive and be verified before the operation.
What Material Is Manufactured Most Accurately?
No single implant material is automatically the most accurate.
Accuracy depends on:
- Quality of the CT scan
- Segmentation
- CAD design
- Manufacturing technology
- Material behavior
- Inspection method
- Validated tolerance
Silicone, PEEK, porous polyethylene, and titanium can all be used to create precise patient-specific devices when manufactured through an appropriate controlled process.
The more important question is:
Which combination of material, design, manufacturing method, and surgical approach is best for the individual patient?
Dr. Eppley’s Bottom Line
Manufacturing precision is not a property of the material alone. It is the result of the entire process—from CT scan and CAD design through production, inspection, cleaning, sterilization, and surgical verification.
Key Takeaways
- The approved CAD design must be converted into a physical implant using a manufacturing process suited to the selected material.
- Custom silicone implants are generally molded and cured, creating flexible devices that can have broad contours and thin tapered borders.
- PEEK implants are commonly machined from solid implant-grade material, producing rigid and dimensionally stable implants.
- Porous polyethylene requires manufacturing that preserves both the custom shape and its porous surface structure.
- Titanium implants may be produced through additive manufacturing, machining, or a combination of methods.
- A device described as 3D printed still requires extensive post-processing, inspection, cleaning, packaging, and sterilization.
- Quality control includes verifying patient identification, material, dimensions, surface integrity, fit, fixation features, and component count.
- Cleaning and sterilization are separate processes; sterilization does not remove manufacturing debris.
- The sterilization method must be validated for the implant material, packaging, and manufacturing process.
- Patient-specific labeling and traceability connect the implant to its design, material batch, manufacturing record, and sterilization cycle.
- The surgical team should verify the implant and packaging well before the operation.
- Final implant inspection occurs again after the device enters the sterile field.
Dr. Eppley’s Bottom Line
A custom facial implant is not complete when it leaves the mold, milling machine, or 3D printer. It becomes ready for surgery only after its dimensions, surface, cleanliness, packaging, sterility, identity, and surgical usability have all been confirmed.
How Are Custom Facial Implants Made from a 3D CT Scan?
Part 6: How Long the Complete Custom Implant Process Takes, What Can Delay It, and What Can Go Wrong During Design or Manufacturing
How Long Does the Complete Custom Implant Process Take?
The complete process usually takes several weeks to a month..
It is not a single manufacturing step.
The timeline includes:
- Obtaining the CT scan
- Transferring the DICOM files
- Reviewing scan quality
- Segmenting the anatomy
- Creating the three-dimensional skull
- Producing the initial implant design
- Reviewing and revising the design
- Approving the final implant
- Manufacturing the device
- Inspecting and cleaning it
- Sterilizing and packaging it
- Shipping it to the surgical facility
- Verifying it before surgery
A straightforward case may move through these stages relatively quickly.
A complex case may take considerably longer.
The exact timeline depends on:
- Implant type
- Material
- Design complexity
- Number of revisions
- Manufacturing method
- Surgeon and patient response time
- Sterilization requirements
- Shipping logistics
Dr. Eppley’s Bottom Line
The custom implant timeline is not simply how long it takes to make the device. It is the total time required to create, review, manufacture, inspect, sterilize, ship, and verify a patient-specific implant safely.
The Timeline Does Not Begin with Manufacturing
Patients sometimes assume that once the CT scan has been completed, the implant immediately enters production.
It does not.
Manufacturing is one of the final stages.
Before the implant can be physically produced, the surgical team must determine:
- What anatomy needs to be changed
- How much change is appropriate
- Where the implant should begin and end
- How asymmetry should be managed
- Whether the implant can be inserted safely
- Where fixation should occur
- Which material should be used
These decisions often require more time than the physical production of the implant.
A Typical Stage-by-Stage Timeline
The following timeline is a general framework rather than a guarantee.
Different manufacturers and surgical practices may use different workflows.
Stage 1: Consultation and Treatment Planning
Typical time: Several days to several weeks
This stage may include:
- Review of photographs
- Review of medical and surgical history
- Discussion of the patient’s goals
- Evaluation of previous implants or facial surgery
- Selection of the anatomical region to be treated
- Preliminary discussion of implant material and surgical approach
Some patients proceed quickly.
Others need time to clarify their goals, compare options, or gather previous records.
Stage 2: Obtaining the CT Scan
Typical time: Several days to several weeks
The scan itself may take only minutes.
Scheduling it may take longer.
Potential variables include:
- Imaging-center availability
- Need for insurance authorization
- Travel
- Obtaining the correct scan protocol
- Access to a suitable medical CT or cone-beam CT facility
The scan should not be rushed if the imaging center cannot provide the required protocol.
Stage 3: DICOM Transfer and Scan Review
Typical time: One to several business days
After the scan is completed, the full DICOM data must be transferred to the surgeon, design team, or manufacturer.
The files must then be reviewed for:
- Slice thickness
- Anatomical coverage
- Motion
- Dental artifact
- File completeness
- Compatibility with design software
If the scan is inadequate, the process may stop at this stage.
Clinical Insight
The Fastest Scan Is Not the Fastest Path
A scan obtained quickly but performed incorrectly may need to be repeated.
Confirming the protocol before imaging is usually faster than correcting an unusable study afterward.
Stage 4: Segmentation and 3D Reconstruction
Typical time: Several days
The DICOM images are converted into a three-dimensional model of the facial skeleton.
This may take longer when the anatomy contains:
- Dental artifact
- Previous plates or screws
- Existing implants
- Thin orbital bone
- Bone defects
- Severe asymmetry
- Previous craniofacial surgery
Complex anatomy often requires more manual refinement.
Stage 5: Initial Implant Design
Typical time: Several days to approximately two weeks
The design team creates the first CAD proposal based on:
- The patient’s anatomy
- The surgeon’s instructions
- Planned dimensions
- Asymmetry analysis
- Surgical approach
- Implant material
The first design may include:
- Implant renderings
- Thickness maps
- Measurements
- Cross-sections
- Screw-hole options
- Right-left comparisons
This initial proposal is not usually ready for manufacturing.
Stage 6: Surgeon Review and Design Revisions
Typical time: Several days to several weeks
This stage is one of the most variable.
A simple implant may require only minor adjustments.
A complex design may require several revision cycles.
Each cycle generally includes:
- Surgeon review
- Written or visual revision instructions
- Engineer modification
- New design submission
- Repeat review
The timeline depends partly on how quickly each party responds.
Dr. Eppley’s Bottom Line
The design phase should be efficient, but not hurried. One thoughtful revision before manufacturing may prevent an avoidable surgical revision later.
Stage 7: Patient Review When Used
Typical time: Several days
Some surgeons involve patients in selected portions of design review.
The patient may review:
- Overall implant size
- Degree of augmentation
- Subtle versus stronger design options
- Areas of asymmetry correction
Patient review can improve communication, but it can also lengthen the process when:
- Goals are unclear
- Multiple family members are involved
- The patient repeatedly changes direction
- Reference images conflict with one another
- The patient attempts to interpret skeletal measurements without clinical context
The patient’s role is to clarify the desired appearance.
The surgeon’s role is to determine whether that goal can be translated safely into implant dimensions.
Stage 8: Final Approval and Design Lock
Typical time: One to several business days after the final revision
Once the design is accepted, it is formally approved.
The approved version becomes the manufacturing file.
At this point, the team should confirm:
- Correct patient
- Correct anatomical region
- Correct side
- Correct material
- Correct component count
- Correct design revision
- Correct fixation features
Manufacturing should not begin until the final version is clearly identified.
Stage 9: Manufacturing
Typical time: Often one to several weeks
Manufacturing time varies by material.
Silicone
Time may be required for:
- Mold preparation
- Material mixing
- Molding
- Curing
- Trimming
- Inspection
PEEK
Time may be required for:
- CNC programming
- Machining
- Tool changes
- Surface finishing
- Dimensional inspection
Porous Polyethylene
Time depends on:
- Proprietary processing
- Machining or forming
- Surface preservation
- Cleaning
Titanium
Time may be required for:
- Additive manufacturing setup
- Layer-by-layer production
- Removal of supports
- Heat treatment
- Machining
- Surface finishing
Complexity, rather than implant size alone, often determines production time.
Stage 10: Quality Control, Cleaning, and Packaging
Typical time: Several days
After production, the implant may undergo:
- Dimensional verification
- Visual inspection
- Fit testing
- Surface inspection
- Cleaning
- Drying
- Packaging
- Label verification
If a problem is identified, the device may need:
- Additional finishing
- Reinspection
- Remanufacturing
Quality-control time is not wasted time.
It is part of the process that makes the implant suitable for implantation.
Stage 11: Sterilization and Release
Typical time: Several days to several weeks
Sterilization can add substantial time because devices may be processed in scheduled batches.
The time may include:
- Transport to the sterilization facility
- Sterilization-cycle scheduling
- Processing
- Aeration when required
- Documentation review
- Final release
Ethylene oxide sterilization, for example, may require aeration after treatment.
The implant cannot be released simply because the sterilization exposure has ended.
Stage 12: Shipping and Surgical Verification
Typical time: Several days
Shipping time depends on:
- Distance
- Customs clearance
- Weather
- Carrier delays
- Holidays
- Destination facility
- Whether the device is being shipped internationally
The implant should arrive early enough for the surgical team to verify:
- Package integrity
- Patient labeling
- Correct implant
- Number of components
- Sterilization status
- Required instruments
Scheduling surgery for the same day the implant is expected to arrive creates unnecessary risk.
Clinical Insight
A Safe Surgery Date Includes a Time Buffer
The operation should not depend on every preceding step occurring without delay.
A reasonable buffer allows time to address:
- Shipping problems
- Packaging damage
- Labeling questions
- Missing components
- Last-minute quality concerns
What Can Delay the Custom Implant Process?
Delays can occur at almost any stage.
Some are preventable.
Others are unavoidable.
The most common causes include:
- Incorrect CT protocol
- Incomplete DICOM transfer
- Poor image quality
- Dental or metal artifact
- Complex anatomy
- Slow design feedback
- Repeated aesthetic changes
- Material availability
- Manufacturing backlog
- Quality-control failure
- Sterilization scheduling
- Packaging problems
- Shipping delays
- Changes in the patient’s health or surgical plan
Delay 1: The Wrong CT Scan
An incorrect scan is one of the most preventable delays.
Problems may include:
- Slices that are too thick
- Limited field of view
- Missing upper or lower anatomy
- Excessive movement
- Exported screenshots instead of DICOM files
- Incompatible file format
- Severe artifact
If the anatomy cannot be reconstructed accurately, the scan may need to be repeated.
Delay 2: Incomplete DICOM Files
A CT study may contain several image series.
The transferred folder may be missing:
- Part of the scan
- Thin-slice images
- Bone reconstruction series
- Orientation data
- Required metadata
A radiology report does not replace these files.
The design process cannot begin until the complete imaging data are available.
Delay 3: Previous Hardware or Existing Implants
Revision patients often have more complex imaging.
Existing plates, screws, or implants may:
- Create artifact
- Obscure the bone surface
- Distort automated segmentation
- Require special design accommodations
- Need planned removal
The design team may need additional information such as:
- Operative reports
- Implant type
- Hardware location
- Whether existing devices will remain in place
Delay 4: Unclear Patient Goals
The design cannot be completed efficiently if the desired result is not clear.
Examples include:
- Wanting a stronger jawline but fearing any increase in width
- Requesting a dramatic change while also wanting no visible difference
- Providing reference photographs with very different facial structures
- Changing from a masculine design to a narrow tapered design after several revisions
These are not necessarily unreasonable concerns.
They indicate that further discussion is needed before final dimensions are selected.
Dr. Eppley’s Bottom Line
The implant cannot solve an undefined problem. Clear aesthetic goals are one of the most important ways to prevent unnecessary design revisions.
Delay 5: Repeated Design Changes
Several revisions may be appropriate in a complex case.
However, repeated changes can extend the timeline when they involve:
- Reversing earlier decisions
- Comparing many nearly identical options
- Repeatedly changing maximum projection
- Adding new anatomical regions late in the process
- Changing implant material after the design is nearly complete
Every major change may require reassessment of:
- Surgical access
- Fixation
- Border design
- Manufacturing method
- Cost
- Delivery time
Delay 6: Changing the Surgical Plan
The implant design is based on a specific operation.
The process may need to restart if the plan changes from:
- Chin implant to total jawline implant
- Cheek implant to infraorbital-malar implant
- One-piece to multi-piece implant
- Silicone to PEEK
- Implant augmentation alone to simultaneous bone reduction
- Retaining existing hardware to removing it
Changing the procedure may be appropriate, but it affects the design.
Delay 7: Manufacturing or Material Availability
Custom devices may depend on:
- Specialized equipment
- Implant-grade material
- Trained personnel
- Validated production schedules
- Sterilization capacity
A delay may occur if:
- A material batch is unavailable
- Production equipment requires maintenance
- The manufacturer has a backlog
- A component fails inspection
- The selected manufacturing process must be repeated
Delay 8: Sterilization and Packaging
Even after the implant is physically complete, it may not be ready for surgery.
Delays may arise from:
- Sterilization batch schedules
- Extended aeration
- Failed packaging-seal inspection
- Damaged sterile barrier
- Incorrect labeling
- Documentation review
A visually perfect implant cannot be used if sterility or package integrity is uncertain.
Delay 9: Shipping and Customs
Internationally manufactured implants may require customs clearance.
Possible delays include:
- Missing documentation
- Import requirements
- Inspection holds
- Weather
- Carrier interruptions
- Holiday schedules
- Incorrect destination information
The farther the implant must travel, the more important the scheduling buffer becomes.
Delay 10: Changes in the Patient’s Medical Status
The implant may be ready while the patient is temporarily unable to undergo surgery.
Examples include:
- Illness
- Infection
- Dental abscess
- New medication
- Pregnancy
- Abnormal laboratory testing
- Failure to stop nicotine
- Need for medical clearance
The device can usually be stored according to the manufacturer’s instructions until surgery can be rescheduled, provided the packaging and shelf-life requirements remain acceptable.
What Can Go Wrong During Segmentation?
Segmentation errors occur when the digital skull does not accurately reproduce the patient’s anatomy.
Possible problems include:
- Thin bone mistakenly removed
- Metal artifact included as bone
- Small bone defects filled incorrectly
- Air spaces misinterpreted
- Existing implant surfaces confused with native bone
- Left-right anatomy mislabeled
If unnoticed, these errors can affect the implant’s inner surface.
Potential consequences include:
- Poor fit
- Rocking
- Incomplete seating
- Incorrect border position
- Asymmetry
“An error introduced during segmentation can be carried forward into the implant unless it is identified during design review.”
What Can Go Wrong During Design?
A technically accurate design can still be aesthetically or surgically inappropriate.
Potential design problems include:
- Excessive implant volume
- Insufficient augmentation
- Incorrect location of maximum projection
- Overly wide contours
- Abrupt edges
- Inadequate asymmetry correction
- Overcorrection
- Unsafe extension near nerves or tooth roots
- Inaccessible screw holes
- Implant dimensions incompatible with the incision
These problems are most safely corrected during digital review.
Overdesign
Overdesign means the implant creates more augmentation than is appropriate.
This can involve:
- Excessive chin projection
- Excessive jaw-angle width
- Too much vertical length
- Overfilled infraorbital rims
- An overly prominent forehead
- Excessive skull volume
Overdesign may result from focusing on the skeleton without adequately considering the soft-tissue response.
A design that looks moderate on a bare skull may appear much stronger after the skin and muscles are redraped over it.
Underdesign
Underdesign occurs when the implant is too small or limited to create the intended change.
Potential causes include:
- Excessive concern about size
- Failure to account for thick soft tissues
- Inadequate implant extension
- Treating only one part of a broader deficiency
- Overly conservative asymmetry correction
Underdesign may produce an accurate fit but an insufficient aesthetic result.
Clinical Insight
Perfect Fit Does Not Guarantee the Desired Appearance
An implant can fit the bone flawlessly and still be the wrong size or shape.
Fit is an engineering requirement.
Aesthetic effectiveness is a separate requirement.
Poor Edge Design
A central implant contour may be appropriate while its borders are not.
Poorly designed edges can create:
- Palpable transitions
- Visible step-offs
- Localized fullness
- Soft-tissue tenting
- Difficulty closing the incision
- Implant show in thin tissues
Edge problems are particularly important over:
- Infraorbital rim
- Zygomatic arch
- Forehead
- Chin border
- Thin scalp regions
Poor Screw Planning
Fixation problems may occur when:
- Screw holes are inaccessible
- The planned angle points toward a nerve or tooth root
- Bone is too thin
- The implant is too thin at the fixation site
- Screw heads are too prominent
- Fixation fails to control rotation
A screw hole that appears ideal on a computer may not be reachable through the incision.
Surgical access must be considered during design.
What Can Go Wrong During Manufacturing?
Even when the design is correct, manufacturing defects can occur.
Potential problems include:
- Dimensional inaccuracy
- Distortion
- Surface defects
- Bubbles or voids
- Cracks
- Tears
- Sharp edges
- Incomplete machining
- Loose particles
- Incorrect screw-hole location
- Wrong material
- Wrong component count
- Incorrect laterality
This is why finished devices require inspection rather than assuming that digital manufacturing is error-free.
Material-Specific Manufacturing Problems
Silicone
Potential problems include:
- Air bubbles
- Incomplete curing
- Mold-line irregularities
- Tearing at very thin borders
- Distortion during removal from the mold
- Surface contamination
PEEK
Potential problems include:
- Machining burrs
- Tool marks
- Incomplete access to deep contours
- Warping
- Incorrect fixation holes
- Sharp edges
Porous Polyethylene
Potential problems include:
- Loose particles
- Damaged porosity
- Irregular borders
- Surface contamination
- Difficulty reproducing very thin tapers
Titanium
Potential problems include:
- Residual supports
- Partially fused powder
- Surface roughness
- Thermal distortion
- Incomplete post-processing
- Incorrect screw-hole finishing
What Can Go Wrong During Quality Control?
Quality control can fail when:
- The wrong design revision is inspected
- Measurements are taken at the wrong locations
- A small component is overlooked
- Right and left parts are mislabeled
- A visual defect is missed
- Package labels do not match the device
- The inspection method is not appropriate for the geometry
Multiple checks reduce risk but cannot make the process completely error-free.
The surgical team provides another layer of verification before implantation.
What Can Go Wrong During Cleaning or Sterilization?
Potential problems include:
- Residual manufacturing debris
- Incomplete cleaning
- Incompatible sterilization method
- Material damage
- Inadequate aeration
- Packaging seal failure
- Sterile barrier damage
- Incorrect sterilization documentation
A device may need to be reprocessed or remanufactured if its cleanliness or sterility cannot be confirmed.
What Can Go Wrong During Shipping?
Shipping-related problems include:
- Crushed packaging
- Punctured sterile pouch
- Lost shipment
- Delayed delivery
- Exposure to improper storage conditions
- Missing component
- Incorrect surgical-facility address
Even when the implant itself appears intact, damaged packaging may compromise sterility.
How Are Errors Usually Detected?
Errors may be identified during:
- Scan review
- Segmentation inspection
- Surgeon CAD review
- Patient design discussion
- Manufacturing file verification
- Dimensional inspection
- Visual quality control
- Fit testing
- Packaging inspection
- Surgical-facility intake
- Final sterile-field inspection
The earlier an error is found, the easier it is to correct.
Dr. Eppley’s Bottom Line
Custom implant safety does not depend on one perfect step. It depends on multiple opportunities to identify and correct a problem before the device is implanted.
What Happens if a Problem Is Found Before Surgery?
The response depends on the problem.
Possible actions include:
- Correcting the digital model
- Revising the design
- Repeating segmentation
- Remanufacturing the implant
- Repackaging
- Resterilizing
- Obtaining a new CT scan
- Delaying surgery
A delay may be disappointing, but it is often the safest choice when:
- Implant identity is uncertain
- Fit is questionable
- Packaging is damaged
- Sterility cannot be confirmed
- The wrong design version was manufactured
- A structural defect is present
What Happens if a Problem Is Found During Surgery?
The surgeon must determine whether the issue involves:
- Incomplete exposure
- Soft tissue beneath the implant
- Incorrect orientation
- Scar tissue
- Changed bone anatomy
- Design mismatch
- Manufacturing defect
Possible responses include:
- Expanding the surgical exposure
- Reorienting the implant
- Removing obstructing scar tissue
- Making a minor adjustment when safe
- Using alternative fixation
- Abandoning implantation
The implant should not be forced into place merely because it is custom-made.
Clinical Insight
“Custom” Does Not Mean It Must Be Used
A patient-specific implant is created for one patient, but that does not make implantation obligatory.
If the device cannot be placed safely or does not match the anatomy, the correct decision may be not to use it.
Can a Custom Implant Be Remade?
Yes.
An implant may be remade because of:
- Design changes
- Manufacturing defects
- Package damage
- Loss of sterility
- New CT anatomy
- Change in surgical plan
- Loss or shipping damage
Remaking the implant adds time and expense, but it may be necessary to protect the final result.
Does a Delay Affect the Implant’s Accuracy?
Time alone does not usually change the skeletal fit.
The implant should remain accurate if:
- The patient’s bone has not changed
- No intervening facial surgery has occurred
- No significant trauma has occurred
- The implant has been stored correctly
- Packaging remains intact
- Shelf-life requirements are met
Soft-tissue weight changes may alter the visible result, but they do not usually change the bone-contacting surface.
When Is a New CT Scan Needed?
A new CT scan may be required when:
- The original scan is unusable
- The skeleton has changed
- Another bone procedure was performed
- Major facial trauma occurred
- Existing hardware was removed or changed
- A long interval has passed in a growing patient
- The implant design is being expanded to an area not included in the original scan
A repeat scan is not routinely necessary merely because several months have passed in a skeletally mature adult.
How Patients Can Help Prevent Delays
Patients can support an efficient process by:
- Confirming the CT protocol before imaging
- Obtaining the full DICOM files
- Providing accurate surgical history
- Supplying previous operative reports when available
- Clearly explaining their goals
- Responding promptly to design questions
- Avoiding repeated changes after approval
- Informing the surgeon of new dental or facial procedures
- Completing medical clearance early
- Avoiding nicotine as directed
- Keeping the surgical team informed of health changes
A Practical Planning Timeline
Patients should think of the process in three broad phases.
Phase 1: Information Gathering
- Consultation
- Photographs
- CT scan
- Previous records
- Goal clarification
Phase 2: Design
- Segmentation
- Initial CAD model
- Surgeon review
- Revisions
- Final approval
Phase 3: Production
- Manufacturing
- Quality control
- Cleaning
- Sterilization
- Packaging
- Shipping
- Preoperative verification
Surgery should be scheduled with enough time for all three phases to occur properly.
The Complete Custom Implant Timeline
Consultation
→ CT scan
→ 3D reconstruction
→ Initial design
→ Revisions
→ Approval
→ Manufacturing
→ Quality control
→ Sterilization
→ Shipping
→ Surgery
“The complete process includes clinical planning, digital design, physical production, and preoperative verification.”
Why the Process Cannot Be Completely Automated
Software can assist with:
- Bone segmentation
- Measurements
- Mirroring
- Surface comparison
- Implant modeling
- Manufacturing file generation
It cannot independently determine:
- The patient’s preferred degree of change
- Whether an asymmetry is clinically important
- How soft tissues will respond
- Whether the implant can be inserted through the planned incision
- Whether the result will appear natural
- When a design is too aggressive
Automation improves efficiency.
It does not eliminate the need for surgeon oversight.
Dr. Eppley’s Bottom Line
The most time-consuming part of custom implant creation is not drawing the implant. It is making the series of judgments that determine whether the implant is appropriate for the patient.
Is a Longer Timeline a Sign of a Problem?
Not necessarily.
A longer process may reflect:
- Complex anatomy
- Multiple implant regions
- Revision surgery
- Significant asymmetry
- Extensive hardware
- Careful refinement
- Specialized manufacturing
- International shipping
However, repeated delays without clear explanation should be investigated.
The patient should understand:
- Which stage the implant is in
- What remains to be completed
- Whether a problem has been identified
- Whether the surgery date remains realistic
When Should Surgery Be Scheduled?
There are two common approaches.
Scheduling Before Manufacturing Is Complete
Advantages:
- Reserves the operating-room date
- Helps coordinate travel
- Creates a planning target
Disadvantages:
- Surgery may need to be postponed
- Manufacturing pressure may increase
- Shipping delays become more consequential
Scheduling After the Implant Arrives
Advantages:
- Confirms the device is available
- Reduces cancellation risk
- Allows package verification
Disadvantages:
- May extend the overall timeline
- Operating-room availability may be limited
Many practices use a hybrid approach by selecting a provisional date with enough production buffer.
What Patients Should Be Told About Timing
Patients should understand that:
- Timelines are estimates
- Design revisions may extend the process
- Manufacturing does not begin until approval
- Sterilization and shipping take additional time
- The surgery date may change if the implant is not ready
- Safety should take priority over travel convenience
Clear expectations reduce frustration and prevent pressure to approve a design prematurely.
Key Takeaways
- The custom implant process usually takes several weeks because it includes imaging, design, revision, manufacturing, quality control, sterilization, and shipping.
- Manufacturing is only one part of the total timeline.
- The most common preventable delay is an inadequate CT scan or incomplete DICOM transfer.
- Complex anatomy, previous hardware, unclear goals, and repeated design changes can extend planning.
- Material choice influences manufacturing and sterilization time.
- Problems can occur during segmentation, design, production, cleaning, packaging, or shipping.
- A custom implant may fit accurately but still be aesthetically underdesigned or overdesigned.
- Multiple quality checks are used to identify errors before surgery.
- A questionable implant should not be used merely to preserve the scheduled operation.
- Delaying surgery is sometimes the safest and most appropriate decision.
- Patients can help prevent delays by obtaining correct imaging, providing complete records, clarifying their goals, and responding promptly during design review.
Dr. Eppley’s Bottom Line
The goal is not to create a custom implant as quickly as possible. The goal is to create the correct implant, verify it at every stage, and have it safely available before the operation begins.
How Are Custom Facial Implants Made from a 3D CT Scan?
Part 7: Dr. Eppley’s Clinical Pearls, Frequently Asked Questions, Key Takeaways, and Final Perspective
Dr. Eppley’s Clinical Pearls
After designing thousands of patient-specific facial implants over more than three decades, several principles consistently emerge. While the technology has evolved dramatically—from hand-carved silicone implants to sophisticated CAD/CAM engineering—the underlying concepts that produce successful outcomes have remained remarkably constant.
The following are the principles that I believe matter most.
Clinical Pearl #1
The CT Scan Is the Beginning—Not the Design
Patients often believe that obtaining a CT scan is the difficult part of the process.
It is actually the easiest.
The CT simply captures anatomy.
The real work begins after the scan is completed.
A beautifully performed CT scan can still produce a poor implant if the design decisions are incorrect.
Conversely, outstanding implant design cannot compensate for inadequate imaging.
Both are essential.
Clinical Pearl #2
Every Millimeter Matters
Patients frequently ask if one or two millimeters really make a difference.
The answer is yes.
A one-millimeter change on the computer may seem insignificant.
On the face, however, that same change may alter:
- Chin projection
- Jawline definition
- Cheek prominence
- Lower eyelid support
- Forehead contour
Precision matters because the human eye is remarkably sensitive to facial contour.
Clinical Pearl #3
Implant Shape Is More Important Than Implant Size
Patients often focus on one number:
“How many millimeters thick will my implant be?”
That question is understandable but incomplete.
Two implants with identical maximum thicknesses may produce dramatically different appearances depending on:
- Surface contour
- Border design
- Width
- Height
- Transition zones
The overall shape—not the maximum thickness—is what creates a natural result.
Clinical Pearl #4
The Borders Are Just As Important As the Center
The thickest portion of the implant creates the visible augmentation.
The borders determine whether that augmentation looks natural.
Most revisions for contour irregularities occur because an implant ends too abruptly rather than because it is too thick.
The implant should gradually become part of the skeleton rather than appearing to sit on top of it.
Clinical Pearl #5
Symmetry Is Not the Goal
No human skull is perfectly symmetrical.
Attempting to eliminate every measurable asymmetry usually produces unnecessary surgery without improving appearance.
The objective is facial balance.
A balanced face often contains measurable asymmetry.
A mathematically symmetrical face may still look unnatural.
Clinical Pearl #6
The Soft Tissue Determines What People Actually See
Patients do not see their skeleton.
They see skin, muscle, fat, and facial expression.
Every implant is placed beneath these tissues.
This is why the implant cannot simply copy the bone.
The surgeon must anticipate how the soft tissues will respond to the new skeletal foundation.
Clinical Pearl #7
Bigger Is Not Better
One of the greatest advantages of custom implants is the ability to make precise improvements.
That precision should not be confused with the opportunity to make unlimited enlargement.
Most patients benefit more from proportion than from size.
The most successful implant is usually the one that people notice the least.
Clinical Pearl #8
Custom Does Not Mean Complicated
Patients sometimes assume that a custom implant is inherently more risky because it is more sophisticated.
In reality, the opposite is often true.
When properly designed, a patient-specific implant typically:
- Fits more accurately
- Requires less intraoperative modification
- Seats more predictably
- Produces smoother contour transitions
- Improves positioning accuracy
Complexity exists primarily during planning—not during surgery.
Clinical Pearl #9
The Design Process Prevents Revision Surgery
Many patients think revisions occur because something went wrong during the operation.
More commonly, revisions occur because an implant was never ideally designed in the first place.
The digital planning process allows these issues to be recognized before surgery.
Every thoughtful revision on the computer reduces the likelihood of a revision in the operating room.
Clinical Pearl #10
Technology Has Improved Implant Design—It Has Not Replaced Surgical Judgment
Artificial intelligence, CAD software, three-dimensional imaging, and digital manufacturing have transformed facial implant surgery.
None of these technologies decide:
- What is attractive
- How much augmentation is appropriate
- Which asymmetry should remain
- How soft tissues will respond
- When enough is enough
Technology improves precision.
Experience determines how that precision should be used.
Frequently Asked Questions
Can a CT scan automatically design my implant?
No.
A CT scan provides the anatomy.
The implant design is created afterward using the patient’s anatomy, photographs, aesthetic goals, and surgical judgment.
Is every custom implant unique?
Yes.
Every patient has a different facial skeleton.
Even patients with similar concerns rarely require identical implant designs.
Can AI design my implant?
Artificial intelligence can assist with measurements, segmentation, and image analysis.
At present, it cannot independently determine the ideal facial proportions, implant dimensions, or aesthetic goals for an individual patient.
AI is becoming an increasingly valuable planning tool, but it does not replace surgeon-directed design.
Can I see the implant before surgery?
Usually yes.
Most manufacturers provide three-dimensional renderings that allow the surgeon—and often the patient—to review the proposed implant before manufacturing begins.
Can I request design changes?
Yes.
Minor changes are often made during the review process before final approval.
Once manufacturing begins, however, significant changes usually require a new design and a new implant.
How accurate is a custom implant?
When based on a high-quality CT scan and properly manufactured, custom implants generally reproduce the approved digital design with a high degree of accuracy.
The visible result, however, still depends on how the soft tissues heal over the implant.
Why can’t the implant simply copy the opposite side of my face?
Because the opposite side may not be ideal.
Mirror imaging is an excellent measurement tool, but facial harmony often requires thoughtful modification rather than exact duplication.
What happens if I have facial asymmetry?
The implant can be designed with different dimensions on each side.
This is one of the greatest advantages of custom implants over standard implants.
Which material is the most accurate?
Accuracy depends more on:
- The CT scan
- Implant design
- Manufacturing quality
- Surgical placement
than on the material itself.
Silicone, PEEK, porous polyethylene, and titanium can all produce highly accurate patient-specific implants when used appropriately.
How many design revisions are normal?
There is no fixed number.
Some implants require no revisions.
Others undergo several rounds of refinement.
The goal is not to minimize revisions.
The goal is to finalize the best possible design before manufacturing.
Can the implant be changed during surgery?
Minor adjustments are sometimes possible, particularly with silicone implants.
The purpose of custom design, however, is to minimize the need for intraoperative modification.
What is the biggest cause of problems?
In my experience, the greatest source of problems is not manufacturing.
It is inadequate planning.
Most significant issues can be prevented through careful imaging, thoughtful design, and thorough review before surgery.
Key Takeaways
- A custom facial implant begins with a high-quality three-dimensional CT scan but is created through a series of design decisions rather than automatically generated by software.
- DICOM imaging allows the patient’s facial skeleton to be reconstructed, measured, and analyzed with remarkable precision.
- CAD software provides the tools to create a patient-specific implant, but the surgeon determines its shape, dimensions, and intended aesthetic effect.
- Implant design requires balancing projection, width, height, contour, asymmetry correction, surgical access, fixation, and long-term facial harmony.
- Different implant materials require different manufacturing techniques, quality-control processes, and sterilization methods.
- Every implant undergoes multiple stages of review before surgery, including design approval, manufacturing inspection, cleaning, sterilization, and preoperative verification.
- The entire process typically requires several weeks because careful planning is more important than rapid production.
- The most successful custom implants are rarely the largest—they are the ones that most naturally restore facial proportion and balance.
- Technology has dramatically improved precision, but it has not replaced surgical experience, aesthetic judgment, or individualized treatment planning.
Final Perspective
When patients first hear the term custom facial implant, they often imagine a piece of medical technology created by a computer.
That description is only partly correct.
The computer provides extraordinary precision.
It reconstructs the skeleton, performs complex measurements, generates engineering models, and helps manufacture an implant capable of fitting a single patient’s anatomy with remarkable accuracy.
But the computer does not decide what your face should look like.
Every meaningful decision still depends on the surgeon.
The surgeon determines where augmentation is needed, how much change is appropriate, which asymmetries should be corrected, where the implant should begin and end, how it will be inserted, how it will be secured, and how the final result should appear through the overlying soft tissues.
In other words, technology supplies the tools.
Experience supplies the judgment.
That distinction is what separates a custom-made implant from a truly custom-designed implant.
After more than three decades of designing patient-specific facial implants, I have become increasingly convinced that the future of facial skeletal augmentation will continue to become more digital, more precise, and more individualized. Artificial intelligence will improve segmentation, automate measurements, assist with surgical simulation, and streamline portions of the design process. Manufacturing will become faster, more accurate, and capable of creating increasingly sophisticated implant geometries.
What I do not believe will change is the importance of understanding facial aesthetics.
The most successful custom facial implant is not the one with the most advanced software behind it.
It is the one that improves facial harmony so naturally that it appears the patient was born with it.
Dr. Eppley’s Final Bottom Line
A custom facial implant is far more than a manufactured medical device. It is the physical result of a carefully planned sequence that combines advanced imaging, digital engineering, surgical anatomy, facial aesthetics, and clinical judgment into a single patient-specific solution. When every step is performed thoughtfully, the implant becomes more than a precise fit—it becomes the right fit.
CORNERSTONE ARTICLE #3
Custom Facial Implant Design Principles: How Patient-Specific Facial Implants Are Designed
The Philosophy of Custom Facial Implant Design
Quick Answer
Custom facial implant design is the process of creating a patient-specific implant that restores facial balance by changing the underlying skeleton rather than simply adding volume. Successful design combines anatomy, aesthetics, engineering, biomechanics, and surgical planning. While computer software provides extraordinary precision, the surgeon determines what changes should be made, how much augmentation is appropriate, and how those changes will ultimately appear beneath the soft tissues.
Quick Facts
- Every custom implant begins with a three-dimensional CT scan.
- Implant design is based on skeletal anatomy, not photographs alone.
- The goal is facial harmony—not simply making one feature larger.
- A custom implant is designed around nerves, muscles, blood vessels, and surgical access.
- Implant shape is generally more important than maximum thickness.
- Small differences of one or two millimeters can significantly change the final appearance.
- Most custom implants undergo several design revisions before manufacturing.
- The best custom implant is usually the one that looks like it has always belonged to the patient’s face.
Part 1 Why Design Matters More Than Manufacturing
Patients are often fascinated by how custom implants are manufactured.
They want to know about:
- 3D printing
- CAD software
- Computer engineering
- Medical-grade materials
- CNC milling
- Silicone molding
These technologies are impressive.
But they are not what determines whether an implant will produce an outstanding result.
The quality of the design determines the quality of the outcome.
Manufacturing simply reproduces that design.
If the design is excellent, modern manufacturing can reproduce it with remarkable accuracy.
If the design is poor, manufacturing will faithfully create a poor implant.
Technology does not improve an incorrect design.
It merely reproduces it.
Dr. Eppley’s Bottom Line
The most sophisticated manufacturing process in the world cannot improve an implant that was designed incorrectly. The success of a custom implant begins with design—not production.
Designing an Implant Is Not the Same as Making It Fit
Many patients assume that designing a custom implant simply means creating a device that perfectly matches the surface of their skull.
That is only one part of the process.
The inner surface of the implant should fit the bone precisely.
The outer surface, however, is entirely different.
The outer surface is where the surgeon decides:
- how much projection to create
- where the augmentation begins
- where it ends
- how rapidly it transitions
- which areas remain untouched
- how the final contour will appear through the overlying soft tissues
In other words, only half of every implant is dictated by anatomy.
The other half is determined by design.
“The inner surface reproduces the patient’s anatomy. The outer surface creates the desired appearance.”
Implant Design Begins With Understanding the Skeleton
Every visible facial feature is supported by bone.
The chin rests on the mandibular symphysis.
The cheek follows the zygoma.
The forehead follows the frontal bone.
The jawline reflects the shape of the mandible.
When the skeleton lacks projection, width, or contour, the soft tissues simply drape over that deficiency.
For this reason, custom implant design always begins by understanding the skeleton rather than the skin.
A patient may complain of:
- a weak jawline
- flat cheeks
- deep under-eye hollows
- a sloping forehead
- poor facial balance
These concerns are visible in the soft tissues.
Their underlying cause is often skeletal.
The implant is designed to correct that skeletal foundation.
Why Photographs Alone Are Not Enough
Photographs are indispensable.
They show:
- facial proportions
- symmetry
- expression
- skin thickness
- aging
- soft tissue volume
But photographs cannot show:
- bone thickness
- skeletal asymmetry
- facial width beneath soft tissue
- nerve pathways
- sinus anatomy
- implant fit
That information comes only from CT imaging.
Successful design requires both.
Photographs explain what the face looks like.
CT explains why.
Clinical Insight
The Face Is Seen From the Outside—But Designed From the Inside
Patients judge appearance by looking in a mirror.
Surgeons design implants by understanding the skeleton beneath that mirror image.
The challenge is connecting those two perspectives.
The Four Pillars of Custom Implant Design
Every successful custom implant rests on four equally important disciplines.
Anatomy
Understanding:
- bone shape
- facial proportions
- asymmetry
- nerves
- muscles
- blood vessels
- sinuses
- tooth roots
Without anatomy, the implant cannot fit safely.
Aesthetics
Understanding:
- masculine versus feminine characteristics
- proportion
- contour
- harmony
- balance
- age
- ethnicity
- facial identity
Without aesthetics, an implant may fit perfectly but still look unnatural.
Engineering
Understanding:
- CAD software
- implant thickness
- border transitions
- fixation
- manufacturing limitations
- material properties
Without engineering, a beautiful design may not be manufacturable.
Surgery
Understanding:
- incision placement
- insertion pathway
- implant flexibility
- screw fixation
- tissue handling
- healing
- revision surgery
Without surgical planning, an excellent implant may never reach its intended position.
Dr. Eppley’s Bottom Line
A custom implant succeeds only when anatomy, aesthetics, engineering, and surgery work together. Weakness in any one of these areas limits the final result.
The Four Goals of Every Custom Implant
Although every patient is unique, every implant I design attempts to accomplish four fundamental objectives.
Goal One: Correct the Skeletal Deficiency
The first goal is straightforward.
The implant should correct the underlying anatomical deficiency.
This may involve:
- increasing projection
- restoring width
- lengthening a contour
- filling a depression
- correcting asymmetry
- recreating missing bone
The implant should solve the structural problem that cannot be corrected by soft-tissue procedures alone.
Goal Two: Maintain Facial Harmony
Correcting one feature is not enough.
Every facial region interacts with the others.
Increasing chin projection changes jawline balance.
Increasing cheek projection changes lower-eyelid appearance.
Widening the forehead changes the apparent width of the face.
The implant should improve the entire face—not simply one isolated feature.
Goal Three: Preserve Natural Appearance
Patients rarely want people to notice that they had an implant.
They want people to notice that they look better.
The distinction is important.
Natural results depend upon:
- smooth transitions
- correct proportions
- appropriate dimensions
- respecting normal anatomy
A successful implant should appear as though it belongs to the patient’s skeleton.
Goal Four: Produce Long-Term Stability
The implant must remain stable over decades.
That means considering:
- fixation
- tissue coverage
- material properties
- implant thickness
- border design
- resistance to movement
A beautiful design that cannot remain stable is not a successful design.
Why Facial Harmony Is More Important Than Individual Features
One of the most common misconceptions in facial aesthetics is that improving one feature automatically improves the face.
It does not.
Facial attractiveness depends on relationships.
For example:
A stronger chin may improve:
- neck definition
- lip balance
- jawline appearance
- facial profile
A wider jaw may require:
- greater chin width
- cheek modification
- forehead balance
Increasing cheek projection may require:
- infraorbital support
- adjustment of the zygomatic arch
- preservation of lower-eyelid contour
No facial feature exists in isolation.
Every design decision affects another part of the face.
Clinical Insight
Faces Are Networks, Not Individual Parts
The face should never be designed one implant at a time.
It should be designed as a complete three-dimensional composition in which every region influences the next.
Custom Design Is About Proportion—Not Size
Patients frequently ask:
“How big will my implant be?”
I often answer with another question:
“Compared to what?”
Size alone has little meaning.
An 8-millimeter implant may appear dramatic in one patient and subtle in another.
The visible effect depends on:
- facial width
- bone shape
- soft tissue thickness
- neighboring structures
- facial proportions
Designing by millimeters alone is like designing a house by the length of a single wall.
The relationship of all the dimensions is what matters.
Dr. Eppley’s Bottom Line
The objective of custom implant design is not to create a larger face. It is to create a more balanced one.
Design Is a Process of Elimination
Many patients imagine implant design as adding material until the face looks stronger.
In reality, much of the process involves deciding what not to change.
Good design requires restraint.
Questions I routinely ask include:
- Should this border extend farther?
- Would another two millimeters improve the result—or make it obvious?
- Should this asymmetry be corrected, or is it part of the patient’s natural appearance?
- Will changing this region create imbalance elsewhere?
- Can this implant be inserted safely?
Every implant becomes better by answering these questions.
Not by making it larger.
The Difference Between an Engineer and a Surgeon
An engineer can create an implant that fits the skull with extraordinary precision.
A surgeon must decide whether that implant should exist at all.
The engineer answers:
Can this be made?
The surgeon answers:
Should it be made?
Those are entirely different questions.
The best custom facial implants emerge when engineering precision is guided by clinical judgment.
Key Takeaways
- Custom implant design is fundamentally different from implant manufacturing.
- The inner surface of the implant is dictated by anatomy; the outer surface is determined by aesthetic design.
- Successful implants are based on four disciplines: anatomy, aesthetics, engineering, and surgery.
- Every implant should correct a skeletal deficiency while preserving overall facial harmony.
- Natural results depend more on proportion and contour than on implant size.
- Every design decision influences adjacent facial regions.
- The best implant is one that improves the face without drawing attention to itself.
- Technology provides precision, but surgical judgment determines how that precision is used.
Dr. Eppley’s Bottom Line
A custom facial implant is not simply a device that fits the skeleton. It is a carefully designed extension of the skeleton that must improve facial balance while respecting anatomy, aesthetics, surgical realities, and long-term stability.
Custom Facial Implant Design Principles: How Patient-Specific Facial Implants Are Designed
Part 2: The Twelve Fundamental Principles of Custom Facial Implant Design
Every successful custom facial implant is built upon a series of design principles rather than a collection of measurements.
The software measures.
The CT scan visualizes.
The manufacturer fabricates.
But none of those technologies determines what makes an implant aesthetically successful.
That comes from applying consistent design principles.
After designing thousands of custom facial implants over the past three decades, I have found that every successful implant follows the same fundamental concepts regardless of whether it is designed for the forehead, cheekbones, jawline, chin, orbit, or skull.
These principles form the foundation of every implant I create.
Principle 1
Design the Skeleton—Not the Skin
Perhaps the most important concept in custom implant surgery is understanding what the implant is intended to change.
The implant is not placed beneath the skin to push outward like a filler.
It is placed directly on bone to change the architecture of the facial skeleton.
Everything else follows.
When patients look in the mirror they naturally focus on the skin.
They notice:
- hollow cheeks
- a weak jawline
- flat cheekbones
- a recessed chin
- a sloping forehead
These are soft-tissue observations.
Their origin, however, is often skeletal.
The implant changes the skeletal framework, allowing the overlying tissues to assume a new position.
This is why implants generally create more natural and permanent changes than simply adding soft tissue volume.
Clinical Example
A patient complains of heavy jowls.
Closer evaluation demonstrates that the real problem is inadequate mandibular projection.
By strengthening the jawline skeleton, the soft tissues become better supported, often improving the jawline without removing any skin.
The implant treats the cause—not simply the appearance.
Dr. Eppley’s Bottom Line
The skin displays the problem. The skeleton usually creates it.
Principle 2
Restore Proportion Rather Than Add Size
Patients frequently ask:
“How much bigger will this make my face?”
That question assumes enlargement is the goal.
It is not.
The goal is proportion.
Facial attractiveness is based on relationships between structures.
Examples include:
- chin projection relative to the nose
- jaw width relative to facial width
- forehead projection relative to the brow
- cheek prominence relative to the lower face
- orbital support relative to the globe
A patient rarely benefits from making one feature dramatically larger.
Instead, they benefit when multiple facial proportions become more balanced.
Sometimes that requires only a few millimeters of augmentation.
“Successful implant design restores proportion—not maximum size.”
Clinical Insight
Bigger Can Actually Make the Face Look Smaller
Overly enlarging one facial structure often exaggerates the deficiency of adjacent regions.
A very wide jawline can make a narrow forehead appear even narrower.
A prominent chin may make a weak midface appear flatter.
Every design decision changes how the rest of the face is perceived.
Principle 3
Every Millimeter Matters
Custom implants are designed in millimeters.
Patients often underestimate how meaningful these measurements are.
A one-millimeter adjustment can change:
- chin projection
- lip support
- lower facial width
- cheek contour
- brow prominence
A two-millimeter border adjustment may eliminate an otherwise visible contour transition.
Conversely, an unnecessary two-millimeter increase may produce an unnatural appearance.
The face is remarkably sensitive to small contour changes.
Clinical Example
An infraorbital implant increased from 5 mm to 7 mm does not simply become “40% larger.”
It changes:
- lower eyelid support
- cheek projection
- orbital vector
- light reflection
- shadow formation
The visible effect is often much greater than the numerical difference suggests.
Dr. Eppley’s Bottom Line
In facial implant design, millimeters are not small numbers—they are major aesthetic decisions.
Principle 4
Shape Is More Important Than Thickness
Patients often focus on the maximum thickness of an implant.
They ask:
“How thick will my jaw implant be?”
The better question is:
“What shape will it create?”
Two implants measuring 8 millimeters thick may appear completely different.
One may have:
- broad distribution
- smooth taper
- rounded transitions
The other may concentrate all of its thickness into a small area.
Although their maximum measurement is identical, their appearance is not.
Shape determines:
- contour
- facial character
- masculinity
- femininity
- naturalness
Thickness is simply one component of shape.
“Maximum thickness does not determine appearance. Surface shape does.”
Principle 5
The Borders Matter as Much as the Center
Patients usually look at the thickest portion of the implant.
Surgeons spend just as much time evaluating its edges.
Why?
Because the borders determine whether the implant blends naturally into the surrounding skeleton.
Abrupt edges create:
- visible transitions
- palpable ridges
- contour irregularities
- unnatural shadows
Properly designed borders become progressively thinner until they disappear into the surrounding bone.
The goal is to eliminate any obvious beginning or ending of the implant.
Clinical Example
A forehead implant may have perfect central projection.
If its temporal borders stop too abruptly, the implant becomes visible despite an otherwise excellent design.
Extending and feathering those borders often creates a much more natural appearance without changing the central thickness.
Clinical Insight
The Center Creates the Change. The Borders Hide the Change.
Patients notice augmentation.
They should never notice where the implant begins or ends.
Principle 6
Facial Harmony Is More Important Than Perfect Symmetry
One of the greatest misconceptions in facial aesthetics is that symmetry equals beauty.
It does not.
Every human face contains asymmetry.
Even fashion models demonstrate measurable skeletal differences between the right and left sides.
Attempting to eliminate every asymmetry often creates overcorrection.
Instead, the objective is harmony.
Harmony means the face appears balanced despite small anatomical differences.
Sometimes this requires:
- asymmetric implants
- different projection on each side
- different border lengths
- different implant widths
Ironically, symmetrical implants often preserve asymmetry because they are placed on asymmetrical skeletons.
Dr. Eppley’s Bottom Line
Symmetrical implants do not necessarily create symmetrical faces.
Principle 7
Design Must Respect Soft Tissue Behavior
Implants change bone.
Patients see skin.
Between those two layers lies:
- muscle
- fat
- fascia
- ligaments
- periosteum
These tissues influence how skeletal augmentation becomes visible.
For example:
Thin soft tissue usually displays implant definition more readily.
Thick soft tissue often masks subtle skeletal augmentation.
This explains why identical implants may produce very different appearances in different patients.
Design must account for the tissues that ultimately cover the implant.
Clinical Example
A patient with thick facial soft tissue often requires broader augmentation to achieve the same visible change produced by a smaller implant in a thin-faced patient.
The implant is designed differently—not because the skeleton differs dramatically, but because the overlying tissues do.
Principle 8
Every Implant Must Have a Purpose
Every portion of a custom implant should solve a specific anatomical problem.
There should never be “extra” implant simply because space exists.
Each extension should answer a question such as:
- What deficiency does this correct?
- What contour does this improve?
- Why does this border extend here?
- What purpose does this projection serve?
If a portion of the implant has no clear purpose, it probably should not exist.
Purpose creates efficiency.
Efficiency creates naturalness.
Clinical Insight
Every Millimeter Should Earn Its Place
One of the easiest ways to overdesign an implant is to add volume without a specific anatomical objective.
Successful implants are intentional.
Principle 9
Bigger Is Not Better
This principle deserves repeating because it is perhaps the most common misconception regarding facial implants.
Patients often equate:
larger implant = better result
Experience teaches otherwise.
Oversized implants may produce:
- loss of natural appearance
- imbalance
- excessive prominence
- difficult revisions
- patient dissatisfaction
Most revision surgery involves implants that were too large rather than too small.
A subtle improvement maintained over decades is usually preferable to an aggressive augmentation that quickly appears unnatural.
Dr. Eppley’s Bottom Line
Natural facial architecture almost always wins over exaggerated skeletal enlargement.
Principle 10
Design Around Anatomy—Not Through It
The skeleton contains numerous structures that must be respected.
These include:
- mental nerve
- infraorbital nerve
- inferior alveolar nerve
- frontal sinus
- tooth roots
- maxillary sinus
- orbital contents
- previous plates and screws
The implant should accommodate these structures rather than forcing them to accommodate the implant.
Sometimes that means:
- altering border location
- changing screw position
- reducing thickness
- dividing the implant into sections
Safety always takes precedence over idealized geometry.
“Successful implant design incorporates anatomical limitations rather than ignoring them.”
Principle 11
Design for Surgical Placement
A beautiful implant that cannot be inserted safely is a failed design.
Every implant must be evaluated not only in its final position but also during placement.
Questions include:
- Can it pass through the planned incision?
- Can it rotate into position?
- Will surrounding tissues permit insertion?
- Can fixation be performed safely?
- Is a one-piece implant practical?
Sometimes a multi-piece implant produces the same final contour while making surgery substantially easier.
Design should always anticipate the operation.
Clinical Insight
The Computer Never Performs the Surgery
An implant exists first as a digital object.
Eventually it must become a physical object that passes through living tissues.
Successful design anticipates that transition.
Principle 12
Design for Long-Term Stability
The operation lasts a few hours.
The implant should last decades.
Long-term success depends upon:
- stable fixation
- adequate tissue coverage
- proper material selection
- smooth borders
- appropriate implant thickness
- resistance to movement
An implant should be evaluated not only for how it looks immediately after placement but also for how it will behave years later.
Durability is part of good design.
Dr. Eppley’s Bottom Line
The best custom implant is one that still looks appropriate twenty years after surgery.
The Eppley Principles of Custom Facial Implant Design
Although every patient is unique, these twelve principles remain remarkably consistent.
Successful implants:
- Design the skeleton—not the skin.
- Restore proportion—not simply size.
- Respect every millimeter.
- Prioritize shape over thickness.
- Blend the borders as carefully as the center.
- Seek harmony rather than mathematical symmetry.
- Account for soft tissue behavior.
- Give every portion of the implant a clear purpose.
- Resist unnecessary enlargement.
- 10.Respect critical anatomy.
- Design for surgical placement.
- 12.Design for lifelong stability.
These principles guide every implant regardless of whether it is intended for the chin, jawline, cheeks, forehead, orbit, or skull.
Key Takeaways
- Successful custom implant design follows consistent principles rather than relying solely on measurements.
- The implant should correct the skeletal framework that supports the visible soft tissues.
- Facial proportion is more important than simply increasing facial size.
- Millimeter-scale changes can produce meaningful aesthetic differences.
- Implant shape and border transitions often have a greater visual impact than maximum thickness.
- Balanced facial harmony is usually preferable to perfect skeletal symmetry.
- Soft tissue characteristics must be incorporated into every design.
- Every implant extension should serve a defined anatomical purpose.
- Safe designs respect nerves, sinuses, tooth roots, and surgical limitations.
- Long-term stability begins during the design process, not after surgery.
Dr. Eppley’s Bottom Line
The success of a custom facial implant is rarely determined by a single measurement. It is determined by how dozens of small design decisions work together to create a result that is anatomically accurate, aesthetically balanced, surgically practical, and durable over time.
Custom Facial Implant Design Principles: How Patient-Specific Facial Implants Are Designed
Part 3 — The Five Dimensions of Custom Facial Implant Design
One of the biggest misconceptions about custom facial implants is that they are designed primarily by deciding how many millimeters thick they should be.
Nothing could be further from the truth.
Thickness is only one measurement.
An implant is actually a three-dimensional sculpture, and every successful design is the result of balancing five independent variables.
These variables are:
- Projection
- Width
- Vertical Height
- Surface Contour
- Border Transition
Together, these five variables determine not only how the implant changes the skeleton, but also how the face will ultimately appear after healing.
One variable can rarely be changed without affecting the others.
Understanding this relationship is one of the keys to understanding why custom facial implants produce more natural results than standard implants.
Dr. Eppley’s Bottom Line
An implant is never designed by thickness alone. It is designed by controlling five dimensions that work together to create facial harmony.
The Five Variables of Implant Design
“Every custom implant is a balance of five independent design variables rather than a single measurement.”
Dimension One
Projection
Projection is the distance the implant extends outward from the underlying bone.
It is the design variable patients discuss most frequently.
Unfortunately, it is also the one most commonly misunderstood.
Projection determines:
- Profile strength
- Skeletal prominence
- Shadow formation
- Light reflection
- Forward support of soft tissues
It does not determine the entire appearance of the implant.
Projection simply answers one question:
How far forward should this part of the skeleton move?
Projection Is Regional
Projection means something different depending on the facial region.
Chin
Projection strengthens the lower facial profile.
Jawline
Projection increases lower facial definition.
Infraorbital Rim
Projection improves lower eyelid support.
Cheek
Projection enhances malar prominence.
Forehead
Projection alters forehead slope.
Skull
Projection restores cranial contour.
The same numerical increase produces very different visual effects depending upon location.
Clinical Example
Adding 4 mm to the chin noticeably changes the facial profile.
Adding 4 mm to the occipital skull usually creates a much subtler visible change because of thicker overlying tissues and a broader implant surface.
Location matters more than numbers.
Projection Is Not Uniform
Most custom implants are not equally thick throughout.
Instead, projection changes continuously across the implant.
Some regions taper gradually.
Others maintain full thickness.
Others transition into adjacent structures.
The maximum thickness is simply the highest point within a continuously changing three-dimensional surface.
“Projection varies continuously across a custom implant rather than remaining constant.”
Clinical Insight
Projection Creates the First Impression
When someone views the face in profile, projection is often the first characteristic they notice.
When they view the face from the front, however, the remaining four design variables become equally important.
Dimension Two
Width
Width is frequently underestimated.
Patients often focus on profile improvement while overlooking frontal appearance.
Width largely determines what people notice when facing the patient directly.
Increasing width changes:
- facial strength
- masculine appearance
- cheek prominence
- lower facial breadth
- cranial proportions
Unlike projection, width often influences facial character more than facial profile.
Width Is Different in Every Region
Jaw width influences:
- lower facial power
- mandibular dominance
- facial shape
Cheek width influences:
- midface balance
- Ogee curve
- facial framing
Forehead width influences:
- upper facial proportion
- head shape
- temporal fullness
Skull width influences:
- overall cranial balance
- side profile
- frontal appearance
Each region contributes differently to perceived facial width.
Clinical Example
Many patients requesting jawline implants actually need additional posterior width rather than increased projection.
The profile may already appear strong.
The frontal view lacks skeletal breadth.
Simply increasing projection does little to correct that problem.
Width Alters Facial Shape
Increasing width changes the overall facial geometry.
Examples include:
A narrow face becoming more square.
A long face appearing shorter.
A tapered face appearing stronger.
A heart-shaped face appearing more balanced.
Small changes in width often produce greater visual impact than much larger changes in projection.
Dr. Eppley’s Bottom Line
Projection changes the side view. Width often changes the face people recognize every day.
Dimension Three
Vertical Height
Vertical height refers to the superior-inferior extension of skeletal augmentation.
This variable is often overlooked because it is less obvious than projection.
Yet vertical height frequently determines facial proportion.
Examples include:
Lengthening the chin.
Lowering the jaw angle.
Increasing forehead height.
Extending skull augmentation.
Supporting the lower orbital rim.
Vertical changes influence:
- facial length
- facial thirds
- lower facial proportion
- neck transition
- mandibular angle definition
Vertical Height Is Not Simply “Making Things Longer”
Height may also determine where the implant begins and ends.
For example:
A chin implant extending farther downward changes lower facial length.
The same implant extending upward affects labiomental support.
The total implant height remains similar.
The aesthetic result does not.
Clinical Insight
Vertical Height Often Produces the Most Underappreciated Improvements
Patients frequently notice profile improvement while being unaware that subtle vertical changes are responsible for much of the improved facial balance.
“Changing vertical height alters facial proportion without changing projection.”
Dimension Four
Surface Contour
Surface contour is perhaps the most artistic aspect of implant design.
Projection, width, and height establish dimensions.
Surface contour determines character.
Questions include:
Should the surface be:
- flat?
- convex?
- gently rounded?
- sharply angular?
- masculine?
- feminine?
These decisions define the personality of the skeleton.
Surface Shape Creates Masculinity and Femininity
Consider the jawline.
A masculine jaw often displays:
- flatter surfaces
- sharper transitions
- broader contours
- stronger angles
A feminine jaw generally demonstrates:
- smoother curves
- narrower transitions
- softer contours
- less angularity
The difference is not simply implant size.
It is the shape connecting those dimensions.
Surface Contour Controls Light
The human eye recognizes contour primarily through light.
Surface shape determines:
- highlights
- shadows
- transitions
- reflections
Small contour changes may dramatically influence facial appearance without changing measurable projection.
This explains why two implants with identical dimensions may look completely different.
Clinical Example
A forehead implant with a smooth convex transition appears youthful.
The same implant with a flatter contour appears stronger and more masculine.
The maximum projection may be identical.
The contour changes everything.
Dr. Eppley’s Bottom Line
Contour is where engineering becomes sculpture.
Dimension Five
Border Transition
Border transition is the least appreciated design variable.
It is also one of the most important.
Every implant must end somewhere.
How it ends determines whether it appears natural.
The border should gradually become thinner until it blends into the surrounding skeleton.
Poor border transitions create:
- visible edges
- palpable steps
- unnatural shadows
- contour irregularities
- implant visibility
Excellent border transitions become invisible.
“Natural appearance depends as much on the border as the augmentation itself.”
Borders Create Continuity
The skeleton functions as one continuous surface.
A successful implant preserves that continuity.
The eye should not recognize:
where the implant begins
or
where it ends.
Instead, the augmentation should appear to emerge naturally from the surrounding anatomy.
Different Regions Require Different Borders
Jawline implants generally require long feathered transitions.
Forehead implants often require broad temporal tapering.
Cheek implants frequently require gradual blending across the zygoma.
Orbital implants demand extremely delicate transitions because the tissues are thin.
Every anatomical region has its own border strategy.
Clinical Insight
Patients Usually Notice Bad Borders Before Oversized Implants
Even relatively small implants may appear unnatural if their borders are poorly designed.
Large implants with excellent borders often appear surprisingly natural.
The Five Variables Never Work Alone
One of the greatest mistakes in implant design is treating these variables independently.
Changing one almost always changes another.
For example:
Increasing projection may require:
- wider borders
- smoother contour
- different fixation
Increasing width may require:
- less projection
- altered surface shape
- different transition zones
Increasing vertical height may require:
- modified contour
- repositioned screw fixation
- altered surgical access
Everything is connected.
“Changing one design variable inevitably influences the others.”
Which Variable Is Most Important?
Patients often ask:
“What is the most important measurement?”
There isn’t one.
Different regions prioritize different variables.
| Facial Region | Primary Variable |
| Chin | Projection |
| Jawline | Width + Contour |
| Jaw Angle | Width + Height |
| Infraorbital | Projection + Border Transition |
| Cheek | Width + Contour |
| Forehead | Contour |
| Skull | Contour + Borders |
This is why successful design cannot rely upon a single number.
Every facial region speaks a different geometric language.
The Fifth Dimension of Naturalness
There is another variable that does not appear on the CAD software.
Experience.
Software measures geometry.
Experience predicts biology.
Experience answers questions such as:
Will the soft tissue conceal this border?
Will the patient appear overcorrected?
Will this contour still look appropriate twenty years from now?
These questions cannot yet be answered mathematically.
Dr. Eppley’s Bottom Line
Computers calculate dimensions. Surgeons decide how those dimensions should work together to create a natural face.
Common Mistakes When Focusing on Only One Dimension
Patients sometimes become preoccupied with a single measurement.
Examples include:
“I want a 10 mm chin implant.”
“I need 12 mm cheeks.”
“I want a wider jaw.”
These statements ignore the remaining design variables.
A 10 mm chin may be:
- too narrow
- too wide
- too short
- too long
- too angular
- too rounded
The number alone says almost nothing.
The complete three-dimensional design determines the outcome.
Thinking Like a Sculptor Rather Than an Engineer
Engineers often think in terms of dimensions.
Sculptors think in terms of form.
Successful implant design requires both.
The implant must satisfy:
Engineering requirements:
- fit
- fixation
- manufacturability
- durability
Aesthetic requirements:
- proportion
- contour
- balance
- harmony
- natural appearance
Only when both are achieved simultaneously does the implant become successful.
Key Takeaways
- Every custom implant is designed using five primary variables: projection, width, vertical height, surface contour, and border transition.
- Projection determines forward skeletal movement but is only one aspect of implant design.
- Width often has a greater influence on frontal appearance than projection.
- Vertical height changes facial proportion and the relationship between facial thirds.
- Surface contour determines facial character, including masculine versus feminine appearance.
- Border transition largely determines whether an implant appears natural or artificial.
- The five design variables constantly interact and cannot be adjusted independently.
- Successful design resembles sculpting a three-dimensional form rather than selecting a single implant thickness.
- Experience is the “sixth dimension” that integrates anatomy, biology, and aesthetics into the final design.
Dr. Eppley’s Bottom Line
The most natural custom facial implants are never designed by asking, “How thick should it be?” They are designed by balancing projection, width, height, contour, and borders into a single harmonious three-dimensional sculpture.
Custom Facial Implant Design Principles: How Patient-Specific Facial Implants Are Designed
Part 4 — Regional Design Principles: Why Every Area of the Face Requires a Different Design Strategy
One of the greatest misconceptions about custom facial implants is that the same design philosophy applies equally to every facial bone.
It does not.
Although the twelve design principles discussed in the previous section remain constant, the way they are applied varies considerably depending on the anatomy, function, visibility, and aesthetic role of each facial region.
Designing a forehead implant is fundamentally different from designing a jaw angle implant.
Likewise, an infraorbital implant requires a completely different strategy than an occipital skull implant.
Each region has its own anatomical constraints, aesthetic objectives, soft tissue characteristics, surgical limitations, and long-term considerations.
Understanding these differences is what transforms general implant design into truly patient-specific facial skeletal engineering.
Regional Design Philosophy
Every implant should answer four questions before the first line is ever drawn in CAD software.
- What skeletal deficiency exists?
- What aesthetic improvement is desired?
- What anatomy limits the design?
- What surgical approach will place the implant safely?
The answers differ in every facial region.
Dr. Eppley’s Bottom Line
There is no universal implant design. Every facial region requires its own unique balance of anatomy, aesthetics, biomechanics, and surgical strategy.
Forehead Implants
Primary Goal
Improve forehead projection, contour, and upper facial balance.
Unlike many facial implants, forehead implants rarely seek to make the forehead “larger.”
Instead, they seek to improve the shape of the frontal bone.
Typical goals include:
- correcting a backward-sloping forehead
- increasing frontal convexity
- improving upper facial masculinity
- restoring congenital deficiencies
- smoothing contour irregularities
- correcting asymmetry
Primary Design Variable
Surface contour
More than any other implant, forehead implants are defined by contour rather than maximum thickness.
The eye immediately recognizes subtle differences in forehead curvature.
A change of only a few millimeters can alter the perceived personality of the face.
Design Considerations
A successful forehead implant should:
- create a smooth frontal slope
- preserve natural forehead curvature
- avoid abrupt temporal transitions
- maintain symmetry while respecting normal anatomical variation
- blend seamlessly into the surrounding skull
Broad feathered borders are essential because the forehead is continuously visible from multiple viewing angles.
Clinical Pearl
The temporal borders often determine whether a forehead implant looks natural more than the central projection itself.
Brow Bone Implants
Primary Goal
Increase supraorbital projection while preserving normal orbital anatomy.
The brow is one of the defining characteristics of facial masculinity.
Unlike the forehead, brow augmentation creates stronger shadowing beneath the supraorbital ridge.
Primary Design Variable
Projection
The challenge is creating prominence without excessive heaviness.
An overly projected brow rapidly appears artificial.
Design Considerations
The implant should:
- preserve smooth transition into the forehead
- avoid excessive lateral overhang
- respect frontal sinus anatomy
- maintain normal orbital relationships
Male brow augmentation generally emphasizes lateral fullness.
Female brow augmentation is usually much more conservative.
Clinical Pearl
The brow should frame the eyes—not overpower them.
Infraorbital Implants
Primary Goal
Restore lower orbital support.
Patients often describe:
- tired eyes
- under-eye hollows
- negative orbital vectors
- flat midfaces
The implant supports the skeletal foundation beneath the lower eyelid.
Primary Design Variables
- Projection
- Border transition
Why Borders Matter
Few facial regions have thinner soft tissue than the lower eyelid.
Even minor contour irregularities may become visible.
Consequently:
- transitions must be extremely smooth
- implant edges should disappear into surrounding bone
- projection should increase gradually
Clinical Pearl
The lower eyelid is unforgiving. Precision matters more here than almost anywhere else in facial implant surgery.
Cheek (Malar) Implants
Primary Goal
Improve midfacial projection and width.
Unlike standard cheek implants that often create a single point of prominence, custom implants distribute augmentation over a broad skeletal surface.
Primary Design Variables
- Width
- Surface contour
Design Philosophy
The cheek should appear:
- broad rather than pointy
- smooth rather than round
- naturally elevated rather than swollen
The implant should reinforce the zygomatic complex instead of creating an isolated prominence.
Clinical Pearl
Natural cheeks are broad curves—not isolated bumps.
Zygomatic Arch Implants
Although frequently discussed together with cheek implants, the zygomatic arch deserves separate consideration.
The arch influences:
- facial width
- lateral facial framing
- masculine appearance
Design Variable
Posterior width.
Overprojection is rarely desirable.
Instead, widening should remain continuous from the cheek onto the arch.
Paranasal Implants
Primary Goal
Restore support around the nasal base.
These implants improve:
- pyriform deficiency
- recessed upper jaw appearance
- upper lip support
- nasal base projection
Design Variable
Anterior projection.
Unlike cheek implants, width is usually less important.
Design Considerations
The implant should:
- preserve nasal airway anatomy
- avoid tooth roots
- maintain smooth transitions beneath the alar base
Clinical Pearl
Paranasal implants improve the foundation of the nose rather than changing the nose itself.
Chin Implants
The chin is among the simplest regions geometrically—but one of the most important aesthetically.
Primary Goal
Improve lower facial balance.
Primary Design Variable
Projection.
However, width and vertical height often become equally important.
Design Considerations
Questions include:
Should the chin become:
- wider?
- taller?
- squarer?
- narrower?
- more tapered?
Every patient requires different answers.
Clinical Pearl
A stronger chin should improve facial balance—not become the dominant feature.
Illustration Callout #3
Show three chin designs:
- projection only
- projection + width
- projection + vertical length
Jawline Implants
The jawline is perhaps the most complex implant in facial aesthetic surgery.
Unlike isolated chin implants, jawline implants affect nearly the entire lower face.
Primary Goals
Improve:
- mandibular definition
- lower facial width
- neck transition
- facial masculinity
Primary Design Variables
- Width
- Surface contour
- Border continuity
Design Philosophy
The jawline should behave as one continuous skeletal line.
Not three separate implants.
The chin, body, and angle should blend into one uninterrupted contour.
Clinical Pearl
The eye follows continuous lines. The jawline should never appear segmented.
Jaw Angle Implants
Although part of the jawline, jaw angles deserve independent planning.
Primary Goal
Increase lower posterior facial width.
Design Variables
- Width
- Vertical height
Projection alone rarely creates an attractive jaw angle.
Instead:
- posterior expansion
- inferior extension
- smooth transition
produce the most natural appearance.
Important Design Principle
One of the most common mistakes is attempting to create a perfectly square jaw angle.
Natural male jaw angles are not cubes.
They are gently curved structures with broad transitions.
Dr. Eppley’s Bottom Line
The strongest jawlines are rarely created by the sharpest angles. They are created by the smoothest transitions.
Temporal Implants
Temporal augmentation differs from every other facial implant.
The implant restores missing lateral volume rather than increasing skeletal prominence.
Goals
Correct:
- temporal hollowing
- narrow upper face
- head narrowing
Primary Variable
Width.
Design Considerations
The implant must respect:
- temporal muscle
- temporal vessels
- fascial layers
Surface contour should remain extremely smooth because the overlying tissues are thin.
Clinical Pearl
Temporal augmentation should disappear beneath the hairline—not announce itself through it.
Skull Implants
Skull implants are unique because aesthetic landmarks are less sharply defined than those of the face.
Instead, success depends upon restoring smooth cranial geometry.
Common Applications
- flat occiput
- plagiocephaly
- sagittal deficiencies
- temporal narrowing
- cranial asymmetry
Primary Design Variables
- Surface contour
- Border transition
Maximum thickness is often less important than broad contour restoration.
Clinical Pearl
Patients rarely recognize exact skull measurements. They immediately recognize smooth head shape.
Revision Implant Design
Revision surgery follows different principles than primary surgery.
The surgeon must first determine:
Why was revision needed?
Common reasons include:
- undercorrection
- overcorrection
- asymmetry
- implant displacement
- contour visibility
- border irregularities
Revision implants frequently involve subtraction rather than addition.
Sometimes making an implant smaller creates a better result than making it larger.
Clinical Insight
The Best Revision Often Removes Complexity
Many revision implants succeed by simplifying an overly aggressive original design.
Less can truly become more.
Designing Combination Implants
Increasingly, multiple implants are designed simultaneously.
Examples include:
- forehead + brow
- infraorbital + cheek
- cheek + jawline
- complete facial masculinization
- skull + forehead
These combinations should never be designed independently.
Instead, each implant should support the others.
Regional Priorities at a Glance
| Region | Primary Design Priority |
| Forehead | Surface contour |
| Brow | Projection |
| Infraorbital | Projection + border transitions |
| Cheek | Width + contour |
| Zygomatic arch | Posterior width |
| Paranasal | Anterior projection |
| Chin | Projection + proportion |
| Jawline | Continuous contour |
| Jaw angle | Width + vertical height |
| Temporal | Width + smooth contour |
| Skull | Overall cranial geometry |
Thinking Beyond Individual Bones
Although each facial region requires unique design strategies, no implant should ever be created in isolation.
The forehead influences the brow.
The brow influences the orbit.
The orbit influences the cheeks.
The cheeks influence the jawline.
The jawline influences the chin.
Ultimately, every implant changes how the entire face is perceived.
The best designers think not in terms of individual bones, but in terms of an integrated three-dimensional facial framework.
Key Takeaways
- Every facial region has unique anatomical, aesthetic, and surgical requirements.
- Forehead and skull implants rely primarily on contour and broad transitions rather than maximum thickness.
- Brow and chin implants depend heavily on controlled projection.
- Infraorbital implants require exceptionally smooth borders because of thin overlying tissues.
- Cheek and jawline implants emphasize width and continuous contour rather than isolated prominence.
- Jaw angle implants should create broad, natural transitions rather than exaggerated square corners.
- Revision surgery often succeeds by simplifying rather than enlarging previous designs.
- Multiple implants should be designed as a coordinated skeletal system rather than independent devices.
Dr. Eppley’s Bottom Line
Successful custom facial implant design is never about applying the same formula to every bone. Each facial region has its own anatomical language, aesthetic priorities, and surgical challenges. The art of patient-specific implant design lies in adapting universal design principles to the unique role each skeletal structure plays within the face as a whole.
Custom Facial Implant Design Principles: How Patient-Specific Facial Implants Are Designed
Part 5: Designing for Different Faces: Why No Two Patients Should Ever Receive the Same Implant Design
One of the greatest advantages of custom facial implants is reflected in the name itself—custom.
No two faces are identical.
No two skeletons are identical.
No two patients have the same aesthetic goals.
Consequently, no two implant designs should be identical.
The principles discussed in the previous sections remain constant, but their application changes dramatically depending on the patient’s unique anatomy. Age, gender, ethnicity, facial proportions, soft tissue thickness, previous surgery, and even personality all influence the final design.
This is why custom facial implant design is far more than a technical exercise in computer modeling. It is an individualized planning process that blends objective anatomical analysis with subjective aesthetic judgment.
Dr. Eppley’s Bottom Line
The purpose of a custom implant is not to create an ideal face. It is to create the best version of your face.
Every Face Has Its Own Skeletal Blueprint
Although human skulls share the same basic anatomy, the variation between individuals is remarkable.
Differences exist in:
- facial width
- facial height
- forehead inclination
- orbital shape
- cheekbone projection
- mandibular width
- chin projection
- jaw angle morphology
- cranial contour
- skeletal symmetry
These differences explain why an implant that produces an excellent result in one patient may be completely inappropriate in another.
Custom implant design always begins with understanding the patient’s existing skeletal framework—not with copying another person’s appearance.
Clinical Insight
Custom Means Patient-Specific, Not Celebrity-Specific
Patients occasionally bring photographs of celebrities whose facial features they admire. While these images can be useful for understanding aesthetic goals, they should be viewed as inspiration rather than templates.
Every face has different skeletal proportions, soft tissue characteristics, and anatomical limitations. Attempting to duplicate another person’s facial structure rarely produces the most natural result.
The goal is improvement, not imitation.
Male and Female Implant Design
One of the most important considerations in facial implant planning is sexual dimorphism—the predictable anatomical differences between male and female facial skeletons.
Designing a masculine face is not simply the opposite of designing a feminine face.
Each follows its own aesthetic principles.
Male Facial Design
Masculine skeletal characteristics typically include:
- stronger forehead projection
- more prominent brow ridges
- wider zygomatic arches
- broader lower face
- larger jaw angles
- greater chin width
- flatter skeletal surfaces
- sharper transitions
Rather than emphasizing isolated features, masculine implant design seeks to create structural strength across the entire facial skeleton.
“Masculine implant design emphasizes skeletal width, projection, and flatter contours.”
Female Facial Design
Female facial aesthetics generally emphasize:
- smoother forehead curvature
- softer brow contours
- higher cheek projection
- narrower lower face
- tapered chin
- continuous curves
- rounded transitions
The objective is refinement rather than enlargement.
Interestingly, female implants often require less augmentation but greater attention to contour.
Clinical Pearl
Masculinity is usually defined by angularity and width. Femininity is usually defined by contour and proportion.
Dr. Eppley’s Bottom Line
The goal is not to make every face stronger. The goal is to make each face look appropriate for the patient’s desired identity.
Age Influences Implant Design
The facial skeleton changes throughout life.
While bone changes relatively slowly, the overlying soft tissues undergo continuous remodeling.
These changes influence implant planning.
Younger Patients
In younger individuals:
- skin elasticity is excellent
- ligaments remain tight
- fat volume is preserved
- soft tissues drape predictably
Implant design can focus primarily on skeletal proportions.
Older Patients
With aging:
- skin becomes thinner
- fat compartments shrink
- ligament laxity develops
- jowls form
- neck definition decreases
- soft tissue descent becomes more apparent
These changes require different planning.
Sometimes skeletal augmentation should be combined with:
- facelift surgery
- necklift
- fat grafting
- eyelid surgery
- soft tissue repositioning
The implant restores structural support, while soft tissue procedures reposition the tissues that cover it.
Clinical Insight
Bone Does Not Age the Way Soft Tissue Ages
Many patients believe aging is simply a skin problem.
In reality, age-related changes occur throughout the facial soft tissues while the skeleton continues to define the foundation upon which those tissues rest.
Custom implants restore support—they do not replace facial rejuvenation procedures.
Facial Shape Determines Design Strategy
One of the most useful ways to approach implant planning is to classify the overall facial shape.
Every shape presents different design priorities.
Long Faces
Characteristics include:
- increased lower facial height
- narrow facial width
- reduced lateral support
Design generally emphasizes:
- width
- transverse balance
- lateral contour
Rather than increasing facial length further.
Short Faces
Typically demonstrate:
- broad appearance
- limited vertical dimension
- reduced chin height
Planning may emphasize:
- vertical augmentation
- chin length
- lower facial proportion
Narrow Faces
Frequently benefit from:
- cheek width
- jaw width
- temporal widening
- forehead widening
The objective is expanding facial framing rather than increasing projection alone.
Wide Faces
These patients often require:
- selective projection
- contour refinement
- localized augmentation
Rather than additional skeletal width.
Soft Tissue Thickness Changes Everything
Patients often assume implants affect everyone equally.
They do not.
Soft tissue thickness is one of the least appreciated variables in facial implant surgery.
Thin Soft Tissue
Advantages:
- excellent skeletal definition
- subtle contour changes become visible
Disadvantages:
- implant borders more visible
- irregularities easier to detect
- less forgiveness
Planning requires:
- broader transitions
- smoother contours
- conservative augmentation
Thick Soft Tissue
Advantages:
- implant edges well concealed
- forgiving anatomy
Disadvantages:
- greater augmentation often required
- subtle implants may disappear beneath soft tissue
Planning emphasizes:
- broader skeletal changes
- larger surface area
- stronger contour support
Clinical Pearl
The same implant may appear dramatic beneath thin tissue and subtle beneath thick tissue.
Facial Asymmetry Requires Individualized Design
No human face is perfectly symmetrical.
The question is not whether asymmetry exists.
The question is whether it should be corrected.
Types of Asymmetry
Common causes include:
- congenital development
- previous trauma
- previous surgery
- skeletal growth differences
- positional plagiocephaly
- dental asymmetry
Each requires different planning.
Partial Correction Often Looks Better
Interestingly, complete correction is not always desirable.
Minor asymmetries contribute to facial individuality.
Attempting perfect mathematical symmetry may actually produce an artificial appearance.
Instead, many designs intentionally preserve subtle differences while correcting those that dominate facial appearance.
Clinical Insight
Natural Faces Are Balanced—Not Perfectly Symmetrical
One of the hallmarks of experienced implant design is recognizing which asymmetries should remain.
Ethnicity and Cultural Aesthetic Preferences
Facial aesthetics are influenced by both anatomy and cultural ideals.
Different populations demonstrate characteristic skeletal features.
For example:
- forehead shape
- malar prominence
- mandibular width
- chin projection
- orbital support
- nasal base morphology
Understanding these differences is important.
Equally important is recognizing that aesthetic preferences vary widely between individuals.
Implant planning should never be based solely on ethnicity.
It should be based on the patient’s own goals while respecting their natural facial identity.
Dr. Eppley’s Bottom Line
Ethnicity provides anatomical context—not aesthetic limitations. Every patient should be treated as an individual rather than as a stereotype.
Previous Surgery Changes Everything
Revision surgery requires a different design philosophy than primary surgery.
Previous procedures may include:
- chin implants
- cheek implants
- jaw implants
- orthognathic surgery
- genioplasty
- facial fracture repair
- craniofacial reconstruction
These operations alter the skeletal foundation.
Planning must account for:
- existing implants
- plates and screws
- altered anatomy
- scar tissue
- previous bone remodeling
The new implant is designed around the current anatomy—not the original anatomy.
“Revision implant design begins with the anatomy that exists today, not the anatomy that existed before surgery.”
Designing for Facial Masculinization and Feminization
Increasing numbers of patients seek comprehensive skeletal transformation.
Rather than changing one isolated feature, they wish to alter the overall character of the face.
This often involves combining implants.
Masculinization
Typical areas include:
- forehead
- brow
- cheeks
- jawline
- chin
The objective is creating:
- greater skeletal width
- stronger transitions
- flatter surfaces
- broader proportions
Feminization Enhancement
Although facial feminization surgery more commonly involves bone reduction, custom implants may occasionally be used to enhance feminine characteristics by:
- restoring forehead contour after brow reduction
- improving cheek contour
- correcting temporal hollowing
- refining facial balance after previous surgery
The philosophy differs significantly from masculinization.
Designing for Personality
This consideration rarely appears in textbooks.
Yet it often influences the final implant.
Some patients desire:
- subtle refinement
Others seek:
- stronger facial character
Neither approach is inherently correct.
The challenge is creating an implant that reflects the patient’s goals while remaining anatomically and aesthetically appropriate.
The surgeon’s responsibility is not to impose a personal artistic preference.
It is to guide the patient toward a result that will remain natural over time.
Clinical Insight
The Best Implant Fits the Patient’s Personality as Well as Their Skeleton
Successful design requires understanding not only anatomy, but expectations.
A technically perfect implant may still disappoint if it does not align with the patient’s aesthetic goals.
Designing for the Future
Custom implant planning should not focus solely on the appearance six months after surgery.
It should anticipate how the face will evolve over decades.
Questions include:
- Will aging soften the result?
- Will the implant remain balanced as tissues change?
- Will future facelift surgery still be possible?
- Could additional implants ever be added if desired?
Planning for the future is one of the hallmarks of experienced implant design.
Individualization Is the Greatest Advantage of Custom Implants
Standard implants begin with predetermined shapes.
Custom implants begin with the patient.
Everything else follows.
This is why two patients with similar complaints often receive very different implant designs.
Their anatomy differs.
Their soft tissues differ.
Their goals differ.
Their faces deserve different solutions.
Key Takeaways
- Every patient has a unique skeletal blueprint that requires individualized implant planning.
- Male and female facial aesthetics follow different design principles, emphasizing width and angularity versus contour and refinement.
- Age-related soft tissue changes often influence implant design and may warrant combining skeletal augmentation with facial rejuvenation procedures.
- Overall facial shape—long, short, narrow, or wide—helps determine whether width, projection, or vertical height should be prioritized.
- Soft tissue thickness significantly affects implant visibility and influences border design, contour, and augmentation magnitude.
- Facial asymmetry should be analyzed thoughtfully; partial correction often appears more natural than perfect mathematical symmetry.
- Ethnicity provides anatomical context, but treatment should always be tailored to the individual patient’s goals.
- Previous surgery, including implants or orthognathic procedures, fundamentally changes implant planning and requires designing around existing anatomy.
- Comprehensive facial masculinization or feminization enhancement involves coordinating multiple skeletal regions rather than treating isolated features.
- The best custom implant is one that respects the patient’s anatomy, aesthetic goals, and long-term facial evolution.
Dr. Eppley’s Bottom Line
Custom facial implants are successful because they are designed for a specific person—not for an average face. Every patient’s anatomy, soft tissues, goals, and future aging pattern are unique. The implant should be equally unique.
Custom Facial Implant Design Principles: How Patient-Specific Facial Implants Are Designed
Part 5: Designing for Different Faces: Why No Two Patients Should Ever Receive the Same Implant Design
One of the greatest advantages of custom facial implants is reflected in the name itself—custom.
No two faces are identical.
No two skeletons are identical.
No two patients have the same aesthetic goals.
Consequently, no two implant designs should be identical.
The principles discussed in the previous sections remain constant, but their application changes dramatically depending on the patient’s unique anatomy. Age, gender, ethnicity, facial proportions, soft tissue thickness, previous surgery, and even personality all influence the final design.
This is why custom facial implant design is far more than a technical exercise in computer modeling. It is an individualized planning process that blends objective anatomical analysis with subjective aesthetic judgment.
Dr. Eppley’s Bottom Line
The purpose of a custom implant is not to create an ideal face. It is to create the best version of your face.
Every Face Has Its Own Skeletal Blueprint
Although human skulls share the same basic anatomy, the variation between individuals is remarkable.
Differences exist in:
- facial width
- facial height
- forehead inclination
- orbital shape
- cheekbone projection
- mandibular width
- chin projection
- jaw angle morphology
- cranial contour
- skeletal symmetry
These differences explain why an implant that produces an excellent result in one patient may be completely inappropriate in another.
Custom implant design always begins with understanding the patient’s existing skeletal framework—not with copying another person’s appearance.
Clinical Insight
Custom Means Patient-Specific, Not Celebrity-Specific
Patients occasionally bring photographs of celebrities whose facial features they admire. While these images can be useful for understanding aesthetic goals, they should be viewed as inspiration rather than templates.
Every face has different skeletal proportions, soft tissue characteristics, and anatomical limitations. Attempting to duplicate another person’s facial structure rarely produces the most natural result.
The goal is improvement, not imitation.
Male and Female Implant Design
One of the most important considerations in facial implant planning is sexual dimorphism—the predictable anatomical differences between male and female facial skeletons.
Designing a masculine face is not simply the opposite of designing a feminine face.
Each follows its own aesthetic principles.
Male Facial Design
Masculine skeletal characteristics typically include:
- stronger forehead projection
- more prominent brow ridges
- wider zygomatic arches
- broader lower face
- larger jaw angles
- greater chin width
- flatter skeletal surfaces
- sharper transitions
Rather than emphasizing isolated features, masculine implant design seeks to create structural strength across the entire facial skeleton.
“Masculine implant design emphasizes skeletal width, projection, and flatter contours.”
Female Facial Design
Female facial aesthetics generally emphasize:
- smoother forehead curvature
- softer brow contours
- higher cheek projection
- narrower lower face
- tapered chin
- continuous curves
- rounded transitions
The objective is refinement rather than enlargement.
Interestingly, female implants often require less augmentation but greater attention to contour.
Clinical Pearl
Masculinity is usually defined by angularity and width. Femininity is usually defined by contour and proportion.
Dr. Eppley’s Bottom Line
The goal is not to make every face stronger. The goal is to make each face look appropriate for the patient’s desired identity.
Age Influences Implant Design
The facial skeleton changes throughout life.
While bone changes relatively slowly, the overlying soft tissues undergo continuous remodeling.
These changes influence implant planning.
Younger Patients
In younger individuals:
- skin elasticity is excellent
- ligaments remain tight
- fat volume is preserved
- soft tissues drape predictably
Implant design can focus primarily on skeletal proportions.
Older Patients
With aging:
- skin becomes thinner
- fat compartments shrink
- ligament laxity develops
- jowls form
- neck definition decreases
- soft tissue descent becomes more apparent
These changes require different planning.
Sometimes skeletal augmentation should be combined with:
- facelift surgery
- necklift
- fat grafting
- eyelid surgery
- soft tissue repositioning
The implant restores structural support, while soft tissue procedures reposition the tissues that cover it.
Clinical Insight
Bone Does Not Age the Way Soft Tissue Ages
Many patients believe aging is simply a skin problem.
In reality, age-related changes occur throughout the facial soft tissues while the skeleton continues to define the foundation upon which those tissues rest.
Custom implants restore support—they do not replace facial rejuvenation procedures.
Facial Shape Determines Design Strategy
One of the most useful ways to approach implant planning is to classify the overall facial shape.
Every shape presents different design priorities.
Long Faces
Characteristics include:
- increased lower facial height
- narrow facial width
- reduced lateral support
Design generally emphasizes:
- width
- transverse balance
- lateral contour
Rather than increasing facial length further.
Short Faces
Typically demonstrate:
- broad appearance
- limited vertical dimension
- reduced chin height
Planning may emphasize:
- vertical augmentation
- chin length
- lower facial proportion
Narrow Faces
Frequently benefit from:
- cheek width
- jaw width
- temporal widening
- forehead widening
The objective is expanding facial framing rather than increasing projection alone.
Wide Faces
These patients often require:
- selective projection
- contour refinement
- localized augmentation
Rather than additional skeletal width.
Illustration Callout #2
Facial Shape Planning
Show four simplified facial outlines:
- Long
- Short
- Narrow
- Wide
Illustrate how implant priorities differ for each.
Soft Tissue Thickness Changes Everything
Patients often assume implants affect everyone equally.
They do not.
Soft tissue thickness is one of the least appreciated variables in facial implant surgery.
Thin Soft Tissue
Advantages:
- excellent skeletal definition
- subtle contour changes become visible
Disadvantages:
- implant borders more visible
- irregularities easier to detect
- less forgiveness
Planning requires:
- broader transitions
- smoother contours
- conservative augmentation
Thick Soft Tissue
Advantages:
- implant edges well concealed
- forgiving anatomy
Disadvantages:
- greater augmentation often required
- subtle implants may disappear beneath soft tissue
Planning emphasizes:
- broader skeletal changes
- larger surface area
- stronger contour support
Clinical Pearl
The same implant may appear dramatic beneath thin tissue and subtle beneath thick tissue.
Facial Asymmetry Requires Individualized Design
No human face is perfectly symmetrical.
The question is not whether asymmetry exists.
The question is whether it should be corrected.
Types of Asymmetry
Common causes include:
- congenital development
- previous trauma
- previous surgery
- skeletal growth differences
- positional plagiocephaly
- dental asymmetry
Each requires different planning.
Partial Correction Often Looks Better
Interestingly, complete correction is not always desirable.
Minor asymmetries contribute to facial individuality.
Attempting perfect mathematical symmetry may actually produce an artificial appearance.
Instead, many designs intentionally preserve subtle differences while correcting those that dominate facial appearance.
Clinical Insight
Natural Faces Are Balanced—Not Perfectly Symmetrical
One of the hallmarks of experienced implant design is recognizing which asymmetries should remain.
Ethnicity and Cultural Aesthetic Preferences
Facial aesthetics are influenced by both anatomy and cultural ideals.
Different populations demonstrate characteristic skeletal features.
For example:
- forehead shape
- malar prominence
- mandibular width
- chin projection
- orbital support
- nasal base morphology
Understanding these differences is important.
Equally important is recognizing that aesthetic preferences vary widely between individuals.
Implant planning should never be based solely on ethnicity.
It should be based on the patient’s own goals while respecting their natural facial identity.
Dr. Eppley’s Bottom Line
Ethnicity provides anatomical context—not aesthetic limitations. Every patient should be treated as an individual rather than as a stereotype.
Previous Surgery Changes Everything
Revision surgery requires a different design philosophy than primary surgery.
Previous procedures may include:
- chin implants
- cheek implants
- jaw implants
- orthognathic surgery
- genioplasty
- facial fracture repair
- craniofacial reconstruction
These operations alter the skeletal foundation.
Planning must account for:
- existing implants
- plates and screws
- altered anatomy
- scar tissue
- previous bone remodeling
The new implant is designed around the current anatomy—not the original anatomy.
“Revision implant design begins with the anatomy that exists today, not the anatomy that existed before surgery.”
Designing for Facial Masculinization and Feminization
Increasing numbers of patients seek comprehensive skeletal transformation.
Rather than changing one isolated feature, they wish to alter the overall character of the face.
This often involves combining implants.
Masculinization
Typical areas include:
- forehead
- brow
- cheeks
- jawline
- chin
The objective is creating:
- greater skeletal width
- stronger transitions
- flatter surfaces
- broader proportions
Feminization Enhancement
Although facial feminization surgery more commonly involves bone reduction, custom implants may occasionally be used to enhance feminine characteristics by:
- restoring forehead contour after brow reduction
- improving cheek contour
- correcting temporal hollowing
- refining facial balance after previous surgery
The philosophy differs significantly from masculinization.
Designing for Personality
This consideration rarely appears in textbooks.
Yet it often influences the final implant.
Some patients desire:
- subtle refinement
Others seek:
- stronger facial character
Neither approach is inherently correct.
The challenge is creating an implant that reflects the patient’s goals while remaining anatomically and aesthetically appropriate.
The surgeon’s responsibility is not to impose a personal artistic preference.
It is to guide the patient toward a result that will remain natural over time.
Clinical Insight
The Best Implant Fits the Patient’s Personality as Well as Their Skeleton
Successful design requires understanding not only anatomy, but expectations.
A technically perfect implant may still disappoint if it does not align with the patient’s aesthetic goals.
Designing for the Future
Custom implant planning should not focus solely on the appearance six months after surgery.
It should anticipate how the face will evolve over decades.
Questions include:
- Will aging soften the result?
- Will the implant remain balanced as tissues change?
- Will future facelift surgery still be possible?
- Could additional implants ever be added if desired?
Planning for the future is one of the hallmarks of experienced implant design.
Individualization Is the Greatest Advantage of Custom Implants
Standard implants begin with predetermined shapes.
Custom implants begin with the patient.
Everything else follows.
This is why two patients with similar complaints often receive very different implant designs.
Their anatomy differs.
Their soft tissues differ.
Their goals differ.
Their faces deserve different solutions.
Key Takeaways
- Every patient has a unique skeletal blueprint that requires individualized implant planning.
- Male and female facial aesthetics follow different design principles, emphasizing width and angularity versus contour and refinement.
- Age-related soft tissue changes often influence implant design and may warrant combining skeletal augmentation with facial rejuvenation procedures.
- Overall facial shape—long, short, narrow, or wide—helps determine whether width, projection, or vertical height should be prioritized.
- Soft tissue thickness significantly affects implant visibility and influences border design, contour, and augmentation magnitude.
- Facial asymmetry should be analyzed thoughtfully; partial correction often appears more natural than perfect mathematical symmetry.
- Ethnicity provides anatomical context, but treatment should always be tailored to the individual patient’s goals.
- Previous surgery, including implants or orthognathic procedures, fundamentally changes implant planning and requires designing around existing anatomy.
- Comprehensive facial masculinization or feminization enhancement involves coordinating multiple skeletal regions rather than treating isolated features.
- The best custom implant is one that respects the patient’s anatomy, aesthetic goals, and long-term facial evolution.
Dr. Eppley’s Bottom Line
Custom facial implants are successful because they are designed for a specific person—not for an average face. Every patient’s anatomy, soft tissues, goals, and future aging pattern are unique. The implant should be equally unique.
Custom Facial Implant Design Principles: How Patient-Specific Facial Implants Are Designed
Part 7: Dr. Eppley’s Design Philosophy, Clinical Pearls, Frequently Asked Questions, and Final Perspective
Custom facial implant design is often described as a collaboration between medicine and engineering.
While that is true, it is incomplete.
Engineering creates precision.
Medicine provides safety.
But neither alone creates beauty.
Beautiful, natural facial skeletal augmentation comes from understanding how anatomy, proportion, facial expression, aging, and individual identity work together.
During more than thirty-five years of facial skeletal surgery, I have become increasingly convinced that successful implant design is less about creating dramatic change and more about creating appropriate change.
Patients rarely seek to become different people.
They seek to become better versions of themselves.
That philosophy has guided every custom implant I have designed.
The Eppley Philosophy of Custom Facial Implant Design
Over the years, my approach has become remarkably consistent.
Every implant should satisfy five questions before it is ever manufactured.
1. Does it solve the anatomical problem?
The implant should address the true skeletal deficiency rather than simply adding volume.
2. Does it improve overall facial harmony?
The face should appear more balanced—not simply larger.
3. Will it look natural?
People should notice the improvement before they notice the implant.
4. Can it be placed safely?
A beautiful implant that cannot be inserted predictably is not a successful design.
5. Will it still look appropriate decades from now?
The operation lasts hours.
The result should last a lifetime.
Dr. Eppley’s Bottom Line
Every implant should solve a problem, improve facial balance, respect anatomy, remain stable, and still look natural twenty years later.
Twenty Clinical Pearls of Custom Facial Implant Design
1. Design the skeleton—not the skin.
Soft tissue follows bone.
Bone determines facial architecture.
2. Every millimeter matters.
A seemingly minor adjustment may significantly influence facial appearance.
3. Shape is always more important than maximum thickness.
Patients see contours.
Not numbers.
4. Border transitions determine naturalness.
The best implant edges become invisible.
5. Facial harmony always wins over maximum augmentation.
Balanced faces age better.
6. Bigger is rarely better.
Most revisions involve reducing augmentation rather than increasing it.
7. Symmetry should be improved—not perfected.
Human individuality depends upon subtle asymmetry.
8. Projection should always be proportional.
Forward movement must match surrounding structures.
9. Width changes facial character more than patients realize.
Especially in the jawline, cheekbones, forehead, and skull.
10. Soft tissue determines what the patient actually sees.
The skeleton creates the framework.
The soft tissue creates the appearance.
11. Every border should have a reason for ending where it does.
Abrupt endings rarely appear natural.
12. Every implant extension should have a purpose.
Additional volume should never be added simply because it can be.
13. The best implants are often surprisingly simple.
Complexity is not the same as sophistication.
14. The surgeon should design for healing—not simply surgery.
The result six months later matters more than the appearance in the operating room.
15. The patient’s goals should direct the design.
Technical perfection means little if expectations are misunderstood.
16. Revision surgery teaches more than primary surgery.
Failures often reveal the most important design lessons.
17. CAD software improves precision.
Experience determines judgment.
18. Artificial intelligence will become an outstanding design assistant.
It should never become the final decision-maker.
19. Every implant changes adjacent facial structures.
No implant exists in isolation.
20. The best compliment is that no one realizes an implant exists.
Natural appearance is the ultimate measure of success.
Illustration Callout #1
Title: The Eppley Design Philosophy
Create a circular diagram.
Center:
Natural Facial Harmony
Surrounding principles:
- Anatomy
- Proportion
- Contour
- Safety
- Longevity
Frequently Asked Questions
Can artificial intelligence design my custom facial implant?
Artificial intelligence can analyze anatomy, measure asymmetry, and assist with computer modeling. However, it cannot reliably determine aesthetic goals, predict how soft tissues will respond, or decide what constitutes an attractive result. AI is likely to become an increasingly valuable planning tool, but surgeon experience remains essential for final implant design.
Why can’t my implant simply mirror the opposite side?
Perfect mirror imaging assumes the opposite side of the face is ideal.
Most faces demonstrate bilateral asymmetry.
Successful implant design usually combines mirror imaging with aesthetic modification rather than copying anatomy exactly.
Is larger always better?
No.
Oversized implants are one of the most common reasons for revision surgery.
Balanced augmentation generally produces more natural and durable results.
Why doesn’t the thickest implant always create the biggest visible change?
Appearance depends on:
- contour
- soft tissue thickness
- implant width
- border transitions
- neighboring anatomy
Maximum thickness is only one design variable.
How many design revisions are normal?
Several revisions are common.
The first design establishes the concept.
Subsequent revisions refine proportions, borders, contour, and implant dimensions until the design reflects the patient’s goals while remaining anatomically appropriate.
Why do custom implants look more natural than stock implants?
Because every surface, border, and contour is designed specifically for one patient’s anatomy rather than adapted from a limited selection of predetermined shapes.
Does every patient need asymmetric implants?
No.
Some patients benefit from symmetric implants.
Others require subtle side-to-side differences to improve overall facial balance.
The decision depends on the underlying skeleton.
Can a custom implant make my face perfectly symmetrical?
No.
Nor should it.
The goal is improved harmony rather than mathematical perfection.
Can my implant be modified during surgery?
Minor adjustments are occasionally possible depending on the implant material.
However, the objective of custom planning is to minimize intraoperative modification through accurate preoperative design.
Can the design predict exactly how I will look?
No.
Design predicts skeletal change.
Final appearance depends upon:
- soft tissue thickness
- healing
- swelling
- scar maturation
- individual biological response
Does implant material affect design?
The overall design philosophy remains similar.
However, different materials influence:
- edge thickness
- flexibility
- fixation strategy
- manufacturing technique
- intraoperative modification
Why do some patients require multiple implants?
Facial balance depends upon relationships between structures.
Correcting several related deficiencies often produces a more harmonious result than overcorrecting one isolated region.
Can implants be designed after previous facial surgery?
Yes.
In fact, custom implants are particularly valuable in revision surgery because they can accommodate altered anatomy, previous implants, plates, screws, or bone remodeling.
How do you know when the design is finished?
The design is complete when additional changes no longer improve facial balance.
At some point, refinement becomes unnecessary.
Recognizing that point requires experience.
Why don’t two patients with the same complaint receive the same implant?
Because they do not have the same skeleton, the same soft tissues, or the same aesthetic goals.
The implant is designed for the individual—not the diagnosis.
Looking Toward the Future
The future of custom facial implants is extraordinarily exciting.
Emerging technologies will likely include:
- AI-assisted design optimization
- automated anatomical measurements
- predictive soft tissue simulation
- virtual surgical planning integrated with augmented reality
- patient-specific fixation guides
- advanced biomaterials
- improved three-dimensional imaging
- faster manufacturing
Each innovation will improve precision.
None will eliminate the need for clinical judgment.
The challenge in facial aesthetics has never been drawing a shape.
The challenge has always been deciding which shape is most appropriate for a particular individual.
That decision remains fundamentally human.
Clinical Insight
Technology Changes Rapidly. Aesthetic Principles Do Not.
Software evolves.
Manufacturing improves.
Imaging becomes more accurate.
Yet the principles of facial proportion, harmony, balance, and natural appearance have remained remarkably constant throughout history.
Technology should enhance those principles—not redefine them.
The Eppley Principles of Custom Facial Implant Design
Every custom facial implant discussed throughout this guide can ultimately be summarized by twelve enduring principles:
- Design the skeleton—not the skin.
- Restore proportion rather than simply adding size.
- Respect every millimeter.
- Shape is more important than thickness.
- Border transitions matter as much as the center of the implant.
- Seek harmony rather than mathematical symmetry.
- Design with soft tissue behavior in mind.
- Ensure every part of the implant has a specific purpose.
- Resist unnecessary enlargement.
- 10.Respect anatomy and surgical realities.
- Design for long-term stability.
- 12.Remember that technology supports judgment—it never replaces it.
These principles apply whether the implant is designed for the forehead, orbit, cheeks, chin, jawline, skull, or any other facial region.
Final Perspective
When people first hear the phrase custom facial implant, they often think about technology.
They imagine computers, CAD software, 3D printing, and sophisticated manufacturing.
Those technologies are important.
But they are not what makes a custom implant successful.
A custom implant succeeds because it reflects thoughtful analysis of an individual’s anatomy, careful consideration of facial proportions, respect for surgical principles, and an appreciation for what creates a natural human face.
The computer generates the geometry.
The manufacturer creates the implant.
The surgeon brings experience, judgment, restraint, and artistic vision.
The patient brings the goal.
Only when all four work together does a custom implant become more than a precisely manufactured device.
It becomes a natural extension of the patient’s own skeleton.
That is the true purpose of custom facial implant design.
Key Takeaways
- Custom implant design is an individualized process that combines anatomy, aesthetics, engineering, and surgical judgment.
- Natural facial harmony is achieved through thoughtful planning rather than maximum augmentation.
- Shape, contour, border transitions, and proportion consistently influence appearance more than a single measurement such as implant thickness.
- Every implant should solve a specific anatomical problem while preserving overall facial balance.
- Experience remains the most important component of successful implant design, even as CAD software and artificial intelligence continue to evolve.
- The twelve Eppley Principles provide a consistent framework for designing custom implants across all facial regions.
- The greatest compliment after surgery is not that someone notices an implant—it is that they notice a more balanced, natural-looking face.
Dr. Eppley’s Final Bottom Line
Custom facial implant design is not about making the face bigger or different. It is about understanding the unique architecture of each patient’s skeleton and creating the smallest, safest, and most anatomically appropriate changes necessary to achieve lasting facial harmony. Technology makes this precision possible, but experience, judgment, and restraint are what transform precision into truly natural results.
CORNERSTONE ARTICLE #4
The Complete Guide to Custom Facial Implant Surgery
Understanding the Surgical Journey
Quick Answer
Custom facial implant surgery is a highly individualized procedure that uses patient-specific implants designed from a three-dimensional CT scan to permanently enhance or restore the underlying facial skeleton. Unlike standard facial implants, which are selected from a limited range of prefabricated sizes, custom implants are engineered specifically for one patient’s anatomy, aesthetic goals, and surgical requirements. The process extends well beyond the day of surgery, encompassing detailed consultation, digital planning, implant design, manufacturing, precise surgical placement, and a carefully monitored recovery that together produce natural, long-lasting facial enhancement.
Quick Facts
- Every custom facial implant is designed from your own CT scan.
- Surgery is performed under general anesthesia in an outpatient surgical facility.
- Most procedures require between 2 and 6 hours, depending on the number and complexity of implants.
- Implants are secured to the underlying bone using small titanium screws for long-term stability.
- Swelling is greatest during the first week and gradually improves over several months.
- Final results are typically appreciated between 3 and 6 months, with subtle soft tissue refinement continuing for up to one year.
- Because the implants become part of the facial framework, the results are considered permanent.
Whether you are considering a single chin implant or comprehensive facial skeletal augmentation, understanding each step of the journey allows you to make informed decisions with confidence.
Part 1: More Than an Operation
Patients often think of custom facial implant surgery as the operation itself.
In reality, the operation represents only one phase of a much larger process.
The final result depends upon a sequence of carefully coordinated events that begins weeks before surgery and continues for months afterward.
Successful treatment involves five major stages:
- Evaluation
- Design
- Manufacturing
- Surgery
- Healing
Each stage contributes to the final outcome.
If any step is compromised, the quality of the result can suffer.
Dr. Eppley’s Bottom Line
The operation is only one chapter of the story. Outstanding results begin with thoughtful planning and end with careful healing.
Why Custom Facial Implant Surgery Is Different
Although the surgical techniques used to place custom implants are based on established craniofacial principles, custom implant surgery differs fundamentally from surgery using standard implants.
Traditional implants require the surgeon to adapt a manufactured implant to the patient’s anatomy.
Custom implants reverse that process.
Instead of modifying the implant during surgery, the implant is designed beforehand to match the patient’s skeleton with remarkable precision.
This shift changes almost every aspect of treatment.
Planning becomes more important.
The operation becomes more predictable.
Implant positioning becomes more accurate.
The need for intraoperative modification is greatly reduced.
Perhaps most importantly, the surgeon spends less time trying to make the implant fit and more time ensuring that it is positioned exactly as intended.
Clinical Insight
Planning Has Replaced Guesswork
Before custom implants became widely available, much of facial implant surgery involved selecting the closest available implant and modifying it during the operation.
Today, most of those decisions occur long before the patient enters the operating room.
Virtual planning has transformed facial implant surgery from an exercise in adaptation into one of precision.
Every Operation Is Personalized
One of the defining characteristics of custom facial implant surgery is that no two procedures are identical.
Even when two patients request the same improvement—for example, a stronger jawline—the surgery may differ considerably.
Factors influencing the procedure include:
- the patient’s skeletal anatomy
- implant location
- implant size
- implant material
- previous facial surgery
- soft tissue thickness
- facial asymmetry
- aesthetic goals
These variables determine everything from the surgical approach to the placement of fixation screws.
The result is a procedure that is tailored not only to the implant, but also to the individual patient.
Surgery Begins Long Before the Operating Room
Patients frequently ask,
“What happens on the day of surgery?”
The better question is,
“What happens before surgery?”
By the time a patient arrives at the surgical center:
- the implant has already been designed
- multiple design revisions may have been completed
- manufacturing has been finished
- sterilization has been completed
- the surgical plan has been finalized
- fixation strategies have been determined
- incision placement has been planned
In many ways, the operation has already been rehearsed digitally.
The surgical procedure becomes the execution of a carefully developed plan.
Precision Through Preparation
Every successful custom facial implant operation reflects hundreds of small decisions made before the first incision.
These decisions include:
- implant contour
- border transitions
- fixation hole placement
- implant segmentation
- surgical approach
- instrument selection
- implant orientation
- soft tissue management
Each decision may appear minor in isolation.
Together, they determine how accurately the implant restores the intended facial architecture.
Clinical Pearl
The operating room is where preparation becomes reality.
What Makes Facial Implant Surgery Unique?
Unlike many cosmetic procedures that modify soft tissues alone, custom facial implant surgery changes the skeletal framework of the face.
Because bone defines facial shape, skeletal augmentation influences every overlying structure.
Changes in the facial skeleton affect:
- facial proportions
- contour
- shadowing
- jawline definition
- cheek prominence
- forehead shape
- neck transition
- profile balance
Rather than stretching or tightening tissues, the operation strengthens the foundation beneath them.
This is why custom implants often produce changes that appear remarkably natural.
The face still looks like the patient.
It simply rests upon a more balanced skeletal framework.
Dr. Eppley’s Bottom Line
Custom facial implant surgery enhances the architecture beneath the skin. The goal is not to change your identity—it is to improve the structural foundation that defines your facial appearance.
A Partnership Between Patient and Surgeon
Although technology plays a central role in custom implant surgery, successful outcomes remain collaborative.
The patient contributes:
- goals
- preferences
- aesthetic priorities
- feedback during design
The surgeon contributes:
- anatomical analysis
- implant design
- surgical planning
- operative execution
- postoperative management
The final result reflects both perspectives.
This partnership distinguishes custom implant surgery from procedures in which treatment decisions are made almost entirely in the operating room.
Clinical Insight
Communication Is Part of the Operation
Many patients assume surgery begins with anesthesia.
In reality, surgery begins with communication.
The better the surgeon understands what the patient hopes to achieve, the more accurately the implant can be designed to meet those expectations.
What Patients Should Expect
Custom facial implant surgery is best viewed as a process rather than an event.
There will be periods of excitement, anticipation, temporary swelling, gradual improvement, and ultimately long-term stabilization.
Most patients experience several recognizable phases:
- Learning
- Planning
- Surgery
- Recovery
- Adaptation
- Long-term enjoyment of the result
Understanding these stages helps establish realistic expectations.
It also explains why patience is an essential part of successful recovery.
The face heals gradually.
The most natural results are revealed over time rather than overnight.
Key Takeaways
- Custom facial implant surgery is a comprehensive process that begins well before the operation and continues throughout recovery.
- Every implant is designed specifically for the individual patient’s anatomy and aesthetic goals.
- Virtual planning replaces much of the intraoperative guesswork required with traditional stock implants.
- The operation enhances the skeletal framework that supports the face rather than simply modifying the soft tissues.
- Careful preparation, precise surgical execution, and thoughtful recovery all contribute to the final outcome.
- Communication between patient and surgeon is a critical component of successful treatment.
- The most natural results emerge gradually as healing progresses.
Dr. Eppley’s Bottom Line
Custom facial implant surgery is not simply the placement of an implant—it is the culmination of a carefully planned process that combines digital design, surgical precision, and biological healing to create a stronger, more harmonious facial foundation.
The Complete Guide to Custom Facial Implant Surgery
Part 2: Preoperative Planning: Where Successful Surgery Really Begins
Many patients believe that custom facial implant surgery begins on the day they enter the operating room.
In reality, the most important work has already been completed.
The operation itself is simply the execution of a carefully developed surgical plan that has often taken weeks to create.
Every successful custom facial implant begins with understanding three fundamental questions:
- What anatomical problem exists?
- What aesthetic change is desired?
- What is the safest and most effective way to achieve that goal?
Answering these questions requires far more than ordering a CT scan or selecting an implant material. It requires a systematic evaluation of the patient’s facial anatomy, expectations, and surgical options.
Planning is where experience matters most.
Dr. Eppley’s Bottom Line
The quality of a custom facial implant operation is largely determined before surgery ever begins. Careful planning creates predictable results.
Step One: The Initial Consultation
Every custom facial implant journey begins with a conversation.
Unlike many cosmetic procedures that involve modifying existing soft tissues, facial implant surgery changes the skeletal foundation of the face. That requires a thorough understanding of what the patient hopes to achieve.
During the consultation, several questions are explored:
- Which facial features concern the patient?
- Are the concerns aesthetic, reconstructive, or both?
- Are the goals subtle or transformative?
- Has previous facial surgery been performed?
- Are there functional problems in addition to cosmetic concerns?
This discussion establishes the framework for every decision that follows.
Clinical Insight
Patients Describe Appearance—Surgeons Diagnose Anatomy
Patients naturally describe what they see in the mirror:
“My chin looks weak.”
“My jaw isn’t defined.”
“My cheeks look flat.”
The surgeon translates those observations into underlying skeletal anatomy that can be measured, analyzed, and corrected.
Understanding Patient Goals
One of the greatest advantages of custom implants is that they can be designed to achieve very specific objectives.
Some patients seek subtle refinement.
Others desire more dramatic skeletal enhancement.
Neither goal is inherently better.
The objective is to understand precisely what the patient considers a successful outcome.
Helpful discussions often include:
- old photographs
- family facial characteristics
- computerized imaging
- examples of previous surgical results
- illustrations of facial anatomy
The goal is not to copy another person’s face.
The goal is to define the patient’s own aesthetic destination.
Clinical Pearl
The best implant designs begin with listening rather than measuring.
Comprehensive Facial Analysis
Once patient goals are understood, attention shifts to objective anatomical evaluation.
Unlike standard implant surgery, custom implant planning evaluates the face as a complete three-dimensional structure.
The surgeon analyzes:
- forehead projection
- brow position
- orbital support
- cheek projection
- midface width
- nasal base support
- chin projection
- mandibular width
- jaw angle morphology
- neck transition
- facial symmetry
- facial proportions
This analysis often reveals relationships that patients themselves had not recognized.
For example, a patient requesting a stronger chin may actually have a deficient jawline or underdeveloped midface contributing to the appearance of imbalance.
“Successful planning evaluates the face as an integrated skeletal system rather than isolated facial features.”
Medical Evaluation
Although custom facial implant surgery is primarily aesthetic, it remains a surgical procedure requiring a complete medical assessment.
Areas reviewed include:
- general health
- previous operations
- medications
- allergies
- smoking history
- diabetes
- bleeding disorders
- autoimmune disease
- prior facial trauma
- dental history
Previous facial procedures deserve particular attention because they may alter normal anatomy.
Examples include:
- genioplasty
- orthognathic surgery
- previous implants
- facial fracture repair
- craniofacial reconstruction
These procedures influence implant design as well as surgical planning.
The Importance of the 3D CT Scan
The CT scan is the foundation of every custom implant.
Unlike photographs, CT imaging reveals the actual skeletal architecture that will support the implant.
The scan provides precise information regarding:
- bone thickness
- facial asymmetry
- skeletal deficiencies
- previous hardware
- sinus anatomy
- nerve locations
- facial proportions
This digital model becomes the template upon which the implant is designed.
Without it, true customization is impossible.
Clinical Insight
The CT Scan Is the Blueprint
An architect cannot design a building without accurate measurements.
Similarly, a custom facial implant cannot be designed without an accurate digital model of the patient’s skeleton.
Digital Surgical Planning
After the CT scan has been processed into a three-dimensional model, the planning phase begins.
Modern CAD software allows the surgeon to evaluate the skull from virtually any angle.
Measurements can be obtained with submillimeter accuracy.
Areas of asymmetry become obvious.
Deficiencies can be quantified.
The implant is then developed directly on the patient’s digital skeleton.
Unlike standard implants, which must be adapted during surgery, every contour is customized before the operation.
Designing the Implant
The actual design process often occurs over multiple revisions.
The initial design establishes the overall concept.
Subsequent revisions refine:
- projection
- width
- contour
- border transitions
- fixation locations
- implant thickness
- implant segmentation
Patients are frequently surprised by the amount of attention devoted to details that measure only one or two millimeters.
Those small refinements often determine whether the final result appears natural.
Clinical Pearl
The first design creates the idea. Later revisions perfect it.
Patient Participation in the Design Process
One of the unique aspects of custom implant surgery is that patients often participate in reviewing the virtual design.
This allows meaningful discussions regarding:
- overall goals
- implant size
- contour
- subtle modifications
- anticipated appearance
Patients should remember, however, that the digital model represents skeletal change—not the final soft tissue appearance.
The implant is designed to improve the underlying architecture.
Healing and soft tissue adaptation ultimately determine the visible result.
Dr. Eppley’s Bottom Line
The virtual design process transforms patients from passive recipients into active participants in creating their surgical plan.
Choosing the Implant Material
Another important planning decision involves selecting the implant material.
Several materials are available, including:
- solid silicone
- PEEK
- porous polyethylene
- titanium (selected reconstructive situations)
Material selection depends upon:
- implant location
- design complexity
- desired flexibility
- fixation strategy
- revision history
- surgeon preference
Although the material influences manufacturing and handling characteristics, careful design remains far more important than the material itself.
A beautifully designed implant made from the appropriate material consistently outperforms a poorly designed implant made from the most advanced material.
Clinical Insight
Design Determines Success More Than Material
Patients often spend considerable time researching implant materials.
In reality, the quality of the design usually has a far greater influence on the final aesthetic result.
Manufacturing Begins
Once the design has been approved, the digital file is transferred for manufacturing.
During this stage:
- the implant is fabricated
- surface quality is verified
- fixation holes are incorporated
- dimensional accuracy is confirmed
- sterilization is completed
- packaging is prepared
This process generally requires several weeks depending on the implant complexity and manufacturer.
Unlike stock implants, each implant is manufactured only once—for one specific patient.
Preparing the Patient for Surgery
While the implant is being manufactured, the patient prepares for surgery.
Typical recommendations include:
- discontinue nicotine products
- stop medications that increase bleeding when medically appropriate
- complete necessary laboratory testing
- maintain good nutrition
- optimize dental hygiene for intraoral procedures
- arrange transportation
- prepare for postoperative recovery
Patients undergoing extensive facial augmentation may also benefit from preparing soft foods, cold compresses, and recovery supplies in advance.
Setting Realistic Expectations
Perhaps the most important aspect of preoperative planning involves education.
Patients should understand:
- swelling is temporary
- recovery is gradual
- implants improve skeletal proportions—not perfection
- minor asymmetry may remain
- final results require patience
Patients who understand the normal healing process typically experience a smoother recovery because they recognize that early swelling does not represent the final outcome.
Clinical Pearl
Preparation reduces anxiety. Education improves recovery.
The Final Preoperative Review
Shortly before surgery, the complete plan is reviewed.
This includes:
- implant design
- surgical goals
- incision locations
- anesthesia
- recovery expectations
- postoperative instructions
- remaining patient questions
By this point, every major decision has already been made.
The surgical team enters the operating room with a detailed roadmap.
Key Takeaways
- Successful custom facial implant surgery begins with careful planning rather than the operation itself.
- The consultation establishes both anatomical needs and patient expectations.
- Comprehensive facial analysis evaluates the face as an integrated skeletal framework.
- Three-dimensional CT imaging provides the blueprint for patient-specific implant design.
- Multiple virtual design revisions often refine the implant before manufacturing begins.
- Patients play an active role in reviewing and approving the design process.
- Implant material selection is important, but thoughtful design has the greatest influence on the final result.
- Proper medical preparation and patient education improve both safety and recovery.
- By the day of surgery, nearly every important decision has already been made.
Dr. Eppley’s Bottom Line
Custom facial implant surgery is unique because the most critical decisions occur before the first incision. Through detailed consultation, precise three-dimensional imaging, individualized design, and meticulous preparation, the operation becomes the final execution of a plan that has already been carefully engineered for one specific patient.
The Complete Guide to Custom Facial Implant Surgery
Part 3: The Operation: How Custom Facial Implants Are Surgically Placed
After weeks of planning, digital design, and implant manufacturing, surgery day has finally arrived.
For most patients, this is the stage that generates the greatest anticipation—and often the greatest anxiety.
Ironically, it is also the stage that has become the most predictable.
Because custom facial implant surgery is extensively planned before entering the operating room, the procedure itself is largely the execution of a carefully engineered blueprint. Every incision, implant orientation, fixation point, and surgical maneuver has already been anticipated.
The surgeon is no longer trying to determine what should be done.
The focus shifts to how to perform it with precision, safety, and efficiency.
Dr. Eppley’s Bottom Line
The operation is where months of planning become reality. A successful procedure is rarely improvised—it is executed.
Arrival at the Surgical Facility
Custom facial implant surgery is almost always performed in an accredited outpatient surgery center or hospital operating room.
After arrival, several steps occur before surgery:
- review of the surgical plan
- confirmation of implant availability
- review of medications and allergies
- photographs when appropriate
- surgical markings
- intravenous line placement
- meeting with the anesthesia team
Because every implant has been manufactured specifically for one patient, each implant is carefully verified before surgery begins.
General Anesthesia
Nearly all custom facial implant procedures are performed under general anesthesia.
This provides:
- complete patient comfort
- absolute immobility
- airway protection
- optimal surgical precision
- the ability to perform multiple implant procedures simultaneously
Depending on the procedure, surgery may last anywhere from two to six hours, occasionally longer when several facial regions are treated during the same operation.
Clinical Insight
Why Local Anesthesia Is Rarely Appropriate
Although small stock chin implants can sometimes be inserted under local anesthesia, custom implants usually involve greater surgical precision, multiple implant sites, screw fixation, and longer operative times. General anesthesia allows the surgeon to focus entirely on accuracy without patient discomfort or movement.
Surgical Positioning
Once anesthesia has been induced, the patient is positioned according to the implant locations.
For most facial procedures:
- the patient lies on the back
- the head is supported in a neutral position
- facial landmarks remain easily accessible
- sterile preparation includes the entire face and neck
When skull implants are performed, positioning may vary depending on whether augmentation involves the forehead, occiput, or both.
Incision Planning
One of the major advantages of custom facial implants is that they rarely require new or unusual incisions.
Instead, they utilize established craniofacial surgical approaches designed to minimize visible scarring.
Incision placement depends entirely upon the implant location.
Common Incisions
Forehead
- Coronal incision
- Pretrichial incision
- Endoscopic scalp incisions (selected cases)
Brow
- Upper eyelid crease
- Hairline
- Coronal approach
Infraorbital Rim
- Lower eyelid incision
- Transconjunctival incision
- Existing lower eyelid approaches
Cheeks
- Upper intraoral incision
- Occasionally lower eyelid approach
Paranasal Region
- Upper buccal sulcus incision
Chin
- Intraoral incision
- Submental incision
Jawline
- Submental incision
- Intraoral posterior vestibular incisions
- Combination approaches
Skull
- Hair-bearing scalp incisions
Clinical Pearl
Whenever possible, incisions are hidden inside the mouth, natural eyelid creases, or within the hair-bearing scalp.
Surgical Exposure
After the incision is made, the surgeon carefully creates a pathway to the underlying bone.
Unlike soft tissue cosmetic surgery, custom implant surgery requires exposure of the facial skeleton.
Special attention is given to protecting:
- sensory nerves
- facial muscles
- blood vessels
- tooth roots
- sinus cavities
Dissection follows natural anatomical tissue planes to minimize trauma.
Because the implant has already been designed for the patient’s anatomy, bone reshaping is rarely necessary.
Dr. Eppley’s Bottom Line
The surgeon’s objective is to expose the skeleton safely while preserving the surrounding anatomy that gives the face its normal function and appearance.
Implant Placement
This is the defining moment of the operation.
The implant is introduced through the surgical exposure and carefully positioned on the underlying skeleton.
Unlike stock implants that often require trimming or reshaping, custom implants usually fit precisely against the bone.
The surgeon confirms:
- complete seating
- correct orientation
- intimate bone contact
- smooth borders
- accurate symmetry
The implant should fit like a three-dimensional puzzle piece created specifically for that patient.
Clinical Insight
A Good Fit Is Immediately Obvious
One of the most satisfying moments in custom implant surgery occurs when the implant settles naturally into its planned position with minimal adjustment.
This precision reflects the quality of the preoperative design.
Screw Fixation
Most custom facial implants are secured using small titanium screws.
Fixation serves several purposes:
- prevents movement
- maintains symmetry
- preserves orientation
- promotes long-term stability
- simplifies healing
These screws are:
- biocompatible
- permanent
- extremely small
- generally not felt by the patient
Once healing occurs, the implant functions as part of the facial framework.
Multi-Piece Implants
Some implants—particularly large jawline implants—are intentionally manufactured as multiple components.
This approach allows:
- smaller incisions
- easier insertion
- improved positioning
- reduced tissue trauma
Once positioned, the individual pieces create one continuous skeletal contour.
Patients are often unaware that multiple pieces were used.
Clinical Pearl
A multi-piece implant functions as one implant after fixation. The segmentation simply facilitates placement.
Regional Surgical Differences
Although the basic principles remain similar, each facial region presents unique surgical considerations.
Forehead
Requires broad subperiosteal elevation with careful preservation of:
- supraorbital nerves
- frontal sinus
- hair-bearing scalp
Brow
Requires precise positioning to maintain natural orbital relationships.
Infraorbital Rim
Demands meticulous protection of:
- infraorbital nerve
- lower eyelid support
- orbital contents
Perhaps the most technically delicate implant procedure.
Cheeks
Require wide exposure across the zygomatic body while avoiding injury to adjacent facial muscles.
Chin
Relatively straightforward exposure with particular attention to:
- mental nerves
- chin pad support
- implant symmetry
Jawline
Among the most technically demanding procedures because of:
- implant length
- mandibular curvature
- mental nerves
- inferior alveolar nerve
- multiple fixation points
Skull
Requires extensive but relatively bloodless dissection beneath the scalp.
Large implants frequently seat surprisingly easily because of the broad surgical exposure.
Intraoperative Verification
Before closure, every implant undergoes a final evaluation.
The surgeon confirms:
- position
- fixation
- contour
- symmetry
- border transitions
- soft tissue coverage
Occasionally minor adjustments are made.
Because of detailed preoperative planning, major modifications are rarely necessary.
Clinical Insight
The Final Inspection
Much like an architect inspecting a completed structure before occupancy, the surgeon carefully evaluates every aspect of the implant before closing the incision.
Wound Closure
After the implants have been secured:
- surgical sites are irrigated
- bleeding is controlled
- soft tissues are repositioned
- incisions are closed in layers
Depending upon location:
- absorbable sutures
- removable sutures
- surgical adhesives
- skin staples (selected scalp procedures)
may be used.
The goal is restoring the tissues exactly as they existed before surgery—only now supported by a stronger skeletal foundation.
Dressings
Not every implant requires extensive dressings.
Depending on the procedure, patients may leave surgery with:
- facial compression garments
- chin wrap
- head dressing
- small drains (occasionally)
- ice packs
Most dressings are temporary and removed within the first several postoperative days.
Recovery Room
After surgery:
Patients awaken in the recovery area where the nursing staff monitors:
- breathing
- blood pressure
- comfort
- swelling
- nausea
- neurological status
Most patients are discharged home the same day once they meet standard recovery criteria.
Because general anesthesia has been used, patients require a responsible adult to accompany them home.
Dr. Eppley’s Bottom Line
Although the operation may last only a few hours, the precision achieved during those hours determines how the implants will function for decades.
What Patients Notice Immediately
During the first several hours after surgery, patients commonly experience:
- facial swelling
- tightness
- numbness
- mild discomfort
- limited facial movement
These findings are expected.
They reflect the body’s normal response to surgery rather than the final appearance.
In fact, the implants themselves are often almost completely hidden by swelling during the first week.
Clinical Pearl
The face seen immediately after surgery is a healing face—not the final result.
Key Takeaways
- Custom facial implant surgery is performed under general anesthesia in an accredited outpatient facility.
- Most facial implant procedures utilize hidden incisions within the mouth, eyelids, or hair-bearing scalp.
- The implants are positioned directly on the facial skeleton and secured with small titanium screws for long-term stability.
- Because each implant has been digitally customized, intraoperative modification is usually minimal.
- Different facial regions require unique surgical approaches while following the same principles of precision and anatomical preservation.
- Before closure, every implant is carefully evaluated for position, symmetry, contour, and fixation.
- Most patients return home the same day, with swelling and tightness representing normal early healing rather than the final outcome.
Dr. Eppley’s Bottom Line
The surgical procedure is where engineering, anatomy, and operative skill converge. By the time the operation begins, every major decision has already been made through meticulous planning. The surgeon’s role is to translate that virtual design into a stable, natural-looking enhancement of the patient’s facial skeleton with precision, safety, and respect for the surrounding anatomy.
The Complete Guide to Custom Facial Implant Surgery
Part 4: Recovery After Custom Facial Implant Surgery: A Week-by-Week Timeline
For many patients, the most challenging part of custom facial implant surgery is not the operation itself—it is the recovery afterward.
Unlike many cosmetic procedures where improvement is seen almost immediately, facial skeletal surgery follows a gradual biological healing process. Swelling, stiffness, temporary numbness, and changes in facial appearance are all normal parts of recovery. While these changes can be unsettling, they represent the body’s natural response to surgery rather than a problem with the implants.
Understanding what to expect—and when to expect it—helps patients recover with confidence rather than unnecessary anxiety.
The face heals in stages. Every week brings noticeable improvement, but patience remains one of the most important ingredients in achieving an excellent result.
Dr. Eppley’s Bottom Line
Recovery is a process of healing, not a countdown to a final result. The face changes continuously during the first several months, with each stage bringing greater definition and refinement.
The First 24 Hours
The first day after surgery is devoted primarily to rest and controlling swelling.
Most patients return home the same day accompanied by a family member or friend.
Common experiences include:
- facial tightness
- moderate swelling
- numbness
- mild oozing from intraoral incisions
- sore throat from anesthesia
- fatigue
- limited mouth opening
Pain is usually less severe than patients anticipate.
Most discomfort is described as pressure or tightness rather than sharp pain.
Cold compresses and head elevation help minimize early swelling.
Clinical Pearl
The first night is often the most uncomfortable—not because of pain, but because swelling begins rapidly during the first several hours.
Days 2–3: Peak Swelling
Most facial swelling reaches its maximum between 48 and 72 hours after surgery.
Patients often feel they look worse before they begin looking better.
This is completely normal.
During this period patients commonly notice:
- significant facial fullness
- bruising
- stiffness
- difficulty smiling naturally
- temporary asymmetry from uneven swelling
These changes should not be interpreted as the surgical result.
The implants themselves are almost completely obscured by postoperative swelling.
Clinical Insight
Swelling Is Not Symmetrical
The right and left sides of the face rarely swell identically.
Temporary asymmetry during recovery is common and usually reflects differences in tissue healing—not implant position.
The First Week
By the end of the first week:
Most bruising begins to fade.
Swelling remains substantial but slowly starts to soften.
Patients often experience:
- facial firmness
- numbness
- restricted facial expressions
- decreased appetite
- improving energy
Depending on the procedure, many patients can resume light household activities.
Walking is encouraged.
Heavy lifting should be avoided.
Diet During the First Week
Diet depends upon implant location.
Intraoral procedures
Soft foods are recommended.
Examples include:
- yogurt
- eggs
- pasta
- fish
- soups
- smoothies
- mashed potatoes
Foods requiring aggressive chewing should be avoided.
Scalp procedures
Normal eating usually resumes immediately.
Jawline procedures
Patients may require a softer diet for one to two weeks because of temporary muscle stiffness.
Clinical Pearl
Good nutrition accelerates healing. Recovery is not the time for restrictive dieting.
Sleeping Position
During the first two weeks:
Patients should sleep with:
- head elevated
- two or three pillows
- recliner if preferred
Elevation helps reduce swelling.
Sleeping directly on the face should be avoided until tenderness resolves.
Weeks Two Through Four
This is when patients begin recognizing meaningful improvement.
Most bruising has disappeared.
Swelling becomes less obvious to others.
Patients typically notice:
- improved facial definition
- increased comfort
- better mouth opening
- improved facial movement
- returning confidence
Many patients return to work during this period depending on:
- occupation
- implant location
- individual comfort level
Returning to Work
General guidelines:
Desk work
7–14 days
Public-facing occupations
2–3 weeks
Physically demanding jobs
3–6 weeks
Recovery varies considerably among individuals.
Exercise
Exercise should resume gradually.
Typical recommendations include:
Walking
Immediately
Light cardio
After approximately two weeks
Weight training
Three to four weeks
Contact sports
Usually six to twelve weeks depending upon implant location.
Patients should always follow individualized postoperative recommendations.
Clinical Insight
Exercise Does Not Move the Implant
Once fixation screws have secured the implant, ordinary exercise does not displace it.
Activity restrictions exist primarily to reduce swelling and allow the surrounding tissues to heal.
Numbness
Temporary numbness is expected after many facial implant procedures.
Common locations include:
- lower lip
- chin
- cheeks
- forehead
- scalp
Nerve recovery occurs slowly.
Improvement often continues for:
- several months
- occasionally one year
Permanent numbness is uncommon.
Clinical Pearl
Nerves heal more slowly than skin or muscle. Sensation usually returns gradually rather than suddenly.
One to Three Months
This period represents the transition from recovery to refinement.
Most patients now appreciate the overall improvement.
Swelling continues to decline.
The facial skeleton becomes more visible beneath the soft tissues.
Patients frequently notice:
- sharper jawline definition
- improved cheek contours
- more natural facial movement
- increasing confidence
Friends often comment that the patient looks “better” without recognizing that surgery has been performed.
This subtlety reflects successful skeletal enhancement.
Three to Six Months
Most patients consider themselves fully recovered by this stage.
Residual swelling continues to improve.
Soft tissues adapt to the new skeletal framework.
Implants begin to feel like a normal part of the face.
Patients generally no longer think about the implants during daily activities.
Dr. Eppley’s Bottom Line
By three to six months, patients stop noticing the implants and begin noticing only their improved facial structure.
Six Months to One Year
The final phase of recovery involves subtle refinement.
Changes include:
- complete scar maturation
- soft tissue adaptation
- continued nerve recovery
- normalization of facial movement
- improved skin draping
Most patients cannot identify day-to-day changes during this period.
Improvement occurs gradually.
At one year, the result is considered mature.
Recovery by Implant Region
Healing varies depending on implant location.
Forehead
Moderate swelling
Scalp numbness common
Recovery generally straightforward.
Brow
Temporary swelling around the eyes.
Occasional bruising.
Infraorbital Rim
Longest visible swelling.
Lower eyelid tightness common.
Recovery may require several months.
Cheeks
Moderate swelling.
Facial fullness initially exaggerates implant size.
Chin
Usually recovers relatively quickly.
Temporary lower lip numbness possible.
Jawline
Often associated with the greatest swelling.
Chewing stiffness common.
Final definition develops gradually.
Skull
Scalp tightness and numbness common.
Swelling usually hidden by hair.
Common Patient Concerns
“I Look Too Big.”
Almost always due to swelling.
“One Side Is More Swollen.”
Very common.
Healing is rarely perfectly symmetrical.
“The Implant Feels Tight.”
Normal.
Soft tissues gradually relax.
“I Can’t Smile Normally.”
Temporary muscle stiffness and swelling restrict facial movement.
Normal expression returns gradually.
“I Can Feel the Screws.”
Initially possible in very thin patients.
Most become unnoticed with healing.
Clinical Insight
Healing Is Not Linear
Patients often experience several days of rapid improvement followed by periods where progress seems to stop.
This plateau is normal.
Recovery occurs in waves rather than a straight line.
Emotional Recovery
Recovery is not purely physical.
Many patients experience emotional fluctuations.
These may include:
- excitement
- impatience
- temporary disappointment from swelling
- increasing confidence
- satisfaction as healing progresses
Understanding these emotional stages is just as important as understanding the physical recovery.
Clinical Pearl
Do not judge your surgical result during the first month. Judge your healing—not your appearance.
Long-Term Care
Once healing is complete:
No special maintenance is required.
Patients may:
- exercise normally
- travel
- undergo MRI examinations
- receive dental care
- participate in sports after complete healing
The implants require no replacement or routine maintenance.
Key Takeaways
- Swelling reaches its peak approximately two to three days after surgery and gradually improves over several months.
- Most patients resume normal daily activities within one to two weeks, although complete recovery takes longer.
- Recovery speed varies according to implant location, with infraorbital and jawline implants generally requiring the longest healing period.
- Temporary numbness, stiffness, and facial tightness are expected components of normal healing.
- Exercise can be resumed gradually once early healing has occurred and fixation remains secure.
- Final facial definition emerges progressively as swelling resolves and the soft tissues adapt to the new skeletal framework.
- Emotional recovery parallels physical healing, making patience an essential part of the process.
- By six months to one year, most patients have achieved their mature, long-term result.
Dr. Eppley’s Bottom Line
Recovery after custom facial implant surgery is a gradual transformation rather than an overnight change. Each stage of healing reveals more of the carefully planned skeletal enhancement beneath the soft tissues. Patients who understand this process are better prepared to appreciate the remarkable improvements that emerge over time, ultimately seeing not an implant, but a stronger, more balanced version of their own facial architecture.
The Complete Guide to Custom Facial Implant Surgery
Part 5: Risks, Complications, and Revision Surgery
Every surgical procedure carries some degree of risk, and custom facial implant surgery is no exception. While modern imaging, virtual planning, and patient-specific implant design have dramatically improved the predictability of facial implant surgery, no operation can eliminate the biological variability of healing.
The good news is that serious complications following custom facial implant surgery are uncommon. When they do occur, they are often recognizable, treatable, and rarely threaten long-term health. More importantly, many potential problems can be minimized through thoughtful implant design, meticulous surgical technique, careful patient selection, and close postoperative follow-up.
Perhaps the most important point for patients to understand is that complications are not all equal. Some are related to surgery itself, some to the body’s healing response, and others to aesthetic expectations. Understanding these differences helps patients develop realistic expectations and approach surgery with confidence rather than unnecessary fear.
Dr. Eppley’s Bottom Line
Every operation involves risk, but the goal of modern custom facial implant surgery is to identify, minimize, and manage those risks through careful planning rather than simply reacting to them after surgery.
Understanding Surgical Risk
When patients hear the word complication, they often imagine a catastrophic event.
Fortunately, that is rarely the reality.
Most postoperative concerns involve temporary healing issues rather than permanent problems.
Complications generally fall into four categories:
- Surgical complications
- Healing complications
- Implant-related complications
- Aesthetic complications
Each category has different causes, different treatments, and different long-term implications.
- “Most postoperative issues fit into one of four predictable categories.”
Infection
Infection is one of the complications patients fear most.
Fortunately, it is also one of the least common.
Several factors contribute to the low infection rate of modern custom implants:
- sterile manufacturing
- perioperative antibiotics
- precise implant fit
- minimal dead space
- meticulous surgical technique
When infections occur, they usually develop within the first several weeks after surgery.
Common signs include:
- increasing redness
- warmth
- swelling
- drainage
- fever
- increasing pain after initial improvement
Early infections often respond to antibiotics.
Occasionally, drainage or temporary implant removal becomes necessary.
Fortunately, permanent removal is uncommon.
Clinical Insight
A Well-Fitting Implant Is Less Likely to Become Infected
Because custom implants closely conform to the underlying bone, there is less unused space around the implant where fluid can accumulate. This intimate fit may contribute to a lower likelihood of bacterial colonization compared to poorly fitting implants.
Hematoma
A hematoma is a collection of blood that develops beneath the tissues after surgery.
Although uncommon, it typically occurs during the first 24 to 48 hours.
Symptoms may include:
- rapid swelling
- increased pressure
- significant pain
- bruising
Small hematomas may resolve naturally.
Larger collections occasionally require prompt drainage to prevent pressure on surrounding tissues.
Seroma
A seroma is a collection of clear tissue fluid.
It is less common than a hematoma but can occur after larger implant procedures, particularly in the scalp.
Most small seromas resolve with observation.
Larger collections may require aspiration.
Swelling That Lasts Longer Than Expected
One of the most common “complications” is actually not a complication at all.
Patients frequently become concerned when swelling persists beyond several weeks.
Depending on the implant location, residual swelling may continue for:
- three months
- six months
- occasionally one year
This is especially true following:
- jawline implants
- infraorbital implants
- extensive skull augmentation
Patience is often the appropriate treatment.
Clinical Pearl
Persistent swelling is usually a sign of normal healing—not implant failure.
Nerve Injury
Temporary sensory changes are expected after many facial implant procedures.
These include:
- chin numbness
- lower lip numbness
- cheek numbness
- forehead numbness
- scalp numbness
These symptoms result from temporary stretching or irritation of nearby sensory nerves.
Permanent nerve injury is uncommon because modern implant design respects normal anatomical pathways identified on CT imaging.
Motor nerve injury, which affects facial movement, is considerably rarer than temporary sensory changes.
Implant Movement
One of the greatest advantages of screw fixation is long-term implant stability.
Properly fixed custom implants rarely move.
When movement occurs, it usually develops:
- before fixation
- shortly after surgery
- following significant trauma
Patients sometimes worry that:
- sleeping on the implant
- exercise
- chewing
- facial movement
will cause displacement.
Once healing has occurred, these activities do not normally affect implant position.
Dr. Eppley’s Bottom Line
A custom implant secured with titanium screws becomes remarkably stable. Everyday activities do not cause the implant to shift.
Implant Visibility or Palpability
Thin patients occasionally notice:
- implant edges
- fixation screws
- transition zones
Most become less noticeable as tissues heal.
Good implant design emphasizes gradual border transitions specifically to reduce visibility.
This is one reason why border design receives so much attention during virtual planning.
Asymmetry
Perfect facial symmetry does not exist naturally.
Consequently, perfect postoperative symmetry should not be expected.
Residual asymmetry may result from:
- pre-existing skeletal differences
- soft tissue asymmetry
- muscle imbalance
- differential swelling
- healing variability
In some patients, slight asymmetry actually appears more natural than complete mathematical symmetry.
Clinical Insight
Symmetry Is an Artistic Goal, Not a Mathematical One
The objective of surgery is facial harmony.
Pursuing absolute symmetry often creates an appearance that is less natural than respecting the subtle asymmetries present in every face.
Undercorrection
Occasionally patients feel that the improvement is too subtle.
This is called undercorrection.
Reasons include:
- conservative design
- patient preference during planning
- soft tissue thickness
- persistent swelling masking definition
Because custom implants are individually designed, undercorrection is often easier to address than with standard implants.
Revision may involve:
- implant replacement
- implant overlay
- secondary augmentation
Overcorrection
Less commonly, patients believe the implant is too prominent.
True overcorrection is uncommon because:
- virtual planning allows detailed review
- patients participate in design
- implant dimensions are measured digitally
When necessary, implant modification or replacement can be performed.
Clinical Pearl
Most concerns regarding implant size become less noticeable as swelling resolves and patients adapt to their new appearance.
Bone Remodeling
Patients frequently ask whether implants damage the underlying bone.
The answer is generally no.
Minor remodeling beneath an implant may occur over many years.
This represents normal biological adaptation rather than disease.
Because custom implants distribute forces broadly across the skeleton, clinically significant bone changes are uncommon.
Implant Exposure
Implant exposure occurs when the overlying tissues fail to heal adequately, allowing the implant to become visible.
Fortunately, this complication is rare.
Risk factors include:
- infection
- smoking
- poor tissue quality
- previous radiation
- repeated surgery
Careful soft tissue handling and healthy wound healing greatly reduce this risk.
Scar Problems
Because most custom facial implant incisions are hidden:
- inside the mouth
- within the scalp
- in eyelid creases
visible scarring is usually minimal.
Patients prone to abnormal scarring should discuss this during consultation.
Revision Surgery
Revision surgery does not necessarily indicate failure.
In facial implant surgery, revisions generally fall into three categories.
Healing Revisions
Address problems such as:
- scar revision
- implant repositioning
- drainage
- minor contour adjustment
Design Revisions
Occur when patients desire:
- additional projection
- less projection
- improved contour
- greater symmetry
These revisions are aesthetic refinements rather than corrections of surgical error.
Secondary Enhancement
Some patients simply decide they would like additional facial enhancement years later.
Examples include:
- adding jawline implants after chin augmentation
- expanding forehead augmentation
- combining cheek and infraorbital implants
This represents continued facial enhancement rather than revision.
The Psychology of Revision
One unique aspect of aesthetic surgery is that satisfaction depends upon both objective improvement and personal expectations.
Patients sometimes request revision despite technically excellent surgery.
Others remain highly satisfied despite minor imperfections.
Successful outcomes require balancing:
- anatomy
- design
- healing
- expectations
This balance begins during consultation and continues throughout recovery.
Clinical Insight
The Best Revision Is the One That Never Becomes Necessary
Most revisions are prevented long before surgery through:
- careful consultation
- realistic expectations
- precise implant design
- meticulous surgical execution
Planning remains the greatest tool for preventing revision.
How Modern Technology Has Reduced Complications
Compared with facial implant surgery twenty years ago, modern custom implants provide several advantages:
- patient-specific fit
- CT-guided planning
- digital measurements
- improved border design
- screw fixation
- virtual symmetry analysis
- precise manufacturing
These advances have reduced many of the uncertainties that once required intraoperative judgment.
Putting Risk Into Perspective
Every patient considering surgery asks the same question:
“Is it worth it?”
The answer depends on balancing:
- expected improvement
- surgical risk
- recovery
- long-term satisfaction
For appropriately selected patients, custom facial implant surgery has one of the highest satisfaction rates among facial skeletal procedures because the improvements are permanent, individualized, and structurally based.
No operation is risk-free.
But thoughtful planning makes successful outcomes far more predictable than many patients realize.
Key Takeaways
- Serious complications following custom facial implant surgery are uncommon.
- Most postoperative concerns involve normal healing rather than implant problems.
- Infection, hematoma, and seroma are uncommon and are usually treatable when recognized early.
- Temporary numbness and swelling are expected components of recovery and generally improve over time.
- Screw fixation provides excellent long-term implant stability, making implant movement rare.
- Revision surgery may address healing, design refinement, or additional aesthetic enhancement rather than surgical failure.
- Modern CT imaging, CAD design, and patient-specific manufacturing have significantly improved the precision and predictability of custom facial implant surgery.
- Careful planning remains the most effective way to minimize complications and achieve long-term success.
Dr. Eppley’s Bottom Line
The greatest advancement in custom facial implant surgery has not been a new material or a new instrument—it has been the ability to plan each operation with extraordinary precision before surgery begins. Most complications can be minimized through thoughtful design, meticulous technique, and realistic expectations. The ultimate goal is not merely to avoid problems, but to create a result that appears so natural the implant itself becomes virtually invisible, leaving only a stronger, more harmonious facial architecture.
The Complete Guide to Custom Facial Implant Surgery
Part 6: Long-Term Results: Living with Custom Facial Implants for a Lifetime
One of the most common questions patients ask after custom facial implant surgery is surprisingly simple:
“What happens now?”
Unlike many cosmetic procedures that require repeated treatments or ongoing maintenance, custom facial implants are designed to become a permanent part of your facial framework. Once healing is complete, most patients spend very little time thinking about their implants. Instead, they simply enjoy a facial appearance that feels more balanced, stronger, and more proportionate.
Living with custom facial implants is remarkably uneventful. Patients eat normally, exercise normally, undergo medical imaging, travel, age, and live their daily lives without making accommodations for the implants.
The implants become part of the background—not the focus—of everyday life.
Dr. Eppley’s Bottom Line
The ultimate success of a custom facial implant is reached when the patient no longer thinks about the implant—they simply recognize their face as looking the way it always should have.
Are Custom Facial Implants Permanent?
Yes.
Custom facial implants are intended to be permanent devices.
Unlike injectable fillers, fat grafting, or temporary implants, they are designed to remain in place indefinitely.
The implant material itself does not:
- dissolve
- wear out
- degrade
- shrink
- lose volume
Once healing is complete, the implant continues providing structural support for decades.
This permanence is one of the major advantages of skeletal augmentation.
Clinical Insight
Permanent Does Not Mean Irreversible
Although custom implants are intended to remain permanently, they can be removed or replaced if circumstances change or if a patient desires additional enhancement.
Do Implants Become Part of the Body?
Patients often ask whether the implant “fuses” to the bone.
The answer depends upon the implant material.
Solid silicone implants remain separate from the skeleton while becoming securely stabilized by:
- surrounding soft tissue
- scar tissue
- titanium screw fixation
Other materials, such as porous polyethylene, allow tissue ingrowth into their surface.
Regardless of material, the implant becomes a stable component of the facial skeleton.
Patients generally cannot distinguish where their natural bone ends and the implant begins.
Can You Feel the Implant?
Immediately after surgery, patients are naturally aware of the implant because of swelling, tightness, and healing.
As recovery progresses, this awareness gradually disappears.
Several months after surgery, most patients report that:
- the implant feels normal
- they no longer notice it during daily activities
- they forget it is present
The goal is not simply an implant that looks natural.
It should also feel like a natural part of the face.
Clinical Pearl
The brain adapts remarkably well to changes in facial structure. What initially feels unfamiliar eventually becomes the patient’s new normal.
Will Other People Know I Had Surgery?
Perhaps the most gratifying compliment patients receive is:
“You look great. Have you lost weight?”
or
“Something looks different, but I can’t tell what.”
Successful custom facial implant surgery enhances the underlying facial framework without creating an artificial appearance.
The objective is not to make patients look like someone else.
The objective is to make them look like themselves—with stronger facial architecture.
Because skeletal changes influence facial proportions rather than individual facial features, improvements are often recognized subconsciously rather than consciously.
How the Face Ages with Implants
One common misconception is that facial implants prevent aging.
They do not.
The normal aging process continues.
Skin still:
- loses elasticity
- develops wrinkles
- descends gradually
Soft tissues still change over time.
However, because the underlying skeleton has been strengthened, facial support often remains better than it otherwise would have.
Patients frequently notice that:
- jawline definition persists longer
- cheek support remains stronger
- profile balance is maintained
The implants do not stop aging.
They provide a stronger framework upon which aging occurs.
Dr. Eppley’s Bottom Line
Custom facial implants do not make the face immune to aging—they provide a stronger skeletal foundation that continues to support the aging face throughout life.
Can You Have a Facelift Later?
Absolutely.
Future facial rejuvenation procedures remain entirely possible.
Examples include:
- facelift
- neck lift
- brow lift
- eyelid surgery
- fat grafting
- laser resurfacing
In fact, skeletal augmentation and soft tissue rejuvenation complement one another.
One restores structural support.
The other addresses the effects of aging in the overlying tissues.
Many patients eventually undergo both during different stages of life.
What Happens After Facial Trauma?
Patients often wonder whether a blow to the face could damage the implant.
Fortunately, custom implants are remarkably durable.
Most everyday trauma causes no damage.
Examples include:
- accidental bumps
- sports injuries after complete healing
- minor falls
Significant facial trauma capable of fracturing facial bones could also damage the implant, but the injury severe enough to do so would likely have injured the natural skeleton as well.
Fortunately, implants can be evaluated with CT imaging and, if necessary, replaced.
Clinical Insight
Implants Are Stronger Than Many Patients Expect
Modern facial implant materials tolerate ordinary daily forces exceptionally well.
Patients do not need to live cautiously once healing has been completed.
MRI, CT Scans, and X-Rays
Custom facial implants are compatible with modern medical imaging.
Patients can safely undergo:
- MRI examinations
- CT scans
- dental X-rays
- airport security imaging
Solid silicone implants produce minimal imaging artifact.
Titanium fixation screws may be visible on CT scans but rarely interfere with diagnostic imaging.
Patients should simply inform healthcare providers that implants are present.
Airport Security
One of the most frequently asked questions is:
“Will airport scanners detect my implants?”
No.
Facial implants do not trigger airport metal detectors.
Even though titanium fixation screws contain metal, they are extremely small and do not activate security screening systems.
Patients do not receive implant identification cards because none are necessary.
Dental Care
Patients with chin or jaw implants often ask whether routine dental treatment becomes more difficult.
The answer is generally no.
Normal procedures including:
- cleanings
- fillings
- crowns
- orthodontics
- dental implants
can all be performed normally.
Dentists should simply be informed that facial implants are present if treatment involves the surrounding bone.
Can the Implant Move Years Later?
Properly fixed custom implants are remarkably stable.
Late movement is exceedingly uncommon.
If an implant changes position years later, it is usually associated with:
- significant facial trauma
- removal of fixation
- unusual biological circumstances
Normal facial movement, chewing, exercise, or sleeping do not cause implant migration.
Clinical Pearl
Once healing is complete, the implant becomes mechanically stable and remains in the position in which it was originally secured.
Can Bone Grow Over the Implant?
Patients occasionally ask whether new bone eventually covers the implant.
The answer depends upon the material and anatomical location.
Minor tissue adaptation may occur.
However, significant bone overgrowth is uncommon.
Likewise, the implant does not continue enlarging over time.
The facial contour established during surgery remains essentially unchanged.
Can the Implant Be Replaced?
Yes.
One advantage of custom implants is that future modifications remain possible.
Patients may eventually desire:
- additional augmentation
- contour refinement
- expansion of previous augmentation
- replacement following trauma
- new implant designs made with improved technology
Because the original CT scan and digital design are preserved, revision planning is often more straightforward than the original surgery.
Clinical Insight
Digital Records Become Lifelong Resources
One of the unique advantages of custom implant surgery is the preservation of the digital design.
Future revisions can often begin using the original virtual model rather than starting from scratch.
Satisfaction Over Time
Studies of facial implant surgery consistently demonstrate that patient satisfaction often increases with time.
Why?
Because patients gradually adapt to their improved appearance.
Initially, they compare themselves with their previous face.
Months later, the enhanced appearance simply becomes their identity.
The implants no longer appear “new.”
They simply appear normal.
Why Patients Rarely Think About Their Implants
Patients considering surgery often imagine that they will constantly be aware of having implants.
In reality, the opposite usually occurs.
After complete healing:
- they no longer feel the implants
- they no longer think about them
- they simply recognize a stronger facial structure
This psychological adaptation represents one of the final stages of successful recovery.
Living Normally
Once recovery has been completed, patients can:
- exercise without restriction
- participate in sports
- travel internationally
- undergo medical imaging
- receive dental care
- wear helmets
- shave normally
- sleep in any position
- age naturally
There are no routine maintenance requirements.
No periodic replacement.
No scheduled servicing.
The implants simply continue performing their structural role.
Clinical Pearl
The best custom facial implants become almost invisible—not only to others, but also to the patient.
Looking Toward the Future
Custom facial implants continue to evolve.
Future developments will likely include:
- AI-assisted implant design
- improved biomechanical modeling
- enhanced surgical planning
- personalized tissue simulation
- more advanced manufacturing techniques
Yet one principle is unlikely to change.
Excellent results will continue to depend upon thoughtful planning, artistic judgment, and a thorough understanding of facial anatomy.
Technology will enhance the surgeon’s expertise—not replace it.
Key Takeaways
- Custom facial implants are designed to provide permanent skeletal enhancement.
- Most patients eventually forget that the implants are present because they feel like a natural part of the face.
- The implants age with the patient by continuing to support the facial framework while normal soft tissue aging occurs.
- Future cosmetic procedures, including facelifts and eyelid surgery, remain entirely possible.
- Custom implants are compatible with MRI, CT scans, dental imaging, and airport security systems.
- Properly fixed implants rarely move after healing and require no routine maintenance or replacement.
- Digital implant designs provide a valuable foundation for any future revisions or enhancements.
- The long-term goal is not simply a permanent implant, but a permanent improvement in facial harmony and confidence.
Dr. Eppley’s Bottom Line
The greatest measure of success in custom facial implant surgery is not how impressive the implant appears on a CT scan—it is how naturally it becomes part of a patient’s life. Years after surgery, the implant should no longer be something the patient notices. Instead, it should simply provide the facial balance, definition, and structural harmony that feels as though it had always been there.
The Complete Guide to Custom Facial Implant Surgery
Part 7: Frequently Asked Questions About Custom Facial Implant Surgery
Patients considering custom facial implant surgery often ask many of the same questions.
Some focus on the operation itself. Others are concerned about recovery, safety, permanence, or long-term results. While every patient has unique anatomy and aesthetic goals, many of the questions have consistent answers based on decades of clinical experience.
The following questions represent the topics most commonly discussed during consultation and throughout the treatment process.
Frequently Asked Questions
1. Am I a Good Candidate for Custom Facial Implant Surgery?
Ideal candidates are healthy adults with stable facial skeletal anatomy who wish to improve facial proportions through permanent skeletal enhancement. Candidates should have realistic expectations and understand that implants enhance existing facial architecture rather than create an entirely different face.
2. What Makes Custom Implants Better Than Standard Facial Implants?
Custom implants are designed specifically for your own facial skeleton using a three-dimensional CT scan. This allows improvements in shape, contour, symmetry, and overall facial harmony that cannot usually be achieved with prefabricated stock implants.
3. How Long Does Surgery Take?
Most procedures require between 2 and 6 hours, depending on:
- number of implants
- implant complexity
- previous surgery
- revision procedures
- additional facial operations performed simultaneously
4. Will I Need to Stay Overnight?
In most cases, no.
Custom facial implant surgery is typically performed as an outpatient procedure, allowing patients to return home the same day.
More extensive reconstructions may occasionally require overnight observation.
5. Is the Surgery Painful?
Most patients are surprised that discomfort is less than expected.
Pain is usually described as:
- pressure
- tightness
- stiffness
rather than severe pain.
Prescription pain medication is generally needed only during the first several days.
6. How Long Will I Be Swollen?
Major swelling improves during the first two to three weeks.
Residual swelling continues to resolve over several months.
Final refinement typically occurs between three and six months, with subtle changes occasionally continuing for up to one year.
7. When Can I Return to Work?
This depends on the procedure and the patient’s occupation.
Typical guidelines include:
- Desk work: 1–2 weeks
- Public-facing jobs: 2–3 weeks
- Heavy physical work: 3–6 weeks
8. When Can I Exercise Again?
Walking begins immediately.
Light cardiovascular exercise generally resumes after about two weeks.
Weight training usually begins after three to four weeks.
Contact sports should be delayed until healing is complete.
9. Will the Implants Move?
No.
Modern custom implants are secured with titanium screws that provide excellent long-term stability.
Once healing has occurred, normal facial movement, chewing, exercise, and sleeping do not cause implant movement.
10. Can Other People Tell I Have Implants?
The goal is not for people to recognize the implants.
The goal is for them to notice improved facial balance.
Most successful custom implant procedures create natural changes that appear to be part of the patient’s normal anatomy.
11. Will My Face Feel Different Forever?
Initially, yes.
Long term, usually no.
As healing progresses, most patients report that the implants simply feel like part of their own face.
12. Can I Feel the Titanium Screws?
Some very thin patients may temporarily feel small fixation screws during early healing.
As tissues mature, most patients no longer notice them.
13. Will the Implants Affect My Smile?
Temporary stiffness is common.
Permanent changes in facial expression are uncommon.
Normal facial movement gradually returns as swelling resolves.
14. Are Custom Facial Implants Permanent?
Yes.
Custom implants are intended to remain in place permanently and do not require routine replacement.
15. Can They Be Removed?
Yes.
Although intended as permanent devices, custom implants can be removed or replaced if necessary.
Revision surgery is generally straightforward because the implant is anatomically well defined.
16. Will I Set Off Airport Security?
No.
The implants and small titanium fixation screws do not activate airport security systems.
No implant identification card is necessary.
17. Can I Have an MRI?
Yes.
Modern custom facial implants are compatible with MRI examinations, CT scans, and routine medical imaging.
Always inform your healthcare provider that implants are present.
18. Will the Implants Age with Me?
The implants themselves do not age.
Your facial soft tissues continue their normal aging process.
Because the skeletal framework has been strengthened, facial support often remains improved throughout aging.
19. Can I Have a Facelift Later?
Absolutely.
Future facial rejuvenation procedures—including facelifts, neck lifts, eyelid surgery, brow lifts, and fat grafting—can all be performed after custom facial implant surgery.
20. What Happens if I Injure My Face?
Most everyday trauma does not damage custom implants.
Severe facial injuries capable of fracturing bone may also affect the implant, but both can usually be evaluated and treated with modern imaging and surgical techniques.
21. What If I Want More Enhancement Later?
Additional augmentation is possible.
Many patients later choose complementary implants to enhance other facial regions or elect to replace an implant with a modified design if their aesthetic goals evolve.
22. Are Custom Facial Implants Safe?
Yes.
When performed by an experienced surgeon using modern imaging, patient-specific design, sterile manufacturing, and meticulous surgical technique, custom facial implant surgery has an excellent safety profile.
As with any surgical procedure, risks exist, but serious complications are uncommon.
23. How Long Do the Results Last?
The implants themselves are permanent.
Once healing is complete, the skeletal changes remain stable for decades.
There is no maintenance schedule or routine replacement interval.
24. Is Recovery Worth It?
Most patients answer this question after surgery rather than before it.
Although recovery requires patience, the permanent nature of the improvement makes the temporary inconvenience worthwhile for appropriately selected patients.
25. What Is the Most Important Factor for Success?
Surprisingly, it is not the implant material.
Nor is it the manufacturing process.
The single most important factor is thoughtful design based on a detailed understanding of facial anatomy and the patient’s aesthetic goals.
Excellent surgery begins with excellent planning.
Dr. Eppley’s Clinical Pearls
After performing custom facial implant surgery for decades, several consistent principles have emerged:
- Every successful result begins with careful listening.
- The CT scan is the foundation of every custom implant.
- A few millimeters can dramatically influence facial aesthetics.
- Smooth transitions create natural-looking results.
- Bigger is rarely better.
- Facial harmony is more important than isolated projection.
- Temporary swelling should never be mistaken for the final result.
- Proper screw fixation provides exceptional long-term stability.
- Technology enhances surgical judgment but never replaces it.
- The best implant is the one no one notices.
The Patient Journey
Every patient who undergoes custom facial implant surgery follows the same general pathway:
Education
↓
Consultation
↓
Three-Dimensional CT Imaging
↓
Virtual Implant Design
↓
Design Refinement
↓
Manufacturing
↓
Surgery
↓
Healing
↓
Long-Term Adaptation
↓
Permanent Facial Enhancement
Final Perspective
Custom facial implant surgery represents the convergence of anatomy, engineering, artistry, and surgical experience. Few procedures in aesthetic surgery allow such precise control over the underlying architecture of the face, creating improvements that are individualized, structurally based, and intended to last a lifetime.
The technology behind custom implants continues to evolve, but the principles remain constant. Successful outcomes begin with a thorough understanding of facial anatomy, careful listening to the patient’s goals, meticulous virtual design, and precise surgical execution. Every stage of the process contributes to the final result.
Perhaps the greatest compliment a patient can receive is not that someone notices an implant, but that they simply look healthier, stronger, or more balanced—without anyone recognizing why. That subtle transformation reflects the true purpose of custom facial implant surgery: enhancing the facial framework while preserving the unique identity of the individual.
As you continue exploring the Eppley Custom Facial Implants Knowledge Center, you will find detailed guides devoted to every facial implant region, implant materials, surgical techniques, recovery, revision surgery, and the latest advances in digital planning and artificial intelligence. Together, these resources provide the most comprehensive educational library available for patients seeking to understand the art and science of facial architecture.
Key Takeaways
- Custom facial implant surgery is a comprehensive process that begins with consultation and extends through lifelong results.
- Three-dimensional CT imaging and patient-specific digital design have transformed facial implant surgery into one of the most precise procedures in aesthetic facial surgery.
- Careful planning is the foundation of predictable, natural-looking outcomes.
- Recovery requires patience, with final refinement occurring over several months.
- Custom implants are designed to be permanent, stable, and compatible with normal daily life, future medical imaging, and additional facial procedures.
- The greatest determinant of success is not the implant itself, but the combination of thoughtful design, meticulous surgery, and realistic expectations.
- The ultimate goal is not simply to change facial features, but to create lasting facial harmony by strengthening the underlying skeletal architecture.
Dr. Eppley’s Bottom Line
Custom facial implant surgery is far more than placing an implant on bone. It is a process of designing and restoring facial architecture with precision, permanence, and purpose. When digital planning, surgical experience, and patient goals come together successfully, the result is not a face that looks different—it is a face that looks naturally complete.
CORNERSTONE ARTICLE #5
Which Custom Facial Implant Do I Need?
A Region-by-Region Guide to Facial Skeletal Enhancement
Quick Answer
Choosing the right custom facial implant begins with understanding that the visible shape of the face is determined primarily by its underlying skeleton. Rather than treating isolated features, custom facial implants are designed to improve the balance, proportions, and contours of the facial framework. The correct implant depends not only on where a deficiency exists, but also on how that area relates to every other region of the face. Successful treatment is based on facial harmony—not simply adding projection to one feature.
Quick Facts
- Every face is a three-dimensional skeletal structure.
- Most aesthetic concerns originate from deficiencies in the underlying bone rather than the overlying skin.
- There is no single “best” facial implant.
- Many patients benefit from augmentation of more than one facial region.
- Three-dimensional CT imaging allows each implant to be designed specifically for one patient’s anatomy.
- The goal is facial balance, not simply making one feature larger.
- Custom implants can enhance virtually every region of the facial skeleton.
Part 1: Understanding Facial Skeletal Enhancement
One of the first questions patients ask during a consultation is remarkably straightforward:
“Which custom facial implant do I need?”
The answer is almost never as simple as “a chin implant” or “a cheek implant.”
The human face functions as a complete architectural structure. Every facial region influences the appearance of the others. A weak chin affects the neck. Flat cheeks influence the lower eyelids. An underdeveloped forehead changes the appearance of the brow and eyes. The jawline alters the perception of the entire lower face.
For this reason, selecting the correct implant requires looking beyond the specific feature that initially concerns the patient.
The objective is not simply to enlarge one part of the face.
It is to improve the harmony of the entire facial skeleton.
Dr. Eppley’s Bottom Line
The best implant is not necessarily the one that adds the most projection—it is the one that restores balance to the entire facial framework.
The Face Is an Architectural Structure
Many cosmetic procedures focus primarily on soft tissues.
Facial implants are different.
They improve the foundation upon which the skin, muscles, and fat naturally rest.
Imagine constructing a building.
The visible exterior reflects the strength and proportions of the framework beneath it.
The face functions in much the same way.
The facial skeleton determines:
- facial width
- facial height
- profile projection
- jawline definition
- cheek prominence
- forehead contour
- orbital support
- facial symmetry
Because the skeleton supports every overlying tissue, relatively small skeletal changes can produce surprisingly significant aesthetic improvements.
“Custom facial implants strengthen the foundation rather than simply stretching the tissues above it.”
Thinking Like an Architect Rather Than a Sculptor
Patients often imagine facial enhancement as adding volume wherever a feature appears deficient.
Experienced surgeons approach the problem differently.
Instead of asking,
“Where should we add volume?”
they ask,
“Which structural relationships create facial imbalance?”
This architectural approach evaluates:
- proportions
- transitions
- support
- projection
- harmony
The goal is not maximum augmentation.
The goal is restoring structural balance.
Clinical Insight
Every Facial Feature Exists Because of the Bone Beneath It
The shape of the jawline, cheeks, forehead, and profile is determined primarily by the underlying skeleton—not by the skin covering it.
Changing the foundation changes the face.
Why Patients Sometimes Choose the Wrong Implant
Patients frequently identify the symptom rather than the anatomical cause.
Examples include:
“I need a stronger chin.”
when the primary deficiency is actually the jawline.
or
“My eyes look tired.”
when inadequate infraorbital bone support is responsible.
or
“My neck looks full.”
when limited chin projection reduces jawline definition.
This is why consultation begins with a complete facial analysis rather than selecting an implant immediately.
Symptom vs. Cause
| What the Patient Sees | Common Skeletal Cause |
| Weak chin | Chin or jaw deficiency |
| Poor jawline | Mandibular deficiency |
| Hollow under-eyes | Infraorbital deficiency |
| Flat cheeks | Malar deficiency |
| Heavy neck | Chin and jaw support deficiency |
| Sloping forehead | Forehead deficiency |
The Face Functions as One Unit
No facial region exists independently.
Improving one area often changes the appearance of another.
Examples include:
Increasing chin projection may improve:
- neck definition
- lip balance
- facial profile
Enhancing the cheeks may improve:
- lower eyelid support
- midface contour
- perceived facial width
Augmenting the forehead may improve:
- brow proportions
- upper facial balance
- profile harmony
These relationships explain why combination procedures frequently produce more natural results than isolated augmentation.
Dr. Eppley’s Bottom Line
Surgeons do not choose implants based on isolated facial features. They choose implants based on how every facial region relates to the others.
The Three Levels of Facial Analysis
When evaluating facial skeletal enhancement, surgeons generally analyze the face on three levels.
Level One
Individual Features
Questions include:
- Is the chin retrusive?
- Are the cheeks flat?
- Is the forehead recessed?
Level Two
Regional Relationships
Questions include:
- Does the chin balance the nose?
- Do the cheeks support the eyes?
- Does the forehead balance the lower face?
Level Three
Overall Facial Harmony
Finally, the face is evaluated as a complete three-dimensional structure.
This final stage determines whether one implant—or several—will provide the greatest improvement.
Why Multiple Implants Often Produce Better Results
Patients sometimes assume that treating one facial feature will automatically improve the entire face.
Sometimes it does.
Frequently, however, balanced enhancement requires addressing more than one skeletal deficiency.
Examples include:
- Chin + jawline
- Infraorbital + cheek
- Forehead + brow
- Jawline + cheek
- Complete facial balancing
The purpose is not to perform more surgery.
The purpose is to create proportion.
A modest improvement in several regions often appears more natural than dramatic augmentation of one.
Clinical Pearl
Balanced enhancement almost always appears more natural than isolated enlargement.
Custom Implants Expand the Possibilities
Traditional stock implants are available for only a limited number of facial regions.
Custom implants dramatically expand what can be treated.
Today, virtually every area of the facial skeleton can be enhanced, including:
- forehead
- brow
- orbit
- infraorbital rim
- cheeks
- zygomatic arch
- paranasal region
- chin
- jawline
- mandibular angles
- temporal region
- skull
This allows treatment to be directed toward the patient’s actual anatomical needs rather than the limitations of available implant sizes.
What Comes Next?
The remainder of this guide examines every major region of the facial skeleton individually.
For each area, you’ll learn:
- what the implant does
- who benefits most
- common misconceptions
- how that region influences the rest of the face
- when combination procedures produce superior results
By the end of this guide, you’ll understand not only which implant may be appropriate, but why it has been recommended.
Key Takeaways
- Choosing a custom facial implant begins with evaluating the entire facial skeleton rather than isolated facial features.
- Facial balance depends on the relationship between all regions of the face, not the size of any one feature.
- Many aesthetic concerns are caused by underlying skeletal deficiencies rather than soft tissue problems.
- Patients often identify the visible symptom, while the surgeon identifies the anatomical cause.
- A complete facial analysis considers individual features, regional relationships, and overall facial harmony.
- Combination procedures often produce more natural and balanced results than isolated augmentation.
- Modern custom implants allow virtually every region of the facial skeleton to be enhanced with patient-specific precision.
Dr. Eppley’s Bottom Line
The question is never simply, “Which implant do I need?” The better question is, “Which skeletal changes will create the most balanced and natural version of my face?” Every successful treatment plan begins by answering that question.
Which Custom Facial Implant Do I Need?
A Region-by-Region Guide to Facial Skeletal Enhancement
Part 2: Upper Face Enhancement: Forehead, Brow, Temporal, and Skull Implants
The upper third of the face is often overlooked in aesthetic surgery.
Patients frequently focus on their nose, cheeks, jawline, or chin while giving little thought to the forehead or skull. Yet the upper face establishes the framework upon which the remainder of the face is perceived. Its size, contour, and projection influence facial balance, profile, masculinity, femininity, and even the appearance of the eyes.
Unlike wrinkles or skin laxity, deficiencies of the upper facial skeleton cannot be corrected with Botox, fillers, or a brow lift. When the underlying bone lacks projection or width, only skeletal augmentation can permanently restore normal facial architecture.
Custom implants have dramatically expanded the ability to reshape the upper face. Today, surgeons can enhance not only the forehead, but also the brow bones, temples, sides of the head, and back of the skull with patient-specific precision.
Dr. Eppley’s Bottom Line
The upper face serves as the foundation for facial balance. A well-proportioned forehead and skull often improve the appearance of the entire face without changing any other facial feature.
Understanding the Upper Face
The upper face extends from the eyebrows to the back of the skull.
It includes four major skeletal regions:
- Forehead
- Brow bones
- Temporal region
- Skull (cranial vault)
Each serves a different aesthetic purpose.
Some influence facial projection.
Others affect facial width.
Others create overall head shape.
Although these regions are often discussed separately, they function together as one continuous sk
Forehead Implants
What Does a Forehead Implant Correct?
The forehead is the largest visible surface of the facial skeleton.
Its contour influences both frontal and profile appearance.
Patients who benefit from forehead augmentation often have:
- a backward-sloping forehead
- forehead flattening
- upper facial deficiency
- congenital contour irregularities
- previous forehead reduction surgery
- traumatic deformities
A custom forehead implant increases forward projection while maintaining smooth transitions into the surrounding skull.
The objective is not to create a prominent forehead, but one that is proportionate to the remainder of the face.
Common Patient Concerns
Patients often describe their forehead by saying:
- “It slopes too far back.”
- “My forehead looks flat.”
- “My upper face seems small.”
- “My brow sticks out more than my forehead.”
These observations frequently indicate underlying skeletal deficiency rather than a skin problem.
Clinical Insight
Forehead Projection Changes the Entire Facial Profile
Even modest forehead augmentation can improve facial balance by strengthening the upper third of the face. This often makes the nose and chin appear more proportional without altering either structure.
Best Candidates
Forehead implants are particularly useful for:
- men seeking stronger facial architecture
- women with congenitally recessed foreheads
- patients with previous forehead reduction procedures
- patients undergoing comprehensive facial balancing
Common Misconception
“A forehead implant makes the forehead look unnaturally large.”
In reality, well-designed implants restore normal projection rather than excessive prominence. Most successful forehead augmentations are recognized as improved facial balance rather than obvious enlargement.
Related Guide
Complete Guide to Custom Forehead Implants
Brow Bone Implants
What Does a Brow Bone Implant Correct?
The brow bones frame the eyes and influence facial expression.
Their projection contributes significantly to perceived masculinity or femininity.
Custom brow implants are designed to:
- increase supraorbital projection
- strengthen the upper orbital rim
- improve profile balance
- restore contour after previous brow reduction
Unlike forehead implants, brow implants focus specifically on the ridge immediately above the eyes.
Common Patient Concerns
Patients commonly report:
- “My brow looks flat.”
- “My eyes seem too exposed.”
- “My forehead and brow don’t match.”
- “I want a stronger masculine brow.”
Clinical Insight
Brow Projection Must Remain Natural
The objective is not to create a heavy or aggressive brow.
Successful brow implants create smooth transitions into both the forehead and orbital rims while preserving normal facial expression.
Best Candidates
- male facial masculinization
- reversal of previous brow reduction surgery
- congenital brow deficiency
- upper facial balancing
Common Misconception
“Larger brow bones always create a more masculine appearance.”
Masculinity results from proportion rather than size alone. Excessive brow augmentation often appears artificial and distracts from the remainder of the face.
Temporal Implants
What Do Temporal Implants Correct?
The temples form the transition between the forehead, cheeks, and sides of the head.
Loss of temporal volume creates:
- hollow temples
- narrowing of the upper face
- premature aging
- imbalance between the upper and lower face
Custom temporal implants restore skeletal width rather than simply filling the overlying soft tissues.
Unlike fat grafting or injectable fillers, skeletal augmentation provides permanent structural support.
Common Patient Concerns
Patients often describe:
- “My temples are hollow.”
- “My head looks too narrow.”
- “My upper face looks pinched.”
- “My cheeks are wider than my temples.”
Clinical Insight
Not Every Hollow Temple Requires an Implant
Some temporal hollowing results from soft tissue volume loss rather than skeletal deficiency.
The challenge is determining whether the deficiency lies in the bone, muscle, fat, or a combination of all three.
Best Candidates
- congenital temporal narrowing
- temporal hollowing associated with skeletal deficiency
- patients seeking greater upper facial width
- facial balancing procedures
Common Misconception
“Temple fillers produce the same result as temporal implants.”
Fillers restore soft tissue volume temporarily.
Temporal implants change the underlying skeletal framework permanently.
Skull Implants
What Do Skull Implants Correct?
Custom skull implants address the shape of the cranial vault rather than the face itself.
Areas commonly treated include:
- back of the head (occiput)
- sides of the head
- top of the head
- plagiocephaly
- sagittal deficiencies
- congenital flattening
Because the skull provides the framework for the entire head, relatively small contour changes can dramatically improve overall head shape.
Common Patient Concerns
Patients frequently say:
- “The back of my head is flat.”
- “My head looks too narrow.”
- “One side of my skull is flatter than the other.”
- “My head shape looks abnormal.”
Clinical Insight
Head Shape Is Just as Individual as Facial Shape
No two skulls are identical.
Custom skull implants are designed specifically to restore natural cranial contours while respecting normal scalp anatomy.
Best Candidates
- congenital flat occiput
- plagiocephaly
- cranial asymmetry
- narrow head shape
- previous cranial surgery
Common Misconception
“Hair hides skull shape.”
While hair conceals minor contour differences, significant cranial deficiencies remain visible through hairstyle, profile photographs, and he
Combining Upper Face Procedures
Many patients benefit from improving more than one upper facial region.
Examples include:
Forehead + Brow
Improves upper facial projection while maintaining natural transitions.
Forehead + Temporal
Creates both increased projection and greater upper facial width.
Temporal + Skull
Widens the upper head while maintaining smooth cranial contours.
Forehead + Brow + Temporal
A comprehensive upper facial balancing procedure commonly performed in male facial masculinization.
How Surgeons Decide Which Upper Face Implant Is Needed
Selection depends upon careful evaluation of several factors:
- profile projection
- frontal width
- skull shape
- forehead slope
- brow prominence
- temporal width
- facial proportions
- patient goals
Three-dimensional CT imaging allows these regions to be evaluated simultaneously rather than independently.
This ensures that any augmentation improves the entire upper face rather than creating imbalance.
Clinical Pearl
The goal is continuity. Every upper facial implant should blend seamlessly into the adjacent skeleton without visible borders or abrupt transitions.
Upper Face Decision Guide
| Patient Concern | Most Likely Implant |
| Backward-sloping forehead | Forehead implant |
| Weak brow ridge | Brow bone implant |
| Hollow temples | Temporal implant |
| Narrow upper head | Temporal widening implant |
| Flat back of head | Occipital skull implant |
| Cranial asymmetry | Custom skull implant |
| Global upper facial deficiency | Combination implants |
Key Takeaways
- The upper third of the face provides the structural foundation for facial balance and profile aesthetics.
- Forehead implants restore projection and improve upper facial proportions.
- Brow bone implants strengthen the area above the eyes and are particularly useful in facial masculinization or brow reduction reversal.
- Temporal implants increase upper facial width and correct skeletal temporal hollowing.
- Skull implants permanently reshape the cranial vault, treating flattening, asymmetry, and contour deficiencies.
- Combination procedures often create more harmonious results than isolated augmentation.
- Three-dimensional CT imaging allows surgeons to evaluate the entire upper facial skeleton as a continuous architectural structure.
Dr. Eppley’s Bottom Line
The upper face is more than a forehead or a brow—it is the framework that establishes the proportions of the entire head. When forehead, brow, temporal, and skull contours are thoughtfully balanced, they create a stronger architectural foundation that enhances every facial feature below them without changing the patient’s identity.
Which Custom Facial Implant Do I Need?
A Region-by-Region Guide to Facial Skeletal Enhancement
Part 3: Midface Enhancement: Infraorbital, Cheek, Zygomatic Arch, Paranasal, and Midface Mask Implants
The midface is often considered the aesthetic center of the face.
It is where the eyes, nose, cheeks, and upper jaw converge to create facial projection, contour, and expression. Unlike the lower face, where strength is associated with the jawline, or the upper face, where the forehead defines profile, the midface largely determines whether a person appears youthful, rested, attractive, or prematurely aged.
Many patients assume that the midface can be improved simply by adding volume to the cheeks. In reality, the midface is composed of several distinct skeletal regions, each serving a different purpose. Augmenting the wrong area may fail to address the actual problem—or even create an unnatural appearance.
Modern custom facial implants allow each component of the midface to be evaluated and enhanced individually or in combination, producing results that are far more anatomical than simply placing a standard cheek implant.
Dr. Eppley’s Bottom Line
The midface is not one structure—it is a collection of interconnected skeletal regions. Successful augmentation begins by identifying exactly which portion of the midface is deficient rather than assuming every problem requires a cheek implant.
Understanding the Midface
The midface extends from the lower eyelids to the upper lip.
It includes five major skeletal regions:
- Infraorbital rim
- Cheek (malar eminence)
- Zygomatic arch
- Paranasal region
- Maxilla (upper jaw)
Each influences different aspects of facial appearance.
Some provide eye support.
Others determine facial width.
Others affect profile projection.
Together they create the central architectural framework of the face.
Illustration Callout #1
The Five Regions of the Midface
Illustrate a three-quarter skull highlighting:
- Infraorbital rim
- Cheek
- Zygomatic arch
- Paranasal region
- Maxilla
Use different colors for each region.
Infraorbital Implants
What Does an Infraorbital Implant Correct?
The infraorbital rim forms the bony support beneath the lower eyelid.
When this region lacks projection, patients often develop:
- under-eye hollowing
- negative orbital vectors
- tired appearance
- poor lower eyelid support
- deep tear troughs
While fillers may camouflage these concerns temporarily, they do not restore the underlying skeletal deficiency.
Custom infraorbital implants strengthen the lower orbital rim itself.
This creates improved structural support beneath the eyes rather than simply filling the soft tissues.
Common Patient Concerns
Patients frequently describe:
- “My eyes always look tired.”
- “I have deep hollows under my eyes.”
- “My lower eyelids seem unsupported.”
- “Fillers don’t last or don’t look natural.”
Clinical Insight
Under-Eye Hollowing Is Often a Bone Problem
Many patients believe their under-eye hollows are caused by aging alone.
In reality, congenital infraorbital deficiency is one of the most common anatomical causes of persistent lower eyelid hollowing.
Best Candidates
- congenital infraorbital deficiency
- negative orbital vectors
- lower eyelid support deficiency
- patients seeking permanent alternatives to repeated fillers
Common Misconception
“Infraorbital implants are simply cheek implants placed higher.”
No.
Infraorbital implants restore the orbital rim, while cheek implants enhance the malar eminence. They address different anatomical problems and produce different aesthetic effects.
Cheek (Malar) Implants
What Does a Cheek Implant Correct?
The malar eminence creates the visible prominence of the cheeks.
This region determines:
- midfacial projection
- youthful contour
- facial width
- the transition between the eyes and lower face
Patients with deficient cheekbones often appear:
- flat-faced
- narrow
- lacking facial definition
Custom cheek implants restore forward projection while maintaining smooth transitions into adjacent structures.
Common Patient Concerns
Patients often say:
- “My face looks flat.”
- “I have no cheekbones.”
- “My face lacks definition.”
- “My cheeks disappear when viewed from the side.”
Clinical Insight
Bigger Cheeks Are Not Better Cheeks
The objective is balanced skeletal projection—not exaggerated cheekbones.
Excessive lateral projection can appear artificial and detract from overall facial harmony.
Best Candidates
- congenital malar deficiency
- flat midface
- facial balancing procedures
- age-related skeletal volume deficiency
Common Misconception
“High cheekbones mean the cheeks should project laterally.”
Beautiful cheekbones are created primarily by forward projection and smooth transitions—not simply increased width.
Zygomatic Arch Implants
What Do Zygomatic Arch Implants Correct?
The zygomatic arch extends laterally from the cheekbone toward the ear.
It influences:
- upper facial width
- facial framing
- masculine facial architecture
- transition between the cheek and temporal region
Arch implants are fundamentally different from cheek implants.
Rather than increasing forward projection, they increase lateral facial width.
Common Patient Concerns
Patients may report:
- “My face looks too narrow.”
- “My cheeks don’t extend far enough.”
- “I want a wider upper face.”
Clinical Insight
Width and Projection Are Different Dimensions
Many patients requesting larger cheeks actually need increased arch width rather than greater malar projection.
The distinction is critical for achieving natural results.
Best Candidates
- narrow upper face
- male facial widening
- deficient zygomatic arches
- comprehensive facial masculinization
Common Misconception
“Cheek implants automatically widen the face.”
Only modestly.
Significant facial widening requires augmentation of the zygomatic arches.
Paranasal Implants
What Do Paranasal Implants Correct?
The paranasal region surrounds the base of the nose.
Deficiency in this area may produce:
- a recessed upper jaw appearance
- deep nasolabial folds
- inadequate nasal base support
- poor midfacial projection
Paranasal implants increase support around the nasal base without changing the nose itself.
Common Patient Concerns
Patients frequently say:
- “My upper jaw seems recessed.”
- “My smile looks sunken.”
- “The area around my nose looks flat.”
Clinical Insight
Deep Smile Folds Are Not Always a Soft Tissue Problem
Nasolabial folds often reflect inadequate skeletal support beneath the overlying tissues.
Strengthening the underlying bone may improve these contours more naturally than repeatedly adding soft tissue fillers.
Best Candidates
- paranasal deficiency
- mild maxillary retrusion
- congenital upper jaw flattening
- selected revision rhinoplasty patients
Common Misconception
“Paranasal implants make the nose larger.”
They do not enlarge the nose.
They improve the skeletal support surrounding the nasal base, often making the nose appear more proportionate.
Midface Mask Implants
What Is a Midface Mask Implant?
A midface mask implant combines several regions into one continuous implant.
It typically incorporates:
- infraorbital rims
- cheeks
- paranasal region
- anterior maxilla
Rather than treating isolated deficiencies, it restores the entire central facial skeleton.
Common Patient Concerns
Patients may describe:
- “My whole midface looks flat.”
- “My eyes, cheeks, and upper jaw all seem recessed.”
- “I want my entire midface improved.”
Clinical Insight
Sometimes One Implant Is Better Than Several
When multiple adjacent regions require augmentation, a continuous midface implant often creates smoother transitions and superior facial harmony compared with placing several separate implants.
Best Candidates
- generalized midface deficiency
- congenital facial retrusion
- severe negative orbital vectors
- selected craniofacial patients
- comprehensive facial balancing
Common Misconception
“A larger implant always looks less natural.”
A well-designed continuous implant often appears more natural than several disconnected implants because it restores normal skeletal continuity.
Combining Midface Procedures
Many patients benefit from combining different midface implants.
Examples include:
Infraorbital + Cheek
Improves lower eyelid support while restoring cheek projection.
Cheek + Zygomatic Arch
Adds both forward projection and facial width.
Infraorbital + Paranasal
Restores support beneath both the eyes and nasal base.
Complete Midface Mask
Provides comprehensive reconstruction of the central facial skeleton.
Common Midface Implant Combinations
Diagram illustrating:
- Infraorbital + Cheek
- Cheek + Arch
- Infraorbital + Paranasal
- Midface Mask Implant
How Surgeons Decide Which Midface Implant Is Needed
Choosing the correct implant depends upon evaluating several key anatomical relationships:
- lower eyelid support
- orbital position
- cheek projection
- facial width
- maxillary projection
- nasal base support
- profile balance
- facial symmetry
Three-dimensional CT imaging allows each region to be measured independently while simultaneously evaluating how they interact.
This prevents treating one deficiency while overlooking another.
Clinical Pearl
The eyes often provide the greatest clue to midface deficiency. Lower eyelid support, orbital position, and under-eye contour frequently reveal which portion of the midface requires augmentation.
Midface Decision Guide
| Patient Concern | Most Likely Implant |
| Under-eye hollows | Infraorbital implant |
| Negative orbital vector | Infraorbital or infraorbital-maxillary implant |
| Flat cheeks | Cheek implant |
| Narrow upper face | Zygomatic arch implant |
| Recessed nasal base | Paranasal implant |
| Generalized midface deficiency | Midface mask implant |
| Combined under-eye and cheek deficiency | Infraorbital-malar implant |
Key Takeaways
- The midface consists of multiple skeletal regions, each contributing differently to facial appearance.
- Infraorbital implants restore lower eyelid support and improve under-eye hollowing.
- Cheek implants increase forward malar projection and define the central face.
- Zygomatic arch implants increase upper facial width rather than forward projection.
- Paranasal implants strengthen the skeletal support surrounding the nasal base and upper jaw.
- Midface mask implants address generalized central facial deficiency with one continuous design.
- Combination procedures often provide more harmonious results than treating isolated regions independently.
- Careful three-dimensional analysis is essential because different midface deficiencies can produce similar outward appearances.
Dr. Eppley’s Bottom Line
The midface is where facial architecture becomes most complex. Eyes, cheeks, nose, and upper jaw all depend upon the same underlying skeletal framework. The key to successful midface augmentation is not selecting the largest implant, but identifying exactly which region lacks support and restoring it with anatomical precision. When the correct structures are strengthened, the face appears healthier, more balanced, and naturally youthful without looking surgically altered.
Which Custom Facial Implant Do I Need?
A Region-by-Region Guide to Facial Skeletal Enhancement
Part 4: Lower Face Enhancement: Chin, Jawline, Jaw Angle, and Chin-Wing Implants
The lower third of the face is the foundation of facial strength.
It is the region that most strongly influences profile, facial shape, neck definition, and perceptions of masculinity and femininity. While patients often describe wanting “a stronger jawline,” that phrase can mean many different anatomical problems. Some have a retrusive chin. Others lack definition along the body of the mandible. Some have weak jaw angles, while others have deficiencies throughout the entire lower jaw.
Understanding these differences is essential because each requires a different surgical solution.
The mandible should not be thought of as three separate structures—the chin, jawline, and jaw angles—but as one continuous architectural framework. Just as the roofline of a building is judged as a whole rather than by one corner, the lower jaw is evaluated by its continuity from one side to the other.
Modern custom implants make it possible to reshape the entire mandible with a level of precision that was never possible with standard implants. Rather than selecting a prefabricated implant that fits “well enough,” the surgeon can design an implant that follows the patient’s anatomy millimeter by millimeter while creating exactly the desired contours.
The goal is not simply a larger jaw.
The goal is a balanced mandibular framework that complements the entire face.
Dr. Eppley’s Bottom Line
The strongest jawline is not the biggest one. It is the one whose proportions create harmony with the forehead, midface, neck, and profile.
Understanding the Mandible
The mandible is the only movable bone of the facial skeleton and forms the entire lower border of the face.
From an aesthetic standpoint, it consists of four distinct regions:
- Chin (symphysis)
- Mandibular body (jawline)
- Jaw angle
- Ascending ramus
Although these areas have different anatomical functions, they blend together visually into one uninterrupted contour.
This explains why treating only one region often fails to achieve the improvement patients expect.
For example, advancing only the chin may improve the profile but leave the jawline appearing narrow or weak.
Likewise, enlarging only the jaw angles may increase facial width without improving chin projection or neck definition.
Successful lower facial enhancement requires evaluating all four regions together.
Chin Implants
What Does a Chin Implant Correct?
The chin occupies only a small portion of the mandible, yet it has a profound influence on facial balance.
It determines:
- profile projection
- lower facial proportion
- lip support
- cervicomental angle
- perceived facial strength
A deficient chin may make the nose appear larger, the neck appear fuller, and the lower face appear weak—even when these structures are otherwise normal.
Custom chin implants can increase projection, vertical height, width, or asymmetry correction. Unlike stock implants, they are designed to match the exact contour of the patient’s mandibular symphysis and can address complex three-dimensional deficiencies.
Common Patient Concerns
Patients often say:
- “My chin disappears in profile.”
- “My neck looks full.”
- “My nose seems too large.”
- “My lower face looks weak.”
- “One side of my chin is different than the other.”
Clinical Insight
The Chin Is the Anchor of the Facial Profile
Among all facial structures, the chin exerts one of the greatest influences on profile balance.
Increasing projection by only a few millimeters can dramatically improve the relationship between the nose, lips, and neck.
Best Candidates
- retrusive chin
- congenital microgenia
- chin asymmetry
- short lower facial height
- patients seeking improved profile balance
Common Misconception
“A chin implant simply pushes the chin forward.”
Modern custom chin implants can increase projection, vertical length, width, or asymmetrically reshape the chin in virtually any direction. They are true three-dimensional skeletal reconstructions rather than simple projection increase.
Jawline Implants
What Does a Jawline Implant Correct?
The term jawline implant is often misunderstood.
Many patients believe it refers to any implant placed along the lower jaw. In reality, a true custom jawline implant is a continuous implant that extends from one jaw angle across the chin to the opposite jaw angle. Rather than treating isolated portions of the mandible, it enhances the entire lower border as a single anatomical unit.
This approach restores continuity rather than creating separate areas of augmentation.
A custom jawline implant can modify:
- chin projection
- chin width
- vertical chin height
- mandibular body thickness
- jawline definition
- jaw angle width
- jaw angle flare
- jaw angle vertical length
- mandibular symmetry
Because every portion is digitally designed together, the implant creates smooth transitions without abrupt changes in contour.
Common Patient Concerns
Patients frequently describe:
- “I don’t have a defined jawline.”
- “My lower face looks narrow.”
- “My jaw disappears into my neck.”
- “I want a stronger lower face.”
- “My jawline isn’t straight.”
These concerns often reflect generalized mandibular deficiency rather than a problem confined to the chin or jaw angles.
Clinical Insight
The Jawline Is a Continuous Curve
The eye naturally follows the lower border of the mandible from chin to angle.
Interruptions in this curve—whether caused by a weak chin, thin mandibular body, or underdeveloped jaw angles—are perceived as an undefined jawline.
The purpose of a custom jawline implant is to restore that uninterrupted contour.
Best Candidates
- generalized mandibular deficiency
- facial masculinization
- weak lower facial definition
- post-orthodontic skeletal imbalance
- revision of previous chin or jaw implants
- patients desiring comprehensive mandibular enhancement
Common Misconception
“A jawline implant simply makes the jaw bigger.”
A well-designed jawline implant rarely creates a dramatically larger jaw.
Instead, it creates smoother contours, improved symmetry, stronger definition, and better proportion between the lower face and the remainder of the facial skeleton.
Natural-looking enhancement comes from improving architecture—not maximizing size.
Clinical Pearl
The Most Successful Jawline Implants Are Often the Least Obvious
The best results rarely attract attention to the jaw itself.
Instead, observers simply perceive the face as stronger, more balanced, or more attractive without recognizing why.
Jaw Angle Implants
What Do Jaw Angle Implants Correct?
The mandibular angles form the posterior corners of the lower jaw.
Although relatively small anatomically, they have a tremendous influence on facial width, lower facial shape, and masculine facial architecture.
Unlike chin implants, which primarily improve profile projection, jaw angle implants influence the face when viewed from the front and oblique angles.
Custom jaw angle implants can increase:
- lateral width
- posterior projection
- vertical length
- flare
- symmetry
These changes can transform a narrow or tapered lower face into one with greater definition and structural presence.
Common Patient Concerns
Patients frequently report:
- “The back of my jaw disappears.”
- “My face is too V-shaped.”
- “I want wider jaw angles.”
- “My lower face lacks definition.”
Clinical Insight
Width Is Not the Same as Strength
Increasing jaw angle width without considering chin projection or mandibular body contour often creates an incomplete result.
The strongest lower faces achieve balance across the entire mandible.
Best Candidates
- narrow lower face
- weak mandibular angles
- facial masculinization
- jaw angle asymmetry
- revision surgery
Common Misconception
“Large jaw angles automatically create a masculine face.”
Masculinity results from the relationship between chin, jawline, and jaw angles—not from enlargement of one region alone.
Oversized angles attached to a weak chin often appear anatomically unnatural.
Chin-Wing Implants
What Is a Chin-Wing Implant?
The term chin-wing implant describes a custom implant that enhances the chin and mandibular body while stopping short of the jaw angles.
It occupies the middle portion of the mandible and is useful when the chin and jawline require enhancement but the jaw angles already have adequate projection and width.
Compared with a full jawline implant, the chin-wing implant provides a more conservative approach to mandibular enhancement.
It can improve:
- chin projection
- jawline continuity
- lower border definition
- neck contour
- mandibular symmetry
without significantly altering facial width.
Common Patient Concerns
Patients often say:
- “I like the width of my face.”
- “I only want better jawline definition.”
- “I don’t want larger jaw angles.”
- “My chin blends poorly into my jaw.”
Clinical Insight
Not Every Patient Needs Larger Jaw Angles
Many individuals already possess well-developed mandibular angles.
In these cases, extending augmentation into the posterior mandible may produce unnecessary facial widening.
A chin-wing implant allows enhancement to remain focused where it is actually needed.
Best Candidates
- isolated chin and jawline deficiency
- female facial contouring
- patients seeking subtle mandibular enhancement
- individuals wishing to avoid increased lower facial width
Common Misconception
“Every jawline implant should extend to the angles.”
The extent of augmentation should always match the anatomical deficiency. More implant is not necessarily better implant.
Combining Lower Face Procedures
Although each mandibular region can be treated independently, many patients benefit from addressing multiple areas simultaneously.
Common combinations include:
Chin + Jawline
Improves profile projection while strengthening the lower border of the mandible.
Jawline + Jaw Angles
Creates greater definition, width, and continuity in the lower face.
Chin + Jaw Angles
Useful in patients requiring increased facial strength while preserving the existing mandibular body.
Comprehensive Jawline Implant
The most complete form of mandibular augmentation, treating the chin, mandibular body, and jaw angles as one continuous skeletal structure.
“Each design addresses a different pattern of mandibular deficiency. Implant selection is determined by anatomy, not by a one-size-fits-all approach.”
How Surgeons Decide Which Lower Face Implant Is Needed
Choosing the correct mandibular implant begins with a comprehensive facial analysis rather than focusing on the patient’s chief complaint.
The surgeon evaluates:
- profile projection
- chin position
- lower facial height
- mandibular width
- jawline definition
- neck contour
- facial symmetry
- dental occlusion
- soft tissue thickness
- overall facial proportions
Three-dimensional CT imaging provides precise measurements of each mandibular region and allows virtual implant designs to be created before surgery.
The final design is based not only on skeletal deficiency, but also on the patient’s goals, soft tissue envelope, and relationship to the upper and middle thirds of the face.
Clinical Pearl
The lower face should never be evaluated in isolation. The ideal jawline is the one that balances the forehead, midface, nose, and neck—not the one with the greatest projection or width.
Lower Face Decision Guide
| Patient Concern | Most Likely Implant |
| Weak chin in profile | Custom chin implant |
| Chin asymmetry | Custom chin implant |
| Poor jawline definition | Chin-wing or full jawline implant |
| Weak chin and jawline | Full custom jawline implant |
| Narrow lower face | Jaw angle implants or full jawline implant |
| Weak posterior jaw | Jaw angle implants |
| Generalized mandibular deficiency | Full custom jawline implant |
Key Takeaways
- The mandible functions as one continuous architectural structure rather than separate anatomical regions.
- Chin implants primarily improve profile balance, lower facial projection, and chin symmetry.
- Custom jawline implants enhance the entire lower border of the mandible, creating continuity from angle to angle.
- Jaw angle implants primarily increase lower facial width, posterior definition, and masculine facial architecture.
- Chin-wing implants improve chin and jawline definition while preserving existing jaw angle width.
- The best implant design is determined by the patient’s skeletal anatomy, not by generalized aesthetic trends.
- Balanced mandibular enhancement almost always produces more natural results than isolated enlargement of a single region.
Dr. Eppley’s Bottom Line
The lower face is the architectural foundation of facial strength. The most successful custom mandibular implants are not those that create the largest jaw, but those that restore continuity, proportion, and balance across the entire mandible. Whether treating the chin alone or redesigning the entire jawline, the objective is always the same: to create a lower facial framework that looks as though it naturally belongs to the patient.
Which Custom Facial Implant Do I Need?
A Region-by-Region Guide to Facial Skeletal Enhancement
Part 5: Combination Procedures and Full-Face Skeletal Enhancement
Very few faces have only one skeletal deficiency.
While patients often focus on the feature that bothers them most—a weak chin, flat cheeks, hollow eyes, or a sloping forehead—an experienced surgeon rarely evaluates that feature in isolation. Every facial structure exists in relationship to every other structure, and improving one area often changes how another is perceived.
For this reason, the most natural and transformative results frequently come not from a single implant, but from carefully planned combinations of implants that restore balance across multiple regions of the face.
The objective is never to make each feature larger.
The objective is to make every feature belong together.
This philosophy represents the difference between facial augmentation and facial architecture.
Dr. Eppley’s Bottom Line
The face is not a collection of individual parts. It is one three-dimensional structure. The best treatment plans improve the relationships between facial regions rather than simply enlarging isolated features.
Facial Balance Is More Important Than Facial Size
Patients often assume that stronger facial features create a more attractive face.
In reality, attractiveness is influenced far more by proportion than by size.
Consider two individuals with identical chin projection.
One may appear perfectly balanced because the forehead, cheeks, nose, and jawline share similar proportions.
The other may appear weak because deficiencies exist elsewhere in the facial skeleton.
This explains why simply making one feature larger does not always improve facial aesthetics.
Successful facial enhancement restores proportion between the upper, middle, and lower thirds of the face.
“Balanced enhancement across multiple facial regions usually appears more natural than dramatic augmentation of a single feature.”
The Three Zones of Facial Architecture
Surgeons evaluate facial balance by dividing the skeleton into three interconnected zones.
Upper Face
Provides:
- forehead projection
- cranial contour
- brow support
- upper facial width
Midface
Provides:
- orbital support
- cheek projection
- facial width
- nasal base support
Lower Face
Provides:
- jawline definition
- chin projection
- facial strength
- neck support
Every treatment plan asks one fundamental question:
Which of these three zones is deficient?
Sometimes the answer is one.
Frequently it is two.
Occasionally it is all three.
Clinical Insight
Every Region Influences Another
Increasing chin projection often improves the appearance of the neck.
Increasing infraorbital support may reduce the appearance of under-eye hollows.
Increasing forehead projection may improve profile balance without changing the nose.
These improvements occur because facial structures exist within a connected architectural framework.
Common Combination Procedures
Although every patient receives an individualized treatment plan, certain combinations are performed frequently because they address predictable anatomical relationships.
Chin + Jawline Implant
Purpose
To strengthen the entire lower facial framework.
Ideal for:
- weak profile
- poor neck definition
- narrow mandible
- generalized mandibular deficiency
This combination produces one of the most dramatic improvements in facial strength while maintaining natural proportions.
Chin + Jaw Angles
Purpose
Increase projection and facial width.
Ideal for:
- tapered lower face
- weak posterior jaw
- male facial masculinization
Full Custom Jawline Implant
Purpose
Treat the mandible as one continuous structure.
Rather than combining separate implants, one custom implant restores:
- chin
- mandibular body
- jaw angles
This creates seamless transitions throughout the lower face.
Infraorbital + Cheek
Purpose
Restore youthful support beneath the eyes while improving cheek projection.
Ideal for:
- negative orbital vectors
- under-eye hollows
- flat midface
- congenital malar deficiency
Perhaps no combination creates a greater improvement in perceived facial youthfulness.
Infraorbital + Paranasal
Purpose
Strengthen central facial support.
Ideal for:
- recessed upper jaw
- lower eyelid deficiency
- deep nasolabial folds
This combination restores the skeletal framework surrounding the nose and lower eyelids.
Midface Mask Implant
Purpose
Treat generalized midfacial deficiency with one continuous implant.
Rather than separate implants, the implant restores:
- infraorbital rims
- cheeks
- paranasal region
- anterior maxilla
The result is smoother skeletal continuity.
Forehead + Brow
Purpose
Improve upper facial projection while maintaining natural transitions.
Commonly performed for:
- facial masculinization
- congenital forehead deficiency
- reversal of brow reduction surgery
Forehead + Temporal
Purpose
Increase both projection and upper facial width.
Produces a stronger upper facial framework while preserving natural head shape.
Temporal + Skull
Purpose
Improve cranial width and contour.
Frequently used for:
- narrow head shape
- congenital skull deficiencies
- cranial asymmetry
Common Combination Procedures
Illustrate simplified color overlays showing:
- Chin + Jawline
- Infraorbital + Cheek
- Midface Mask
- Forehead + Brow
- Forehead + Temporal
- Full Facial Balancing
Full-Face Skeletal Enhancement
Some patients exhibit deficiencies throughout multiple facial regions.
Examples include:
- recessed forehead
- deficient brow
- flat cheeks
- negative orbital vectors
- weak chin
- narrow jawline
Treating only one area often improves the face.
Treating the entire skeletal framework can fundamentally change facial balance.
This does not mean making every feature larger.
It means restoring proportional relationships across the entire face.
Clinical Insight
More Implants Do Not Mean a Less Natural Result
Ironically, comprehensive treatment often appears more natural than isolated augmentation.
Why?
Because every enhanced region remains proportional to the others.
A face in which all structures are balanced rarely appears surgically altered.
Facial Masculinization
One of the most common applications of combination custom implants is facial masculinization.
Typical treatment plans include:
- forehead implant
- brow implant
- jawline implant
- jaw angle enhancement
- chin enhancement
- zygomatic arch widening
Each implant contributes to characteristics commonly associated with the male facial skeleton:
- broader upper face
- stronger brow
- wider jaw
- squarer chin
- greater skeletal definition
Importantly, the amount of augmentation is individualized. Masculinization is achieved through proportion—not exaggeration.
Facial Feminization and Softening
Although custom implants are more commonly associated with augmentation, they also play a role in restoring feminine facial proportions.
Examples include:
- subtle forehead augmentation
- limited chin enhancement
- correction of asymmetry
- restoration of congenital deficiencies
- smoothing previous skeletal irregularities
In women, the objective is usually refinement rather than increased skeletal prominence.
“The same implant technology can produce very different outcomes depending on the patient’s anatomy and aesthetic goals.”
How Surgeons Develop a Comprehensive Treatment Plan
Every consultation begins with the patient’s concerns.
However, treatment planning goes far beyond simply addressing those concerns.
A systematic evaluation includes:
Clinical Examination
Assessment of facial proportions, skeletal landmarks, soft tissue thickness, muscle function, and symmetry.
Photographic Analysis
Evaluation from:
- frontal
- oblique
- profile
- basal
- smiling views
Each view reveals different skeletal relationships.
Three-Dimensional CT Imaging
CT imaging provides the true foundation of custom implant planning.
It allows the surgeon to evaluate:
- bone thickness
- asymmetry
- contour
- skeletal deficiencies
- previous implants
- prior osteotomies
- available fixation sites
Digital Design
The CT scan becomes a virtual three-dimensional model.
Every implant is designed while simultaneously evaluating adjacent facial structures.
This ensures that one enhancement complements another.
Patient Goals
Finally, every design is individualized.
Some patients seek:
- subtle refinement
Others desire:
- stronger masculine definition
Others simply want improved facial balance.
There is no universally “correct” design.
The correct design is the one that achieves the patient’s goals while preserving natural facial harmony.
Clinical Pearl
The best treatment plans begin by asking what should remain unchanged—not simply what should be augmented. Preserving facial identity is as important as correcting skeletal deficiency.
Why Experience Matters
Custom implant technology has made sophisticated skeletal enhancement available to more patients than ever before.
Technology alone, however, does not create successful outcomes.
Software cannot determine:
- appropriate facial proportions
- ideal implant dimensions
- aesthetic balance
- surgical judgment
Those decisions remain dependent upon experience.
The surgeon’s role has evolved from selecting implants to designing facial architecture.
That distinction ultimately determines the quality of the final result.
Key Takeaways
- Most patients have more than one area of skeletal deficiency.
- The most natural outcomes often result from combining implants rather than enlarging a single facial feature.
- Facial harmony depends on the relationship between the upper face, midface, and lower face.
- Common implant combinations are based on predictable anatomical relationships, not cosmetic trends.
- Full-face skeletal enhancement seeks proportional balance rather than maximum augmentation.
- Comprehensive planning combines clinical examination, photography, three-dimensional CT imaging, digital design, and the patient’s aesthetic goals.
- Modern technology enables remarkable precision, but successful outcomes still depend on thoughtful design and surgical experience.
Dr. Eppley’s Bottom Line
The question is never, “How many implants does this patient need?” The real question is, “Which combination of skeletal changes will create the most harmonious face while preserving the patient’s identity?” Every successful custom facial implant procedure is an exercise in architectural planning, where each enhancement supports the others to produce a result that appears balanced, natural, and uniquely suited to the individual.
Which Custom Facial Implant Do I Need?
A Region-by-Region Guide to Facial Skeletal Enhancement
Part 6: Frequently Asked Questions About Choosing the Right Custom Facial Implant
After learning about the different regions of facial skeletal enhancement, most patients still have one central question:
How do I know which implant is right for me?
The answer depends on more than the location of a visible concern. It requires an understanding of facial proportions, skeletal anatomy, soft tissue thickness, symmetry, profile relationships, and the patient’s personal aesthetic goals.
A patient may believe the problem is a weak chin when the larger issue is generalized mandibular deficiency. Another may request cheek implants when inadequate infraorbital support is the true cause of the concern. Some patients need only one carefully designed implant, while others obtain a more natural result from modest enhancement of several connected regions.
The following questions address the most common concerns patients have when deciding which custom facial implant—or combination of implants—may be appropriate.
Frequently Asked Questions
1. How Do I Know Which Custom Facial Implant I Need?
The correct implant is determined through a complete facial analysis rather than by selecting the feature that appears most deficient.
The surgeon evaluates:
- facial proportions
- frontal and profile projection
- skeletal width
- vertical facial height
- facial symmetry
- soft tissue thickness
- adjacent facial regions
- the patient’s aesthetic goals
Photographs and a three-dimensional CT scan help determine whether the concern originates from the chin, jawline, cheeks, infraorbital rims, forehead, or another part of the facial skeleton.
The implant recommendation should be based on the anatomical cause of the concern—not simply the feature the patient notices first.
2. Can I Choose the Implant I Want?
Patients play an essential role in defining the desired outcome, but implant selection should be guided by anatomy.
A patient may arrive requesting a chin implant, for example, but facial analysis may reveal that a full jawline implant would provide better balance. Likewise, someone requesting cheek augmentation may actually need infraorbital support or zygomatic arch widening.
The best planning process combines:
- the patient’s goals
- the surgeon’s anatomical assessment
- three-dimensional imaging
- digital implant design
The patient chooses the desired degree and character of change, while the surgeon determines how that goal can be achieved safely and anatomically.
3. Is There One Best Type of Facial Implant?
No single implant is best for every patient.
Each type of implant serves a different purpose:
- Forehead implants improve upper facial projection.
- Brow implants strengthen the supraorbital region.
- Infraorbital implants support the lower eyelids.
- Cheek implants increase malar projection.
- Zygomatic arch implants increase facial width.
- Paranasal implants support the nasal base.
- Chin implants improve lower facial projection.
- Jaw angle implants strengthen the posterior jaw.
- Full jawline implants reshape the entire mandible.
- Skull implants improve cranial contour.
The best implant is the one that addresses the patient’s specific skeletal deficiency while improving overall facial harmony.
4. Do I Need a Chin Implant or a Jawline Implant?
A chin implant is usually appropriate when the deficiency is limited primarily to the front of the lower jaw.
A full custom jawline implant is more appropriate when the deficiency involves several areas, including:
- chin projection
- chin width
- mandibular body
- jawline definition
- jaw angles
A chin implant may improve the profile but will not significantly strengthen the sides or back of the jaw. A jawline implant treats the lower face as one continuous structure.
The choice depends on whether the problem is localized or extends throughout the mandible.
5. Do I Need Jaw Angle Implants or a Full Jawline Implant?
Jaw angle implants are best suited for patients whose main concern is inadequate width, definition, or vertical length at the back of the jaw.
A full jawline implant may be more appropriate when the chin and mandibular body are also deficient.
Jaw angle implants can improve the posterior corners of the lower face, but they do not correct:
- weak chin projection
- a narrow mandibular body
- irregular jawline continuity
- central lower facial deficiency
When several areas require augmentation, one continuous custom jawline implant often creates smoother and more natural transitions.
6. Is a Chin-Wing Implant the Same as a Full Jawline Implant?
No.
A chin-wing implant typically enhances the chin and mandibular body but stops before reaching the jaw angles.
It is useful for patients who want:
- better chin projection
- improved jawline continuity
- greater lower border definition
- minimal change in jaw angle width
A full jawline implant extends from one jaw angle to the other and can modify the entire mandible.
The chin-wing design is a more limited option for patients whose posterior jaw is already adequately developed.
7. Do I Need Cheek Implants or Infraorbital Implants?
These implants treat different parts of the midface.
Cheek implants enhance the malar eminence and primarily increase forward cheek projection.
Infraorbital implants support the lower orbital rims and are more appropriate for:
- under-eye hollowing
- negative orbital vectors
- poor lower eyelid support
- deep tear troughs caused by skeletal deficiency
Some patients need both. In those cases, a combined infraorbital-malar implant may provide a smoother and more complete correction than either implant alone.
8. What Is the Difference Between a Cheek Implant and a Zygomatic Arch Implant?
Cheek implants primarily increase forward projection.
Zygomatic arch implants primarily increase lateral width.
A patient with a flat midface may benefit from cheek augmentation, while a patient with a narrow upper face may benefit more from arch widening.
Some patients require both forward projection and additional width. In those cases, the implant can be designed to extend across the cheek and zygomatic arch as one continuous structure.
9. Do I Need a Cheek Implant or a Midface Mask Implant?
A cheek implant is appropriate when the deficiency is concentrated at the malar eminence.
A midface mask implant is considered when several adjacent regions are deficient, such as:
- infraorbital rims
- cheeks
- paranasal areas
- anterior maxilla
The midface mask treats generalized central facial retrusion rather than an isolated cheek deficiency.
It is a more comprehensive implant, but that does not necessarily mean it creates a larger or less natural result. When several regions require augmentation, a continuous implant may look more anatomical than multiple disconnected implants.
10. Can Custom Facial Implants Correct Facial Asymmetry?
Yes.
Correction of asymmetry is one of the greatest advantages of custom implant design.
The implant can be made differently on each side to compensate for:
- congenital skeletal asymmetry
- previous fractures
- prior surgery
- uneven facial development
- asymmetric chin or jaw projection
- cranial flattening
Perfect symmetry is rarely possible because the overlying soft tissues may also be different from side to side. However, custom implants allow much more precise correction than standard implants, which are usually symmetrical by design.
11. Can One Implant Correct More Than One Facial Region?
Yes.
Many custom implants are specifically designed to cross traditional anatomical boundaries.
Examples include:
- infraorbital-malar implants
- infraorbital-maxillary implants
- cheek-arch implants
- forehead-brow implants
- chin-wing implants
- full jawline implants
- midface mask implants
Combining adjacent regions into one implant can create smoother transitions, reduce contour gaps, and provide more complete skeletal continuity.
The design should follow the patient’s anatomy rather than arbitrary implant categories.
12. Is It Better to Use One Large Implant or Several Smaller Implants?
Neither approach is universally better.
One continuous implant may be preferable when several adjacent areas require augmentation because it creates:
- smoother transitions
- more predictable alignment
- fewer independent implant edges
- unified correction of asymmetry
Separate implants may be preferable when the regions are anatomically distant, require different surgical approaches, or may need independent future adjustment.
The decision depends on anatomy, surgical access, implant size, and the desired degree of control.
13. How Many Custom Facial Implants Can Be Placed During One Surgery?
Several implants can often be placed during one operation, depending on:
- the number of surgical sites
- total operative time
- medical health
- anticipated swelling
- recovery demands
- whether other procedures are being performed
Common combinations include:
- forehead and brow implants
- infraorbital and cheek implants
- jawline and midface implants
- upper, middle, and lower facial augmentation
There is no fixed maximum number. The treatment plan should balance efficiency with safety and recovery considerations.
14. Should I Treat My Most Noticeable Feature First?
Not always.
The feature that attracts the patient’s attention may not be the primary anatomical cause of facial imbalance.
For example:
- A large-looking nose may partly reflect a recessed forehead or chin.
- A full-looking neck may reflect inadequate chin and jaw projection.
- Tired-looking eyes may result from infraorbital deficiency.
- A narrow face may result from deficient zygomatic arches rather than small cheeks.
Treating the underlying skeletal relationship may improve the visible concern without directly operating on the feature that initially seemed problematic.
15. Can a Custom Implant Make My Nose Look Smaller Without Rhinoplasty?
It can improve the apparent proportion of the nose.
A nose may seem prominent because the forehead, midface, or chin lacks sufficient projection. Strengthening those surrounding skeletal structures can make the nose appear more balanced.
This does not physically reduce the nose, but it changes its relationship to the rest of the face.
In some patients, forehead or chin augmentation produces a substantial improvement in profile harmony without rhinoplasty.
16. Can a Chin or Jawline Implant Improve My Neck?
Yes, within limits.
Increasing chin and jaw projection can improve:
- the transition between the jaw and neck
- cervicomental definition
- the apparent fullness beneath the chin
- lower facial support
However, an implant does not remove fat, tighten loose skin, or repair separated neck muscles.
Patients with significant soft tissue laxity or excess submental fat may require additional procedures such as liposuction, neck lifting, or direct soft tissue reduction.
17. Can Facial Implants Replace Fillers?
Sometimes, but not in every situation.
Fillers are useful for:
- temporary enhancement
- minor contour adjustments
- testing a potential aesthetic change
- soft tissue volume loss
Custom implants are more appropriate when the concern is caused by a permanent skeletal deficiency.
Implants provide:
- stable structural projection
- predictable shape
- long-term correction
- no need for repeated injections
Fillers and implants can also be complementary because they treat different tissue layers.
18. Can Facial Implants Replace Orthognathic Surgery?
No, not when a functional jaw relationship or significant bite problem exists.
Orthognathic surgery repositions the jaws and can correct:
- malocclusion
- major maxillary or mandibular retrusion
- open bite
- facial skeletal relationships associated with dental function
Custom implants change external skeletal contour but do not move the teeth or correct the bite.
They may be appropriate for patients with normal occlusion who want aesthetic enhancement or for residual contour deficiencies after orthognathic surgery.
19. Should I Have Orthognathic Surgery or Custom Facial Implants?
The decision depends largely on dental function and skeletal movement requirements.
Orthognathic surgery is generally preferred when there is:
- significant malocclusion
- functional jaw deformity
- airway-related skeletal concerns
- a need to reposition the tooth-bearing jaws
Custom implants may be appropriate when:
- the bite is acceptable
- the concern is primarily aesthetic
- projection or width is deficient without functional impairment
- residual contour deficiencies remain after prior jaw surgery
In some patients, orthognathic surgery and custom implants are used together or performed in stages.
20. How Much Can a Custom Facial Implant Change My Appearance?
The degree of change can range from very subtle to highly transformative.
The result depends on:
- implant location
- implant thickness
- number of regions treated
- preoperative deficiency
- soft tissue thickness
- patient goals
A few millimeters of projection can produce a meaningful change in facial balance. Larger corrections involving several facial regions can create a substantial transformation.
The amount of change should be chosen deliberately during the design process rather than determined during surgery.
21. Can a Custom Implant Change My Facial Identity?
A poorly planned or excessively large implant can create a result that feels unfamiliar.
A thoughtfully designed implant should enhance the patient’s existing facial identity rather than replace it.
Preserving identity depends on:
- maintaining natural proportions
- avoiding excessive projection
- respecting age, sex, and facial type
- creating smooth transitions
- understanding which features should remain unchanged
The goal is usually for the patient to look like a more balanced version of themselves—not like a different person.
22. How Do Male and Female Implant Designs Differ?
Male and female implant designs often differ in contour, width, projection, and angularity.
Male designs may emphasize:
- brow projection
- facial width
- straighter jawlines
- broader chins
- stronger jaw angles
- zygomatic arch width
Female designs may favor:
- smoother forehead contour
- more limited brow projection
- refined cheek projection
- narrower or more tapered lower facial contours
- subtle chin enhancement
These are general tendencies rather than rigid rules. Implant design should reflect the individual patient’s anatomy and aesthetic goals rather than a standardized gender template.
23. Can Custom Implants Be Designed for a Subtle Result?
Yes.
Custom does not mean large.
One of the greatest advantages of digital design is the ability to create small, precisely controlled changes.
A subtle implant may be only a few millimeters thick and designed primarily to:
- smooth a contour
- correct asymmetry
- improve transitions
- strengthen one deficient skeletal region
- restore a previously lost contour
Subtle designs often produce some of the most natural and satisfying results because they correct the structural deficiency without drawing attention to the implant itself.
24. Can I See or Approve My Implant Design Before Surgery?
Patients can usually review the planned implant design during the digital design process.
This review may include:
- three-dimensional views of the skull
- implant thickness maps
- frontal, oblique, and profile views
- comparisons between design versions
- assessment of implant borders and transitions
However, the design is not a direct simulation of the final soft tissue appearance. It shows how the underlying skeleton will be changed.
The surgeon must translate skeletal design into the expected external facial result using experience and knowledge of soft tissue behavior.
25. What Is the Most Important Factor in Choosing the Right Implant?
The most important factor is not the implant material, software, or manufacturer.
It is the accuracy of the diagnosis and the quality of the design.
A technically perfect implant placed on the wrong facial region will not create the desired result. Likewise, an implant that is too large, too small, or poorly blended may produce dissatisfaction even if it fits the bone precisely.
Successful implant selection requires:
- correct identification of the skeletal deficiency
- understanding of facial proportions
- thoughtful design
- realistic expectations
- precise surgical placement
The implant must solve the right problem.
A Practical Facial Implant Decision Pathway
Patients can think about implant selection through a simple sequence of questions.
Step 1: What Do I See?
Identify the visible concern:
- weak profile
- hollow under-eyes
- flat cheeks
- narrow face
- sloping forehead
- poor jawline
- skull asymmetry
Step 2: What Structure Is Causing It?
Determine whether the cause is primarily:
- bone
- fat
- muscle
- skin
- dental or jaw position
- a combination of several tissues
Step 3: Is the Deficiency Localized or Regional?
A localized deficiency may require one implant.
A regional deficiency may require a longer implant that crosses several adjacent skeletal areas.
Step 4: How Does the Concern Relate to the Rest of the Face?
Assess whether treating one area alone would create balance or expose another deficiency.
Step 5: What Degree of Change Is Desired?
Determine whether the goal is:
- subtle refinement
- moderate enhancement
- strong structural transformation
Step 6: Can the Desired Change Be Achieved Safely?
The final design must respect:
- nerves
- muscles
- incisions
- soft tissue limits
- fixation requirements
- implant thickness
- surgical access
Common Mistakes When Choosing a Facial Implant
Choosing an Implant Based Only on a Photograph
Photographs are essential, but they cannot show the complete three-dimensional skeletal anatomy.
Treating the Symptom Rather Than the Cause
Under-eye hollowing, poor neck definition, and a large-looking nose may result from deficiencies elsewhere in the facial skeleton.
Assuming Bigger Will Be Better
Excessive augmentation may create unnatural contours, poor transitions, or imbalance with untreated facial regions.
Ignoring Adjacent Anatomy
Every implant affects how neighboring facial structures are perceived.
Choosing a Stock Implant Because It Is Simpler
A stock implant may be appropriate for a straightforward deficiency, but it should not be chosen when the anatomy requires asymmetry correction, broader coverage, or a more complex shape.
Designing Each Implant Independently
When several implants are planned, they must be designed as parts of one facial architecture rather than as unrelated devices.
Clinical Pearl
The most common planning error is not choosing the wrong material. It is choosing the wrong anatomical target.
When One Implant Is Enough
A single implant may provide an excellent result when:
- the deficiency is clearly localized
- the remaining facial skeleton is well proportioned
- asymmetry is limited to one region
- the patient desires a focused change
- adjacent facial regions already provide adequate balance
Examples include:
- isolated chin retrusion
- localized forehead flattening
- unilateral skull asymmetry
- isolated infraorbital deficiency
- deficient jaw angles with an otherwise strong mandible
A single implant can have a powerful effect when it corrects the true structural imbalance.
When Combination Implants Are Better
Multiple or extended implants may be preferable when:
- several adjacent regions are deficient
- one implant alone would create disproportion
- facial asymmetry crosses anatomical boundaries
- full-face balancing is desired
- the patient seeks masculinization or comprehensive skeletal enhancement
- prior surgery has created multiple contour irregularities
The purpose is not to increase the number of procedures. It is to improve the continuity and proportion of the result.
The Role of the Three-Dimensional CT Scan
The three-dimensional CT scan is central to choosing the correct implant because it reveals the actual skeletal anatomy beneath the soft tissues.
It allows evaluation of:
- bone contour
- asymmetry
- projection
- width
- previous implants
- prior osteotomies
- fixation sites
- regional skeletal relationships
The CT scan does not independently determine the best implant.
It provides the anatomical map from which the surgeon creates the treatment plan.
The Role of Patient Preference
There is rarely only one technically possible implant design.
Two patients with similar anatomy may want very different results.
One may prefer:
- subtle correction
- limited width
- soft transitions
Another may prefer:
- greater projection
- stronger angles
- a more masculine or angular result
The design process should therefore be collaborative. The surgeon defines the anatomical possibilities and limitations, while the patient helps define the desired aesthetic destination.
Key Takeaways
- The implant a patient initially requests is not always the implant that best addresses the underlying problem.
- Choosing the correct custom implant requires evaluation of the entire face, not one isolated feature.
- Chin, jawline, cheek, infraorbital, forehead, brow, temporal, and skull implants each address different anatomical deficiencies.
- Many implants can be extended across adjacent regions to create smoother transitions and more complete correction.
- A single implant may be sufficient for a localized deficiency, while combination treatment may be more appropriate for regional or full-face imbalance.
- Three-dimensional CT imaging reveals the skeletal anatomy, but surgical judgment determines how that anatomy should be changed.
- Custom implant design can produce subtle refinement or substantial transformation.
- The goal is not to maximize implant size or the number of implants, but to restore facial proportion while preserving identity.
- The most important step is identifying the true anatomical cause of the patient’s concern.
Final Perspective
Choosing the right custom facial implant is not a process of selecting from a menu of facial features.
It is a process of diagnosis.
The visible concern must first be traced to its underlying anatomical cause. The entire facial skeleton must then be evaluated to determine whether the deficiency is isolated, regional, or part of a broader pattern of imbalance. Only after those relationships are understood should an implant be designed.
This is why two patients who appear to have the same concern may require very different solutions.
One patient with a weak profile may need only a chin implant. Another may require a full jawline implant. One patient with under-eye hollowing may benefit from infraorbital augmentation, while another may need a combined infraorbital-malar implant or full midface mask design.
The implant is therefore not the starting point.
The patient’s anatomy is the starting point.
Custom facial implants provide the ability to translate that anatomy into a highly individualized skeletal correction. When the diagnosis is accurate and the design is thoughtful, the result is not simply a larger chin, stronger cheek, or wider jaw. It is a face whose parts relate to one another more naturally.
That is the true purpose of patient-specific facial skeletal enhancement.
Dr. Eppley’s Bottom Line
The right implant is the one that corrects the true anatomical deficiency, improves the relationships between facial regions, and remains consistent with the patient’s identity and goals. Custom facial implant surgery is not about adding volume wherever the face appears weak. It is about understanding why the face appears unbalanced and restoring its architecture with precision.
CORNERSTONE ARTICLE #6
Custom Facial Implant Materials
Silicone, PEEK, Porous Polyethylene, Titanium, and the Science of Choosing the Right Implant
Quick Answer
Custom facial implants can be manufactured from several biocompatible materials, most commonly solid silicone, polyetheretherketone (PEEK), porous polyethylene, and titanium. No material has been conclusively proven superior for every facial or cranial application. Each has a different combination of flexibility, rigidity, tissue response, imaging characteristics, manufacturing requirements, cost, removability, and suitability for revision surgery.
For most cosmetic facial and skull augmentation procedures, the most important determinants of success are not the material alone. They are:
- correct diagnosis
- thoughtful implant design
- smooth anatomical transitions
- precise placement
- stable fixation
- appropriate soft tissue coverage
- meticulous surgical technique
The better question is therefore not:
“What is the best facial implant material?”
It is:
“Which material best fits this particular implant design, anatomical location, and surgical objective?”
Quick Facts
- There is no universally ideal implant material.
- Solid silicone is flexible, nonporous, readily customized, and comparatively easy to remove or revise.
- PEEK is rigid, strong, radiolucent, and frequently used for patient-specific craniofacial reconstruction.
- Porous polyethylene permits fibrous and vascular tissue ingrowth, which stabilizes the implant but can make later removal more difficult.
- Titanium is strong, biocompatible, and especially valuable for fixation, orbital reconstruction, and load-bearing craniofacial applications.
- All facial implant materials can become infected.
- Tissue ingrowth does not make an implant immune to infection.
- A custom implant can fit the bone precisely yet still produce an undesirable aesthetic result if its external contours are poorly designed.
- Implant material does not compensate for incorrect implant dimensions or placement.
- Long-term success depends on matching the material to the anatomy and purpose of the operation.
Part 1: Understanding Facial Implant Materials
The Material Is Only One Part of the Implant
Patients often focus heavily on the substance from which an implant is manufactured.
This is understandable. The implant is intended to remain in the body for many years, and patients naturally want to know whether it is safe, durable, and compatible with normal life.
But an implant is more than a material.
Its clinical behavior depends on at least five separate factors:
- Material
- Design
- Anatomical location
- Fixation
- Surgical placement
A well-chosen material cannot rescue a poorly designed implant. Likewise, an anatomically sophisticated design may perform poorly if placed in an unsuitable tissue plane or inadequately secured.
The final result is created by the interaction of all five variables.
What Makes an Ideal Facial Implant Material?
In theory, the ideal material would be:
- biocompatible
- noncarcinogenic
- nonallergenic
- chemically stable
- resistant to degradation
- resistant to infection
- lightweight
- strong but not excessively rigid
- easy to shape
- easy to manufacture precisely
- easy to insert
- easy to fixate
- compatible with CT and MRI
- invisible beneath the soft tissues
- easy to revise or remove
- affordable
No currently available material possesses every one of these characteristics.
Every material represents a tradeoff.
For example, tissue ingrowth may increase biological attachment but complicate removal. Rigidity may improve structural stability but require a larger incision. Flexibility may simplify insertion but require screw fixation to prevent displacement.
The surgeon must decide which properties are most important for the procedure being performed.
Reconstruction and Cosmetic Augmentation Are Not the Same
Material selection may differ substantially between reconstructive and aesthetic surgery.
A patient missing part of the orbital floor after trauma has different needs from a patient seeking a stronger jawline. A large full-thickness skull defect is not the same as cosmetic augmentation of a normally intact occipital bone.
Reconstructive implants may need to:
- bridge defects
- protect the brain or orbit
- maintain structural rigidity
- restore missing skeletal continuity
- resist functional loads
Cosmetic implants usually sit on an intact skeletal surface and are intended to:
- increase projection
- change width
- correct asymmetry
- create smoother contours
- improve facial proportions
A material highly suitable for repairing a skeletal defect is not automatically the best choice for a large cosmetic onlay implant.
Design Matters More Than Marketing
Patients sometimes encounter claims that one material is more advanced, safer, or more “biological” than all others.
Such claims should be interpreted cautiously.
A material may possess impressive laboratory properties without offering a meaningful aesthetic advantage in a particular operation. Current reviews of facial implant materials emphasize that no alloplastic material has demonstrated universal superiority across all craniofacial applications.
The success of a custom implant depends heavily on whether it:
- covers the correct skeletal region
- provides the correct amount of projection
- has smooth, feathered borders
- avoids excessive thickness
- accommodates nerves and muscles
- can be inserted through an appropriate incision
- sits securely on the bone
- produces the intended external appearance
Dr. Eppley’s Bottom Line
The implant material matters, but it matters only after the correct implant has been designed. A perfectly manufactured implant with the wrong shape is still the wrong implant.
Part 2: Solid Silicone Facial Implants
What Is Solid Silicone?
Solid silicone facial implants are made from medical-grade silicone elastomer.
This is different from the soft silicone gel contained inside many breast implants. A solid facial implant is a cohesive elastomeric structure. It does not contain liquid gel that can leak from a shell.
Its physical firmness can be adjusted during manufacturing. Depending on its composition and thickness, a solid silicone implant may range from relatively soft and flexible to firm and structurally supportive.
Why Has Silicone Been Used So Extensively?
Silicone has a long history in facial augmentation because it combines several useful characteristics:
- biocompatibility
- chemical stability
- flexibility
- permanent volume
- smooth surface
- ease of shaping
- ease of screw fixation
- relative ease of removal
- compatibility with custom manufacturing
Silicone does not normally bond directly to bone. The body forms a thin fibrous capsule around its surface.
This capsule is not inherently a complication. It is the body’s expected response to a smooth, nonporous implant.
Flexibility
The flexibility of silicone is one of its most important advantages.
A large implant may be temporarily bent or folded during insertion and then allowed to return to its intended shape once positioned over the bone. This can permit insertion through an incision considerably smaller than the implant itself.
This property is particularly useful for:
- full jawline implants
- large forehead implants
- skull implants
- extended infraorbital-malar implants
- implants with broad surface coverage
A rigid implant of similar dimensions may require a larger incision, a multi-piece design, or a different surgical approach.
Custom Manufacturing
Silicone can be manufactured from a digital implant design created from a patient’s three-dimensional CT scan.
The design process can control:
- implant thickness
- surface contour
- borders
- symmetry correction
- screw fixation sites
- extension across anatomical regions
- flexibility at strategic areas
The implant can be made as one piece or divided into several interlocking or overlapping components when surgical access requires it.
Tissue Response
Because solid silicone is nonporous, significant tissue ingrowth does not occur through the implant.
Instead, the surrounding tissues form a capsule around it.
This has several practical consequences:
Advantages
- the implant does not become densely incorporated into surrounding tissues
- removal is usually more straightforward
- replacement or design revision is generally easier
- the implant may be repositioned if necessary
Limitations
- biological attachment is limited
- the implant should usually be mechanically stabilized
- inadequate fixation can allow movement during early healing
Fixation
Custom silicone implants are commonly secured with titanium screws.
Screw fixation:
- prevents early movement
- maintains exact positional accuracy
- reduces the risk of displacement
- keeps the implant closely adapted to the bone
- helps maintain symmetry
- allows the surgeon to confirm proper seating
Once healing has occurred, the surrounding capsule and soft tissues provide additional stability, but initial mechanical fixation remains important for many custom designs.
How Does Silicone Feel?
A properly positioned implant sits directly on the facial skeleton beneath muscle, fascia, periosteum, fat, and skin.
The patient does not generally feel its material properties in the same way one might feel a loose implant held in the hand.
The external feel depends on:
- implant location
- implant thickness
- soft tissue coverage
- the firmness of the underlying bone
- whether an implant edge is prominent
- whether the implant moves
A well-designed and properly placed silicone implant should feel like part of the underlying skeletal structure rather than a separate object.
Bone Remodeling Beneath Silicone
Some degree of pressure-related bone remodeling can occur beneath facial implants. Reports in the literature have described remodeling or resorption particularly with certain chin implant designs, although its frequency and clinical significance vary.
This does not mean that silicone dissolves bone.
Possible contributing factors include:
- excessive implant pressure
- instability or micromotion
- implant position
- muscle forces
- long-term mechanical loading
- excessive projection
Stable screw fixation and accurate anatomical adaptation may reduce unnecessary implant movement and concentrated pressure.
Infection
Silicone implants can become infected, just as implants made from other materials can.
Risk is influenced by:
- incision location
- contamination
- oral or sinus communication
- surgical duration
- implant size
- tissue quality
- previous surgery
- hematoma or fluid collection
- wound breakdown
- patient health factors
When a smooth silicone implant becomes infected, the absence of deep tissue ingrowth may make surgical removal easier than removal of a porous implant.
However, ease of removal should not be confused with immunity from infection. No implant material is infection-proof.
Revision and Removal
One of silicone’s strongest practical advantages is revisability.
A solid silicone implant can generally be:
- removed
- resized
- replaced
- modified
- repositioned
- exchanged for a new custom design
The capsule creates a defined surgical pocket that often helps the surgeon identify the implant borders during revision.
Revision surgery can still be complex, particularly when:
- the implant is very large
- multiple screws are present
- scar tissue is extensive
- nerves are nearby
- the implant was placed through an intraoral incision
- previous infection has altered the tissues
Nevertheless, silicone is usually among the more manageable materials when future revision is anticipated.
Medical Imaging
Solid silicone implants can be seen on CT and MRI but generally do not create the type of severe metallic artifact associated with some metals.
They do not interfere with airport security and do not prevent routine medical imaging.
Healthcare providers should still be informed of their presence so images can be interpreted correctly.
Longevity
Solid silicone does not normally dissolve, resorb, or require routine replacement.
Its longevity depends on maintaining:
- stable position
- healthy soft tissue coverage
- freedom from infection
- satisfactory aesthetic design
An implant may be revised years later because a patient’s aesthetic goals change, surrounding tissues age, or the original design is no longer preferred. That is different from the material “wearing out.”
Principal Advantages of Silicone
- flexible
- lightweight
- permanent
- available in different firmness levels
- adaptable to large custom designs
- insertable through relatively limited incisions
- easily secured with screws
- generally straightforward to remove
- well suited to revision surgery
- compatible with CT and MRI
- comparatively economical
Principal Limitations of Silicone
- does not permit substantial tissue ingrowth
- requires reliable fixation in many locations
- can move if inadequately secured
- may develop a visible or palpable border if poorly designed
- can become infected
- excessive projection may contribute to pressure-related bone remodeling
- flexibility may be undesirable when rigid structural replacement is needed
Dr. Eppley’s Clinical Perspective
For cosmetic onlay augmentation of the intact facial skeleton, solid silicone often provides an especially useful combination of:
- design versatility
- flexibility
- ease of insertion
- stable screw fixation
- long-term permanence
- revision access
This does not make it universally superior. It makes it highly practical for many aesthetic facial and skull implant applications.
Part 3: PEEK Facial and Cranial Implants
What Is PEEK?
PEEK stands for polyetheretherketone.
It is a high-performance thermoplastic polymer used in orthopedic, spinal, cranial, and maxillofacial implants. PEEK is valued for its mechanical strength, chemical stability, radiolucency, and compatibility with patient-specific manufacturing.
PEEK has been used particularly extensively in cranial defect reconstruction, where rigid implants can be designed to replace missing portions of the skull. It has also been used for custom facial augmentation and reconstruction.
Rigidity
PEEK is substantially more rigid than silicone.
This rigidity can be advantageous when an implant must:
- bridge a skeletal defect
- protect underlying structures
- maintain a precisely engineered shape
- resist deformation
- provide firm structural reconstruction
The same rigidity may be a disadvantage for a very large cosmetic onlay implant because the implant cannot be substantially folded during insertion.
A larger incision or multi-piece design may therefore be required.
Mechanical Characteristics
PEEK’s elastic modulus is closer to that of cortical bone than that of many metals, although exact properties vary with formulation and manufacturing. This has contributed to its use as an alternative to metallic implants in several skeletal applications.
PEEK is:
- strong
- fatigue resistant
- lightweight compared with metal
- dimensionally stable
- resistant to chemical degradation
It can be milled or three-dimensionally printed into patient-specific forms.
Radiolucency and Imaging
PEEK is radiolucent and generally produces less CT and MRI artifact than metallic implants.
This may be useful when future imaging of the surrounding bone, orbit, brain, or soft tissues is important.
The implant remains identifiable on medical imaging, but it does not usually obscure adjacent anatomy to the degree that dense metal may.
Tissue Integration
Standard PEEK is relatively bioinert and does not naturally achieve strong osseointegration without surface modification.
This characteristic has motivated research into:
- porous PEEK
- surface roughening
- hydroxyapatite coatings
- titanium-coated PEEK
- bioactive composites
- microstructured surfaces
Much of the evidence supporting enhanced PEEK integration remains preclinical or limited, and the long-term clinical value of many modifications continues to be investigated.
Fixation
Because PEEK is rigid, it can be secured with plates or screws placed through preplanned fixation holes.
The implant must fit the underlying skeleton accurately. A rigid implant cannot conform to unexpected irregularities as readily as a flexible material.
This makes:
- high-quality CT data
- accurate segmentation
- precise manufacturing
- careful surgical exposure
- exact implant seating
particularly important.
A review of adverse-event reports involving PEEK patient-specific implants identified poor fit and infection among the commonly reported problems, demonstrating that sophisticated material and manufacturing do not eliminate the need for accurate planning and execution.
Surgical Insertion
PEEK cannot usually be rolled or substantially folded.
Large implants may therefore require:
- longer incisions
- wider surgical exposure
- multi-piece construction
- interlocking segments
- assembly within the surgical pocket
Multi-piece designs may improve insertion but introduce additional considerations, including:
- alignment between components
- visible seams
- fixation of each segment
- risk of contour mismatch
Infection
PEEK implants can become infected.
Its smooth or relatively nonintegrating surface may allow removal, but removal of a large rigid implant may still require extensive exposure.
Infection risk is influenced by surgical and anatomical factors rather than material alone.
Published clinical literature on PEEK is growing, but long-term aesthetic implant data remain less extensive than data for its reconstructive use. Current reviews continue to call for more standardized reporting and longer follow-up.
Revision Surgery
PEEK revision may be more difficult than silicone revision because:
- the implant is rigid
- insertion and removal may require larger exposure
- the implant cannot be easily folded
- intraoperative reshaping is limited
- modifying a thick implant can be time-consuming
- replacement generally requires a newly manufactured device
PEEK can be burred or drilled, but it is not typically as convenient to alter extensively during surgery as silicone.
Cost
Custom PEEK implants are often more expensive than custom silicone implants.
Cost may reflect:
- material expense
- specialized manufacturing
- machining or printing requirements
- regulatory controls
- engineering time
- sterilization
- limited manufacturing facilities
Higher cost does not automatically mean a superior cosmetic result. It indicates a different manufacturing pathway and material profile.
Principal Advantages of PEEK
- high strength
- rigid structural support
- lightweight compared with metal
- precise patient-specific manufacturing
- radiolucency
- limited metallic imaging artifact
- useful for cranial and skeletal defect reconstruction
- stable shape
- good fatigue resistance
Principal Limitations of PEEK
- rigid and not foldable
- may require larger incisions
- limited intraoperative adaptability
- more difficult to revise or exchange
- generally more expensive
- standard PEEK is bioinert
- accurate skeletal fit is essential
- long-term aesthetic augmentation evidence is still developing
When PEEK May Be Particularly Useful
PEEK may be considered for:
- large cranial defects
- rigid cranial reconstruction
- selected orbital or midface defects
- mandibular reconstruction
- complex post-traumatic deformities
- patients requiring minimal metallic imaging artifact
- facial applications where rigidity is specifically desired
Dr. Eppley’s Bottom Line
PEEK is a sophisticated and valuable reconstructive material, especially when rigid replacement of missing bone is required. Its strength does not necessarily provide an advantage for every cosmetic onlay implant, where flexibility, limited-incision insertion, and future revisability may be equally important.
Part 4: Porous Polyethylene Facial Implants
What Is Porous Polyethylene?
Porous polyethylene is a high-density polyethylene material manufactured with interconnected pores.
Medpor is a widely recognized commercial form, although porous polyethylene is the generic material category.
The pores allow soft tissue and vascular ingrowth. Histological studies of retrieved implants have demonstrated collagen, fibrous tissue, cells, and, in some areas, bone ingrowth within the porous structure.
Why Is Tissue Ingrowth Important?
Tissue ingrowth can provide:
- biological stabilization
- resistance to migration
- attachment to surrounding tissues
- vascular access within portions of the implant
- reduced dependence on capsule formation
This integration is often presented as porous polyethylene’s defining advantage.
But every advantage has a corresponding tradeoff.
The same tissue ingrowth that stabilizes the implant may make it substantially more difficult to:
- reposition
- remove
- revise
- separate from muscles
- dissect away from nerves
- exchange for a different design
This becomes especially important in aesthetic surgery, where dissatisfaction may result from implant shape rather than material failure.
Rigidity and Handling
Porous polyethylene is generally firmer and less elastic than silicone but less metal-like than titanium.
It can be:
- carved
- trimmed
- contoured
- drilled
- secured with screws
Traditional implants are commonly supplied as blocks, sheets, or preformed facial shapes.
Patient-specific porous polyethylene implants may be available in some settings, although manufacturing pathways and design options vary.
Stability
Tissue ingrowth provides increasing biological attachment over time.
Screw fixation may still be used to ensure exact initial position. Tissue ingrowth should not be relied on to correct an implant that was inaccurately placed at surgery.
The implant must begin in the correct position.
Infection
Porous polyethylene has been used successfully in facial reconstruction for decades, with multiple published series reporting acceptable complication rates.
Its vascular ingrowth has sometimes been proposed as beneficial for host defense. However, porous implants can still become infected.
When infection occurs, treatment may be challenging because:
- bacteria may occupy the porous network
- antibiotics may not reliably eradicate an established implant biofilm
- surrounding tissue may be densely adherent
- removal may damage adjacent tissues
Infection rates cannot be compared fairly without accounting for implant site, surgical indication, incision, follow-up duration, and patient selection.
Revision and Removal
Removal is one of the most important practical differences between porous polyethylene and smooth silicone.
A recently placed porous implant may sometimes be removed without major difficulty.
A long-standing implant with extensive tissue ingrowth can be more challenging.
Removal may require:
- sharp dissection
- piecemeal extraction
- separation from muscle
- management of bleeding from vascularized tissue
- protection of nearby nerves
- removal of attached capsule or scar
In regions such as the temple, orbit, or jaw angle, intimate attachment to surrounding structures may increase revision complexity.
For this reason, porous polyethylene may be less attractive when the probability of future aesthetic revision is meaningful.
Implant Visibility and Edge Control
Because porous polyethylene is firmer, a thick edge beneath thin soft tissue may be visible or palpable.
As with every material, success depends on:
- proper thickness
- tapered borders
- adequate tissue coverage
- accurate pocket development
- stable fixation
Tissue ingrowth does not compensate for a bulky or poorly blended edge.
Fracture and Fragmentation
Porous polyethylene is durable but may be more susceptible than flexible silicone to fracture when thin, sharply bent, repeatedly stressed, or aggressively manipulated.
This is not a common event in properly selected applications, but mechanical behavior should be considered when designing narrow extensions or placing implants in areas exposed to significant muscle forces.
Medical Imaging
Porous polyethylene is compatible with CT and MRI.
Because it is nonmetallic, it generally causes limited imaging artifact.
Its appearance may become more difficult to distinguish as tissue grows into and around it, but radiologists can usually identify its location when informed that an implant is present.
Principal Advantages of Porous Polyethylene
- tissue and vascular ingrowth
- biological stabilization
- durable
- carveable
- screw fixable
- compatible with CT and MRI
- extensive history in orbital and facial reconstruction
- available in many preformed shapes
Principal Limitations of Porous Polyethylene
- tissue ingrowth may make revision difficult
- removal can damage adherent tissues
- can become infected
- porous structure may harbor established bacterial biofilm
- less flexible than silicone
- large implants may require greater exposure
- intraoperative contouring may create irregularities
- thin or highly stressed components may be vulnerable to fracture
Common Misconception
“Tissue Ingrowth Makes the Implant Part of the Body”
Tissue ingrowth anchors the implant but does not transform synthetic polyethylene into living bone.
The implant remains a permanent foreign material. It simply becomes incorporated into surrounding fibrous and vascular tissues.
Dr. Eppley’s Bottom Line
Porous polyethylene’s greatest advantage and greatest disadvantage are the same: tissue ingrowth. It provides biological attachment, but that attachment can make aesthetic revision or removal considerably more difficult.
Part 5: Titanium Facial and Cranial Implants
What Is Titanium?
Titanium is a biocompatible metal widely used throughout craniofacial surgery.
It is commonly found in:
- fixation screws
- bone plates
- orbital meshes
- cranial meshes
- dental implants
- joint prostheses
- patient-specific reconstructive implants
Titanium has an extensive clinical history and is valued for its strength, corrosion resistance, and compatibility with bone.
Forms of Titanium Implants
Titanium may be used as:
Plates and Screws
Used to stabilize bones and secure other implants.
Mesh
Used to reconstruct orbital walls, cranial defects, and selected facial defects.
Solid Milled Components
Manufactured from titanium blocks for patient-specific reconstruction.
Three-Dimensionally Printed Porous Titanium
Created with complex internal structures that reduce weight and may support bone integration.
These forms behave differently and should not be discussed as though all titanium implants are identical.
Strength and Rigidity
Titanium is much stronger and more rigid than silicone or porous polyethylene.
This is useful for:
- load-bearing reconstruction
- fixation
- bridging skeletal defects
- orbital support
- thin but strong structural components
- reconstruction after trauma or tumor removal
For purely cosmetic augmentation over intact bone, extreme strength may not provide a meaningful advantage.
The facial skeleton beneath the implant is already structurally intact. The implant’s purpose is primarily contour enhancement, not load-bearing reconstruction.
Osseointegration
Titanium can achieve direct bone contact and osseointegration under suitable conditions.
Surface treatment, porosity, stability, and anatomical location influence the degree of integration.
Osseointegration is particularly useful for dental implants and certain orthopedic applications.
For a cosmetic facial onlay implant, extensive bone integration may not always be necessary and may complicate future removal.
Weight
Titanium is heavier than polymeric materials, although modern lattice designs and thin meshes can minimize weight.
In most small craniofacial implants, weight is not clinically noticeable. It becomes more relevant when considering very large solid implants.
Thermal Conductivity
Metal conducts heat and cold more readily than polymers.
Most deeply placed titanium plates and meshes do not produce significant temperature symptoms. However, some patients with thin soft tissue coverage report awareness of cold in areas containing superficial metal hardware.
This is uncommon but illustrates that material behavior may be experienced differently depending on implant location.
Imaging
Titanium is generally considered compatible with MRI when the implanted device is appropriately manufactured and secured.
However, titanium can produce artifact on CT and MRI, particularly around larger or denser constructs. The degree of artifact depends on:
- implant size
- shape
- imaging sequence
- scanner technology
- proximity to the area of interest
Titanium typically produces less artifact than some other metals but more than nonmetallic polymers such as PEEK.
Infection
Titanium implants and fixation devices can become infected.
Infection risk depends on:
- contamination
- tissue coverage
- communication with the mouth or sinuses
- hardware exposure
- soft tissue injury
- prior radiation
- patient health
- implant stability
An infected titanium implant may require removal, particularly when associated with wound exposure, chronic drainage, or bone infection.
Revision and Removal
Removal depends on the implant form.
Small screws and plates are often straightforward to remove after exposure.
Porous or osseointegrated titanium implants may be more difficult.
Large patient-specific titanium implants may require extensive surgical access because they are rigid and cannot be folded for extraction.
Why Is Titanium Not Used for Every Cosmetic Implant?
Titanium’s strength is often unnecessary for cosmetic onlay augmentation.
Potential disadvantages include:
- rigidity
- larger insertion requirements
- imaging artifact
- higher manufacturing costs
- difficulty modifying intraoperatively
- possible palpability beneath thin tissues
- greater complexity of removal
- unnecessary structural strength for non-load-bearing applications
Titanium remains invaluable when its particular strengths match the reconstructive problem.
Principal Advantages of Titanium
- exceptional strength
- long clinical history
- corrosion resistant
- suitable for thin structural components
- excellent for plates and screws
- useful for orbital and cranial reconstruction
- can support osseointegration
- can be manufactured as patient-specific mesh or lattice structures
Principal Limitations of Titanium
- rigid
- cannot be folded for limited-incision insertion
- may produce imaging artifact
- comparatively expensive in custom solid forms
- may be palpable beneath thin tissues
- difficult to modify extensively during surgery
- large implants may be difficult to remove
- strength may exceed what is needed for cosmetic augmentation
Dr. Eppley’s Bottom Line
Titanium is indispensable for fixation and many reconstructive problems. But the strongest material is not automatically the best cosmetic augmentation material. The implant must be strong enough for its purpose—not stronger simply for the sake of strength.
Part 6: Comparing Facial Implant Materials
| Property | Solid Silicone | PEEK | Porous Polyethylene | Titanium |
| General character | Flexible elastomer | Rigid polymer | Firm porous polymer | Rigid metal |
| Tissue response | Fibrous capsule | Limited integration unless modified | Fibrous and vascular ingrowth | Bone contact or osseointegration possible |
| Flexibility | High | Low | Low to moderate | Very low |
| Structural rigidity | Moderate | High | Moderate | Very high |
| Weight | Low | Low | Low | Higher |
| Foldable for insertion | Yes | No | Generally no | No |
| Custom manufacturing | Excellent | Excellent | Available in selected forms | Excellent |
| Intraoperative modification | Relatively easy | Limited | Possible by carving | Limited |
| Screw fixation | Easy | Easy | Easy | Integral to material use |
| Tissue ingrowth | No substantial ingrowth | Limited in standard PEEK | Yes | Depends on surface and porosity |
| Ease of removal | Usually favorable | Moderate | Often difficult after ingrowth | Variable |
| Revision flexibility | High | Lower | Lower | Lower |
| CT artifact | Limited | Limited | Limited | Greater |
| MRI compatibility | Generally compatible | Generally compatible | Generally compatible | Generally compatible, device-specific |
| Cost | Usually lower | Higher | Moderate | Higher for custom implants |
| Common uses | Cosmetic facial and skull augmentation | Cranial and rigid facial reconstruction | Orbital and facial augmentation | Fixation, orbit, trauma and skeletal reconstruction |
This table describes general tendencies. Specific products vary in composition, porosity, stiffness, manufacturing method, and regulatory status.
Which Material Is Most Natural?
Patients frequently ask which implant material feels most like bone.
The answer is more complicated than comparing hardness.
A facial implant is covered by the patient’s tissues and supported by bone. The external feel depends more on:
- location
- soft tissue thickness
- implant thickness
- border design
- fixation
- movement
- depth of placement
A rigid implant can feel unnatural if its edge is abrupt. A flexible implant can feel skeletal if it is securely fixed and smoothly contoured.
Naturalness is primarily a design and placement issue.
Which Material Is Safest?
There is no defensible universal ranking.
Safety depends on:
- the operation
- implant location
- patient health
- material quality
- manufacturing standards
- sterility
- surgical technique
- fixation
- wound healing
- long-term follow-up
All four major materials have been used successfully. All four can also develop complications.
Current reviews have not established one material as universally superior for all facial reconstructive and aesthetic applications.
Which Material Has the Lowest Infection Rate?
Published infection rates are difficult to compare because studies differ in:
- anatomical site
- cosmetic versus reconstructive indications
- implant size
- incision location
- prior trauma or radiation
- follow-up duration
- definitions of infection
- antibiotic protocols
- patient selection
A small cheek implant placed through a clean incision cannot be fairly compared with a large implant reconstructing a contaminated cranial defect.
Material matters, but the surgical environment often matters more.
Which Material Is Easiest to Revise?
In general, smooth solid silicone is often the most straightforward to revise because it does not permit dense tissue ingrowth and can be flexed during removal.
Porous polyethylene may be more difficult because of tissue incorporation.
Large rigid PEEK and titanium implants may require wider exposure because they cannot be folded.
This distinction is especially important in cosmetic surgery, where future revision may be requested for aesthetic reasons even when the implant is medically functioning normally.
Which Material Lasts the Longest?
All of these materials are intended to be permanent.
Silicone, PEEK, porous polyethylene, and titanium do not normally require scheduled replacement solely because a certain number of years has passed.
A revision may become necessary because of:
- infection
- implant movement
- wound exposure
- trauma
- dissatisfaction with shape
- aging-related soft tissue changes
- changing aesthetic goals
- development of a new surgical plan
Longevity is therefore not simply the lifespan of the raw material.
It is the duration for which the implant remains safe, stable, and aesthetically satisfactory.
Part 7: How Surgeons Choose an Implant Material
Step 1: Define the Surgical Objective
Is the implant intended to:
- augment intact bone
- replace missing bone
- bridge a defect
- support the orbit
- protect the brain
- improve facial width
- increase projection
- correct asymmetry
- stabilize an osteotomy
The objective immediately narrows the material options.
Step 2: Evaluate the Implant’s Size
A small rigid implant may be inserted easily.
A large rigid implant may require a much larger incision.
Large cosmetic implants often benefit from flexibility, particularly in regions where the desired incision is substantially smaller than the implant.
Step 3: Evaluate the Anatomy
Important factors include:
- tissue thickness
- proximity to nerves
- muscle attachments
- oral or sinus exposure
- curvature of the bone
- available fixation sites
- previous scars
- existing implants
- degree of asymmetry
Step 4: Consider Revision Potential
Revision potential is especially important in aesthetic surgery.
The surgeon should consider:
- How easily can the implant be removed?
- Can it be modified?
- Can it be exchanged?
- Will tissue ingrowth endanger nearby nerves or muscles?
- Will removal require a larger incision than placement?
- Is the patient likely to request further enhancement later?
Step 5: Consider Imaging Needs
PEEK or other polymers may be attractive when minimizing metallic imaging artifact is important.
Titanium may be entirely appropriate when imaging artifact is unlikely to affect future care.
Step 6: Consider Cost
Material cost should be considered, but not in isolation.
A more expensive material may be justified when it offers a needed structural benefit. It should not be selected merely because it appears more technologically sophisticated.
Step 7: Match the Material to the Design
The final question is whether the chosen material can faithfully produce and surgically deliver the intended implant design.
General Material Considerations by Facial Region
Forehead Augmentation
Common considerations:
- broad surface area
- need for smooth borders
- limited scalp incision
- potential need for flexibility
- importance of symmetry
Solid silicone is often practical for cosmetic forehead augmentation. PEEK or titanium may be considered for reconstructive defects requiring rigidity.
Brow Bone Augmentation
Important factors include:
- precise orbital contour
- thin soft tissue coverage
- supraorbital nerve protection
- controlled projection
- insertion approach
Silicone and PEEK may both be used depending on the design and desired rigidity.
Infraorbital and Malar Augmentation
Important factors include:
- thin lower eyelid tissues
- infraorbital nerve location
- implant edge control
- orbital support
- need for asymmetry correction
Silicone, PEEK, porous polyethylene, and titanium may all have roles. Titanium is especially useful in orbital reconstruction, while silicone is often useful for broad cosmetic augmentation.
Jawline Augmentation
Important factors include:
- very large implant dimensions
- insertion through limited incisions
- complex three-dimensional curvature
- mental nerve protection
- multiple fixation points
- future revision potential
Flexible solid silicone is particularly useful for large, continuous cosmetic jawline implants.
Jaw Angle Augmentation
Important factors include:
- masseter muscle coverage
- implant fixation
- insertion through the mouth
- risk of postoperative movement
- potential revision
Silicone and porous polyethylene have both been used, but their revision characteristics differ substantially.
Skull Augmentation
For cosmetic onlay skull augmentation, important considerations include:
- large implant footprint
- limited scalp incision
- smooth contour
- flexibility
- scalp closure
Solid silicone is often advantageous for large cosmetic onlay implants.
For full-thickness cranial defects, rigid materials such as PEEK or titanium may be more appropriate because protection and structural reconstruction become central objectives.
Orbital Reconstruction
Orbital defects may require:
- thin structural support
- precise restoration of orbital volume
- resistance to deformation
- support of the globe
- compatibility with postoperative imaging
Titanium mesh and PEEK are established reconstructive options. Porous polyethylene and composite implants may also be used depending on defect size and surgeon preference.
Material Selection Decision Tree
Is intact bone being augmented or is bone missing?
- Intact bone → consider cosmetic onlay materials
- Missing bone → consider rigid reconstructive materials
Must the implant pass through a small incision?
- Yes → flexible material may be advantageous
- No → rigid material remains an option
Is future aesthetic revision likely?
- Yes → prioritize removability
- No → tissue integration may be more acceptable
Is rigid structural protection required?
- Yes → PEEK or titanium
- No → silicone or other onlay material may be appropriate
Part 8: Common Misconceptions
“Silicone Is Liquid and Can Leak”
Solid silicone facial implants do not contain liquid gel.
They are cohesive elastomeric devices.
“PEEK Is Always Better Because It Is More Expensive”
Cost reflects manufacturing and material complexity, not guaranteed aesthetic superiority.
A less expensive material may be better suited to a large cosmetic implant.
“Porous Implants Cannot Become Infected”
Tissue ingrowth does not eliminate infection risk.
Established infection involving a porous implant can be difficult to eradicate.
“Titanium Is Best Because It Is the Strongest”
Strength is valuable only when structural strength is needed.
Cosmetic facial augmentation usually does not require metal-level rigidity.
“Tissue Ingrowth Always Makes an Implant Safer”
Tissue ingrowth improves attachment but may make revision or removal more traumatic.
“A Harder Implant Feels More Like Bone”
External feel depends more on tissue coverage, border design, placement, and fixation than on hardness alone.
“Custom Means the Implant Will Automatically Look Good”
Custom means the implant is manufactured for one patient.
It does not guarantee that its aesthetic dimensions were correct.
The quality of the design remains decisive.
Part 9: The Future of Custom Implant Materials
Three-Dimensional Printing
Advanced manufacturing allows increasingly complex implants to be printed with:
- internal lattices
- controlled porosity
- variable stiffness
- lighter structures
- predefined fixation sites
- region-specific surface properties
PEEK and titanium are particularly active areas of additive-manufacturing research.
Surface Modification
Researchers are investigating surfaces that may:
- improve bone integration
- reduce bacterial adhesion
- encourage vascular ingrowth
- control inflammation
- improve soft tissue attachment
Examples include:
- hydroxyapatite coatings
- titanium-coated PEEK
- antibacterial surface treatments
- microtextured surfaces
- bioactive composites
Many remain under investigation, and promising laboratory findings do not always translate directly into superior long-term clinical outcomes.
Patient-Specific Stiffness
Future implants may not have the same physical properties throughout their entire structure.
One region could be:
- firm for fixation
- flexible for insertion
- porous for integration
- smooth near a nerve
- thin and compliant near a border
This may allow a single implant to combine the advantages of several materials or structural configurations.
Antibacterial Technology
Potential future strategies include:
- antimicrobial coatings
- drug-eluting surfaces
- bacterial-resistant microstructures
- localized antibiotic delivery
- surfaces designed to reduce biofilm formation
The challenge is achieving durable infection resistance without impairing tissue compatibility.
Hybrid Implants
Hybrid implants may combine:
- a flexible polymeric body
- rigid fixation zones
- porous tissue-contact surfaces
- smooth revision-friendly borders
- metallic reinforcement where needed
Such implants could potentially match material behavior to regional anatomical demands.
Artificial Intelligence and Topology Optimization
Artificial intelligence may eventually help engineers determine:
- where structural strength is necessary
- where material can be reduced
- how to minimize implant weight
- how to control flexibility
- where fixation should be positioned
- how an implant can be inserted through the smallest incision
AI may improve engineering efficiency, but it will not independently define the ideal aesthetic outcome. The intended facial shape must still be determined through clinical judgment and patient preference.
Frequently Asked Questions
1. What Is the Best Material for a Custom Facial Implant?
There is no universally best material.
For many cosmetic onlay implants, silicone offers an especially useful combination of flexibility, precision, fixation, and revisability. PEEK and titanium may be more appropriate when rigid skeletal reconstruction is required. Porous polyethylene may be chosen when tissue incorporation is desired.
2. Which Material Is Used Most Often for Cosmetic Custom Facial Implants?
Material use varies among surgeons and manufacturers.
Solid silicone is commonly used for cosmetic custom implants because it can be manufactured in large, anatomically complex shapes and inserted through comparatively small incisions.
3. Which Material Feels Most Natural?
Natural feel depends primarily on implant position, fixation, border design, thickness, and tissue coverage.
No material feels natural when it is mobile, oversized, or poorly contoured.
4. Can Solid Silicone Leak?
No. A solid silicone facial implant does not contain liquid gel.
5. Can Facial Implants Break?
Breakage is uncommon.
Flexible silicone tolerates bending well. Rigid materials can fracture under sufficient force, although normal daily activity should not damage a properly designed implant.
6. Can a Facial Implant Melt or Dissolve?
No. These materials are designed for long-term implantation and do not normally dissolve inside the body.
7. Does Silicone Cause Autoimmune Disease?
A direct causal relationship between solid facial silicone implants and systemic autoimmune disease has not been established. Patients with complex immune or medical histories should discuss their individual concerns with their surgeon and medical specialists.
8. Can PEEK Be Used for Jawline Implants?
Yes, but its rigidity may require larger incisions or multi-piece construction. Whether this is advantageous depends on the specific implant design and surgical plan.
9. Is PEEK Stronger Than Silicone?
PEEK is substantially more rigid and structurally strong.
However, greater strength does not automatically create a better cosmetic result.
10. Is PEEK More Natural Because Its Stiffness Is Similar to Bone?
Its mechanical properties may resemble cortical bone more closely than some other materials, but external naturalness depends on contour, placement, fixation, and soft tissue coverage.
11. Does Tissue Grow Into PEEK?
Standard PEEK is relatively bioinert. Surface-treated or porous forms are being developed to improve integration, but their clinical behavior varies.
12. Does Tissue Grow Into Porous Polyethylene?
Yes. Fibrous tissue and vascular structures can grow into its interconnected pores.
13. Does Tissue Ingrowth Prevent Implant Movement?
It can improve long-term attachment, but the implant must still be accurately positioned and stabilized during surgery.
14. Which Implant Is Easiest to Remove?
Smooth solid silicone is generally among the easiest materials to remove because it does not permit substantial tissue ingrowth and can flex during extraction.
15. Is Porous Polyethylene Difficult to Remove?
It can be, particularly after extensive tissue ingrowth has occurred.
Difficulty varies with implant size, location, duration, and surrounding anatomy.
16. Is Titanium Safe in an MRI?
Most modern titanium craniofacial hardware is considered MRI compatible or conditional, but the patient should always inform the imaging facility and follow the specifications of the particular implanted device.
17. Will Titanium Set Off Airport Security?
Small craniofacial plates and screws rarely trigger routine airport screening, although security equipment and implant size vary.
18. Do Silicone or PEEK Set Off Metal Detectors?
No. They are nonmetallic.
19. Which Material Causes the Least CT Artifact?
Nonmetallic polymers such as PEEK, silicone, and polyethylene generally produce less CT artifact than titanium.
20. Which Material Has the Lowest Risk of Infection?
No material can be reliably declared lowest-risk across all procedures because clinical studies involve different anatomical sites, indications, and surgical conditions.
21. Can an Infected Implant Be Saved?
Occasionally, early or limited infections may respond to drainage, antibiotics, and surgical cleaning.
Established implant infection frequently requires removal. The decision depends on the material, location, severity, tissue condition, and patient health.
22. Can Different Materials Be Used in the Same Patient?
Yes.
A patient may have a silicone jawline implant, titanium fixation screws, and a PEEK cranial implant. Materials are selected according to the needs of each region.
23. Are Titanium Screws Used with Silicone Implants?
Yes. Small titanium screws are commonly used to secure silicone implants to bone.
24. Do Facial Implants Need to Be Replaced Every Ten Years?
No.
Facial implants do not have a routine replacement schedule when they remain stable, uninfected, and aesthetically satisfactory.
25. Can the Material Be Changed During Revision Surgery?
Yes.
An implant may be replaced with another design made from the same material or exchanged for a different material when clinically appropriate.
26. Is a More Expensive Material Better?
Not necessarily.
The value of a material depends on whether its properties improve the particular operation.
27. Does a Rigid Implant Provide a Sharper Result?
Not automatically.
Sharpness is created by implant design, skeletal position, soft tissue thickness, and facial anatomy.
28. Can a Flexible Implant Move More Easily?
It can move if not properly secured.
Screw fixation allows a flexible implant to remain stable against the bone.
29. Can Any Material Correct Facial Asymmetry?
All major custom implant materials can be manufactured asymmetrically.
The accuracy of correction depends primarily on CT analysis and implant design.
30. What Is More Important: Material or Design?
Both matter, but design usually has the greater influence on the visible aesthetic result.
A technically advanced material cannot compensate for an implant that is too large, too small, poorly positioned, or incorrectly shaped.
Key Takeaways
- Silicone, PEEK, porous polyethylene, and titanium all have legitimate roles in craniofacial surgery.
- No material has been proven universally superior for every facial implant procedure.
- Solid silicone is flexible, permanent, easily fixated, and comparatively revision-friendly.
- PEEK is rigid, strong, radiolucent, and particularly useful in patient-specific cranial and skeletal reconstruction.
- Porous polyethylene permits tissue ingrowth, improving attachment but making later removal more difficult.
- Titanium provides exceptional strength and remains invaluable for fixation, orbital reconstruction, trauma, and load-bearing skeletal applications.
- Cosmetic augmentation and reconstructive defect repair may require different material characteristics.
- Infection risk cannot be predicted from material alone.
- Tissue ingrowth is neither entirely beneficial nor entirely undesirable; it represents a tradeoff between integration and revisability.
- Implant cost does not determine aesthetic quality.
- The ideal material is the one whose physical and surgical characteristics best support the required design.
- Material selection remains secondary to accurate diagnosis, thoughtful design, secure fixation, and precise placement.
Final Perspective
The search for a perfect facial implant material has continued for decades.
Every new material has offered meaningful advantages, but every one has also introduced limitations. Flexible materials are easier to insert and revise but require secure fixation. Rigid materials provide structural stability but may require greater surgical exposure. Porous materials encourage tissue attachment but complicate removal. Metals provide exceptional strength but may produce imaging artifact and unnecessary rigidity for purely cosmetic augmentation.
The correct material cannot be selected by comparing a single property.
Strength alone is not enough.
Tissue ingrowth alone is not enough.
Cost, manufacturing complexity, and technological novelty are not enough.
The material must be considered in the context of the entire operation:
- What anatomical problem is being treated?
- Is bone being augmented or replaced?
- How large is the implant?
- Through what incision must it pass?
- How will it be secured?
- How important is future revision?
- What soft tissues will cover it?
- What external facial shape must it create?
Only after those questions are answered can material selection become meaningful.
Custom facial implant surgery is therefore not a competition between silicone, PEEK, porous polyethylene, and titanium. It is the process of matching each material’s properties to a patient-specific anatomical and surgical requirement.
Dr. Eppley’s Bottom Line
There is no best facial implant material in isolation. There is only the best material for a particular implant, anatomical location, and surgical objective. In most aesthetic procedures, the quality of the design has a greater effect on the visible result than the name of the material. The implant must first have the right shape, dimensions, transitions, and position. Only then can the material perform its proper role.
CORNERSTONE ARTICLE #7
Recovery After Custom Facial Implant Surgery
A Complete Guide to Swelling, Pain, Numbness, Activity, and Final Results
Quick Answer
Recovery after custom facial implant surgery is usually defined more by swelling, tightness, stiffness, and temporary numbness than by severe pain. Most patients are mobile and functioning independently within the first few days, but they rarely look socially presentable that quickly.
The most visible swelling generally develops during the first several days and then gradually improves. Many patients can return to desk-based work within approximately one to two weeks, although more extensive procedures may require longer. Exercise, unrestricted chewing, contact activities, and judgment of the final result require considerably more patience.
The most important recovery principle is simple:
Feeling better occurs much sooner than looking fully healed.
A patient may feel relatively normal within several weeks while residual swelling, tissue firmness, altered sensation, and implant adaptation continue for several months.
Quick Facts
- Swelling usually increases during the first few postoperative days before it begins to improve.
- The amount of swelling depends more on the implant location, size, number of surgical regions, tissue dissection, and associated procedures than on the implant material alone.
- Pain is generally greatest during the first several days and then progressively declines.
- Tightness and pressure may persist longer than pain.
- Temporary numbness is common near sensory nerves, particularly around the chin, lower lip, cheeks, and under-eye regions.
- Most patients should not judge implant size, symmetry, or contour during the early swollen phase.
- Upper-face, midface, lower-face, and skull implants have different recovery patterns.
- Returning to work does not mean the healing process is complete.
- Final contour refinement often requires several months.
- New or worsening swelling after initial improvement should be reported promptly.
Part 1: Understanding the Recovery Process
Recovery Is Not a Single Event
Patients often think of recovery as the number of days before they return to work.
That is only one part of the process.
Recovery after custom facial implant surgery occurs on several overlapping timelines:
Physical recovery
When the patient feels comfortable, sleeps reasonably well, eats adequately, and no longer needs strong pain medication.
Social recovery
When swelling and bruising have improved enough for the patient to appear in public without feeling self-conscious.
Functional recovery
When normal chewing, facial movement, exercise, work, and daily activities have returned.
Sensory recovery
When numbness, tingling, tightness, or altered sensation has resolved or stabilized.
Aesthetic recovery
When swelling has subsided enough for the implant’s true dimensions, transitions, and symmetry to be evaluated.
These timelines do not occur simultaneously.
A patient may be physically comfortable but still visibly swollen. Another may look socially acceptable while still experiencing numbness or tightness. Aesthetic refinement usually continues after normal daily function has returned.
Dr. Eppley’s Bottom Line
Recovery is not measured only by when you go back to work. It is measured by when the tissues have softened, sensation has recovered, swelling has resolved, and the implant has become visually and physically integrated into the face.
Why Custom Implant Recovery Is Different
A custom facial implant is designed to cover a specific skeletal region. Some implants are small and localized. Others extend across large portions of the forehead, midface, jawline, or skull.
Recovery is therefore influenced by:
- implant surface area
- implant thickness
- number of surgical sites
- extent of periosteal elevation
- incision location
- amount of muscle dissection
- proximity to sensory nerves
- whether the operation is primary or revision surgery
- whether several implants are placed at once
- whether other procedures are performed simultaneously
A small chin implant and a full custom jawline implant are both facial implant procedures, but their recovery experiences are not equivalent.
Likewise, a limited cheek implant does not produce the same swelling pattern as a combined infraorbital-malar implant extending beneath both lower eyelids.
The Five Recovery Timelines
Create a horizontal diagram showing:
- Physical recovery
- Social recovery
- Functional recovery
- Sensory recovery
- Aesthetic recovery
Each should extend for a different length of time, with aesthetic recovery lasting the longest.
Part 2: The General Recovery Timeline
The First 24 Hours
Immediately after surgery, patients commonly experience:
- facial pressure
- tightness
- swelling
- stiffness
- mild to moderate discomfort
- numbness
- fatigue from anesthesia
- temporary difficulty smiling or opening the mouth fully
- drainage from incisions or drains when used
Swelling may be present when the patient first awakens, but it usually has not reached its maximum.
Patients undergoing outpatient surgery generally return to a hotel or nearby recovery location the same day once they are alert, medically stable, and able to tolerate fluids.
More extensive procedures or patients with specific medical needs may require overnight observation.
The First Night
The first night is often more uncomfortable than painful.
Patients may notice:
- increasing pressure
- difficulty finding a comfortable sleeping position
- dry mouth
- facial stiffness
- restricted chewing
- mild blood-tinged oral drainage after intraoral surgery
- nasal congestion after midface procedures
- scalp tightness after forehead or skull surgery
Medication should be taken according to the postoperative plan rather than waiting for discomfort to become severe.
Head elevation is typically important because lying flat may worsen swelling and pressure.
Days 2 Through 4
This is often the most visibly swollen period.
Postoperative facial swelling commonly increases during the first few days before gradually resolving. Studies of more extensive maxillofacial procedures similarly demonstrate that edema is most pronounced early and then progressively decreases, although the precise pattern varies by operation.
During this phase, patients may experience:
- facial fullness
- uneven swelling
- bruising
- firmness
- limited mouth opening
- difficulty chewing
- temporary changes in speech
- numbness or tingling
- a heavy or unfamiliar feeling
- emotional concern that the implant is too large
This is not the appropriate time to evaluate the aesthetic result.
The implant is covered by swollen tissues that may substantially exaggerate its apparent size and distort its contours.
Days 5 Through 7
By the end of the first week, many patients begin to feel noticeably better.
Common improvements include:
- less pressure
- reduced pain medication use
- easier walking
- improved appetite
- better sleep
- less drainage
- increasing mouth opening
- early reduction in bruising
Swelling remains obvious, especially after jawline, midface, or multi-region surgery.
The face may still appear asymmetrical because swelling rarely resolves equally on both sides.
Week 2
During the second week, patients often become more socially functional.
Many can:
- return to computer-based work
- participate in virtual meetings
- leave the recovery location
- resume light errands
- eat a broader range of soft foods
- use limited camouflage makeup when permitted
- sleep more comfortably
However, they may still experience:
- visible swelling
- residual bruising
- numbness
- tightness
- restricted smiling
- mild fatigue
- firmness around implant borders
- asymmetrical tissue settling
Patients whose occupations require frequent public interaction may prefer more recovery time.
Weeks 3 and 4
By this stage, most of the dramatic surgical appearance has usually improved.
The patient may feel increasingly normal, but several features remain common:
- residual swelling
- morning puffiness
- intermittent tightness
- tenderness with pressure
- incomplete sensory recovery
- muscle stiffness
- mild contour irregularity caused by swelling
- awareness of the implant during facial movement
Light exercise may be resumed when approved by the surgeon, but heavy straining, impact, and direct pressure may remain restricted.
Months 2 and 3
During the second and third months:
- swelling continues to decrease
- tissues begin to soften
- facial movement becomes more natural
- numbness may improve
- implant awareness diminishes
- contour transitions become more visible
- asymmetry caused by edema becomes easier to distinguish from true structural asymmetry
Many patients feel nearly recovered at this stage.
However, the result may still not be final, particularly after:
- large jawline implants
- extensive midface implants
- forehead or brow implants
- skull implants
- revision surgery
- multiple simultaneous implants
Months 3 Through 6
This is often the period of aesthetic refinement.
Residual swelling slowly resolves, scar tissues soften, and the overlying soft tissues adapt to the new skeletal framework.
During this period, patients may notice:
- improved contour definition
- more natural facial animation
- further sensory recovery
- less tightness
- greater symmetry
- less awareness of implant borders
- improved distinction between swelling and final projection
Most results can be meaningfully assessed during this period, but certain large or revision procedures may continue to mature beyond six months.
Six Months to One Year
Subtle changes may continue for up to one year.
These changes are usually not dramatic. They involve:
- final softening
- resolution of low-grade edema
- scar maturation
- continued nerve recovery
- adaptation of muscle movement
- psychological adjustment to the new facial proportions
The implant itself has not changed shape. The tissues covering it have gradually adapted.
Custom Facial Implant Recovery Timeline
Create a timeline with:
Day 0: Surgery
Days 2–4: Peak swelling
Week 1: Early healing
Week 2: Social recovery begins
Weeks 3–4: Light activity increases
Months 2–3: Major swelling resolves
Months 3–6: Contour refinement
6–12 months: Final maturation
“Timelines vary according to implant location, surgical extent, revision status, and individual healing.”
Part 3: Pain, Pressure, and Tightness
How Painful Is Custom Facial Implant Surgery?
Most patients describe the experience as more uncomfortable than severely painful.
Common sensations include:
- pressure
- tightness
- muscle soreness
- burning near incisions
- tenderness
- stiffness
- aching
Pain is usually greatest during the first several days and then declines.
The amount of discomfort depends on:
- implant location
- implant size
- muscle dissection
- number of treated regions
- revision scar tissue
- individual pain sensitivity
- associated procedures
A forehead or skull implant may produce considerable scalp tightness but limited chewing discomfort.
A jawline implant may produce greater mouth-opening restriction and muscle soreness.
A midface implant may feel like sinus pressure or fullness beneath the eyes.
Why Tightness Lasts Longer Than Pain
The implant expands the skeletal framework beneath tissues that must adapt to a new contour.
Even after surgical pain decreases, the patient may still feel:
- stretching
- pressure
- stiffness
- firmness
- restricted expression
- muscular resistance
This does not necessarily indicate that the implant is too large.
Soft tissue adaptation takes longer than wound closure.
Pain That Should Be Reported
Pain should generally improve rather than progressively worsen.
The surgeon should be contacted for:
- rapidly increasing pain
- severe pain localized to one side
- pain associated with new swelling
- pain accompanied by fever or drainage
- pain that improves and then suddenly returns
- severe dental pain after intraoral surgery
- pain with redness or wound separation
- intense eye pain or visual symptoms after periocular surgery
Pain is subjective, but its direction over time is important.
Improving discomfort is expected. Escalating discomfort deserves evaluation.
Part 4: Swelling and Bruising
Why Swelling Occurs
Swelling is the body’s normal response to surgical tissue manipulation.
Custom implant surgery requires elevation of tissue from the bone to create a precise subperiosteal pocket. This produces inflammation and temporary fluid accumulation.
Swelling is influenced by:
- surgical region
- implant footprint
- duration of surgery
- number of implants
- revision scar tissue
- associated osteotomies or soft tissue procedures
- individual inflammatory response
- postoperative blood pressure
- activity level
- head position
Why One Side May Swell More
Uneven swelling is common and does not automatically mean the implant is asymmetric.
One side may have:
- more surgical dissection
- greater preexisting asymmetry
- more scar tissue
- more bleeding
- different muscle tension
- a thicker implant
- different lymphatic drainage
- greater dependent swelling caused by sleeping position
Early asymmetry should be observed, not immediately interpreted.
Morning Swelling
Many patients notice that the face appears puffier in the morning.
This may result from:
- prolonged horizontal positioning
- reduced overnight movement
- dependent fluid accumulation
- dietary sodium
- inflammation
Swelling often decreases after the patient becomes upright and active.
Bruising
Bruising varies greatly.
Some patients develop almost none, while others experience discoloration that moves downward under gravity.
For example:
- forehead bruising may settle around the eyelids
- cheek bruising may descend toward the jaw
- jawline bruising may move into the neck
- scalp surgery may cause forehead or eyelid discoloration
The location of bruising several days after surgery may therefore be distant from the actual implant.
What Helps Swelling?
Postoperative instructions vary, but common measures may include:
- head elevation
- cold application during the early period when advised
- prescribed anti-inflammatory medication
- avoiding strenuous activity
- maintaining hydration
- limiting excessive sodium
- gentle walking
- wearing compression when specifically prescribed
- avoiding tobacco and nicotine
- keeping follow-up appointments
No home measure can eliminate swelling immediately.
The most important treatment is time.
Part 5: Numbness, Tingling, and Sensory Recovery
Why Numbness Occurs
Sensory nerves travel across and through the facial skeleton.
Creating the implant pocket may stretch, retract, decompress, or temporarily disturb these nerves.
Common areas of altered sensation include:
- lower lip
- chin
- cheek
- upper lip
- side of the nose
- lower eyelid
- forehead
- scalp
Temporary sensory changes have been reported in patient-specific facial implant series and in operations involving the anterior mandible. Recovery often occurs gradually over months, although persistent deficits are possible.
What Nerve Recovery Feels Like
Sensory recovery is not always smooth.
Patients may experience:
- numbness
- tingling
- pins and needles
- itching
- brief electrical sensations
- hypersensitivity
- burning
- altered temperature perception
- areas that feel “asleep”
Intermittent tingling may represent nerve recovery rather than deterioration.
How Long Does Numbness Last?
There is no single timeline.
Some sensory changes improve within weeks.
Others require several months.
More prolonged recovery may occur after:
- revision surgery
- larger implants
- extensive nerve exposure
- significant preoperative asymmetry
- prior orthognathic surgery
- scar tissue
- nerve compression
- direct nerve injury
A small percentage of patients may have permanent altered sensation.
That possibility should be understood before surgery, particularly for implants placed near the infraorbital or mental nerves.
Motor Function vs. Sensory Function
Numbness does not necessarily mean facial movement is damaged.
Sensory nerves control feeling.
Motor nerves control muscle movement.
Swelling, muscle elevation, and stiffness can temporarily make the smile appear weak or uneven even when the motor nerve is intact.
Persistent or progressive facial weakness requires evaluation.
Part 6: Diet and Mouth Opening
Recovery After Intraoral Surgery
Chin, jawline, jaw angle, paranasal, cheek, and some midface implants may be placed partly or entirely through incisions inside the mouth.
This affects recovery because:
- chewing stretches the tissues
- food can contact incision areas
- oral swelling limits movement
- jaw muscles may be sore
- mouth opening may be reduced
Early Diet
The initial diet commonly emphasizes foods that require minimal chewing.
Examples include:
- protein drinks
- yogurt
- eggs
- soft pasta
- soups that are not excessively hot
- mashed vegetables
- soft fish
- oatmeal
- smoothies without irritating seeds
- other surgeon-approved soft foods
The purpose is not only comfort.
It also reduces mechanical stress on intraoral incisions and the implant pocket.
Progressing the Diet
Diet is generally advanced according to:
- incision healing
- mouth opening
- pain
- implant location
- surgeon instructions
- whether other jaw procedures were performed
Patients should not assume that feeling hungry means the tissues are ready for hard or chewy foods.
Foods that may be restricted initially include:
- steak
- hard bread
- nuts
- raw vegetables
- gum
- chewy candy
- foods requiring wide mouth opening
- sharp or crusty foods that can traumatize oral incisions
Limited Mouth Opening
Temporary restriction is common after jaw angle and full jawline surgery.
Causes include:
- masseter muscle swelling
- muscle elevation
- pain
- intraoral incision tightness
- protective guarding
- inflammation
Mouth opening should generally improve gradually.
Forced stretching too early may increase pain or tissue irritation. Later stretching exercises may be recommended when the surgeon believes the tissues are ready.
Oral Hygiene
Oral cleanliness is especially important after intraoral implant placement.
The postoperative plan may include:
- prescribed mouth rinses
- gentle toothbrushing
- avoidance of direct trauma to incisions
- irrigation when instructed
- dietary restrictions
- antibiotics when prescribed
Patients should follow the specific protocol rather than improvising with harsh or alcohol-containing rinses.
Part 7: Sleeping After Surgery
Why Position Matters
Sleeping flat or placing pressure directly on a recently operated area may increase:
- swelling
- throbbing
- discomfort
- dependent edema
- mechanical pressure on healing tissues
Patients are often advised to sleep with the head elevated during the early recovery period.
Sleeping on the Back
Back sleeping is generally preferred after:
- cheek implants
- infraorbital implants
- jaw angle implants
- jawline implants
- temporal implants
- skull implants
Side sleeping may place uneven pressure on one implant region or worsen asymmetric swelling.
Forehead and Skull Implants
These procedures present a practical challenge because the treated area may contact the pillow.
Patients may need to:
- adjust pillow height
- use a travel or contour pillow
- avoid direct pressure on incisions
- alternate permitted head positions
- follow procedure-specific instructions
The correct position depends on implant location. A patient with an occipital implant may require a different strategy from one with a forehead implant.
Part 8: Returning to Work and Social Activities
Desk-Based Work
Many patients can return to nonphysical work within approximately one to two weeks.
The limiting factor is often appearance rather than comfort.
A patient working from home may return sooner than someone who:
- sees clients
- speaks publicly
- appears on camera
- performs strenuous tasks
- wears equipment against the face or scalp
Public-Facing Work
Patients who want to appear largely unoperated may need:
- two to three weeks
- occasionally longer after extensive surgery
- additional time after multi-region or revision procedures
Residual swelling may remain visible even when bruising has resolved.
Physical Work
Jobs involving:
- lifting
- bending
- construction
- healthcare transfers
- athletics
- risk of facial contact
- prolonged heat exposure
may require a longer absence or modified duties.
Return should be based on the actual job demands rather than the job title.
Travel
Travel planning should consider:
- access to the operating surgeon
- risk of early bleeding or swelling
- medication needs
- hydration
- mobility
- ability to elevate the head
- emergency care at the destination
- airline restrictions after certain associated procedures
Many custom implant patients travel for surgery. They should remain near the surgical facility for the period recommended by the surgeon rather than scheduling immediate departure.
Part 9: Exercise and Physical Activity
Walking
Gentle walking is usually encouraged early because it supports circulation and reduces prolonged inactivity.
Walking does not mean vigorous exercise.
The goal is movement without raising blood pressure excessively.
Light Cardiovascular Activity
Light activity may resume when:
- swelling is decreasing
- pain is controlled
- the patient is no longer taking impairing medication
- no wound problems are present
- the surgeon approves
This may occur around the second or third week for some patients, but extensive procedures may require longer.
Weight Training
Heavy lifting increases:
- blood pressure
- facial pressure
- throbbing
- swelling
- risk of bleeding
Weight training is therefore commonly delayed longer than walking or light cardiovascular exercise.
Return should be gradual rather than immediate.
Contact Sports
Contact sports create the risk of direct impact before tissues have fully healed around the implant.
Activities such as:
- boxing
- martial arts
- wrestling
- football
- rugby
- basketball
- high-risk cycling
- skiing
require specific clearance.
The implant may be securely fixed, but the surrounding tissues and incisions still require protection.
Swimming
Swimming should generally wait until incisions are completely healed and the surgeon has approved immersion.
Concerns include:
- bacterial exposure
- wound irritation
- strenuous arm activity
- pressure from goggles or swim caps
- facial impact
Part 10: Recovery by Implant Region
Chin Implants
Common recovery features include:
- lower lip and chin numbness
- tightness
- temporary smile stiffness
- swelling beneath the chin
- limited chewing when an intraoral incision is used
- bruising extending into the upper neck
A small isolated chin implant usually has a shorter recovery than a full jawline implant.
Full Jawline Implants
Recovery may include:
- substantial lower facial swelling
- masseter muscle soreness
- limited mouth opening
- lower lip or chin numbness
- neck swelling
- temporary facial width exaggeration
- difficulty judging jaw angle dimensions
- longer social recovery
The jawline may initially appear wider, heavier, or more square than intended because swelling accumulates around the mandibular border.
Jaw Angle Implants
Common features include:
- posterior lower facial swelling
- masseter tightness
- reduced mouth opening
- difficulty chewing
- temporary asymmetry
- fullness near the ears
- swelling descending into the neck
A retrospective series of silicone jaw-angle augmentation documented infection and displacement as important complications, underscoring the need to monitor healing and implant position rather than assuming every persistent change is routine swelling.
Cheek Implants
Recovery commonly includes:
- midface fullness
- bruising
- temporary smile stiffness
- cheek numbness
- upper lip tightness
- swelling that changes the appearance of the eyes or nose
The cheeks may initially appear too high or too prominent.
This usually becomes less dramatic as edema decreases.
Infraorbital Implants
Recovery may involve:
- lower eyelid swelling
- under-eye bruising
- temporary blurred appearance from tearing or ointment
- cheek or upper lip numbness
- tightness beneath the eyes
- temporary asymmetry
Because this region is close to the eye, visual symptoms require special attention.
Loss of vision, severe eye pain, rapidly increasing orbital pressure, or marked restriction of eye movement requires urgent evaluation.
Midface Mask Implants
These are broader implants and may produce:
- extensive central facial swelling
- nasal congestion
- under-eye puffiness
- upper lip stiffness
- temporary speech changes
- facial numbness
- restricted smiling
- a prolonged period before the true result becomes visible
Because several adjoining regions are augmented at once, early swelling can significantly exaggerate midface projection.
Paranasal Implants
Common recovery features include:
- swelling beside the nose
- upper lip stiffness
- nasal base fullness
- intraoral incision soreness
- temporary difficulty smiling
- nasal congestion
The upper lip may feel unusually tight until swelling and muscle stiffness improve.
Forehead and Brow Implants
Patients may experience:
- scalp numbness
- forehead tightness
- eyelid swelling
- bruising around the eyes
- temporary eyebrow movement restriction
- scalp incision tenderness
- headache-like pressure
Swelling can descend from the forehead into the eyelids because of gravity, even though the eyelids were not directly operated on.
Temporal Implants
Recovery may include:
- temple fullness
- chewing soreness
- tightness
- temporary temporal numbness
- swelling around the side of the forehead
- awareness during jaw movement
Implants placed beneath or near the temporal muscle may affect chewing comfort temporarily.
Skull Implants
Recovery varies according to implant location.
Patients may experience:
- scalp tightness
- incision tenderness
- numbness
- pressure when lying down
- fluid accumulation
- temporary contour irregularity from scalp swelling
- difficulty sleeping on the treated region
Large skull implants create a broad tissue pocket, so surgeons may use drains or compression depending on the procedure.
Part 11: Primary Surgery vs. Revision Recovery
Why Revision Surgery May Take Longer
Revision surgery often involves:
- scar tissue
- an existing capsule
- removal of previous implants
- altered anatomy
- nerve adherence
- bone remodeling
- irregular soft tissue thickness
- longer operating time
- more extensive dissection
As a result, revision patients may experience:
- greater swelling
- more prolonged numbness
- slower soft tissue adaptation
- longer firmness
- more asymmetrical early healing
- a longer period before final judgment
Immediate Implant Exchange
When one implant is removed and another is placed during the same operation, recovery depends on:
- whether infection is present
- whether the old pocket can be reused
- whether the new implant is larger
- whether the implant location changes
- the condition of the soft tissues
- how much capsule must be removed
- whether new fixation is required
An uncomplicated elective exchange differs substantially from revision performed for infection or exposure.
Part 12: Emotional Recovery
The Early Postoperative Reaction
The first sight of the swollen face can be emotionally difficult.
Patients may think:
- “The implant is much too large.”
- “My face is uneven.”
- “I no longer look like myself.”
- “Something must be wrong.”
- “I made a mistake.”
These reactions are particularly common after extensive or full-face augmentation.
The brain is highly sensitive to changes in facial identity. Even a successful structural change can initially feel unfamiliar.
The Swelling–Anxiety Cycle
Anxiety may lead patients to repeatedly:
- inspect the face
- compare sides
- take photographs
- press on the implant
- search for complications online
- evaluate the result under different lighting
- interpret daily fluctuations as structural changes
This can intensify distress without improving diagnostic accuracy.
Scheduled photographs and follow-up examinations are more useful than hourly self-assessment.
When Concern Is Appropriate
Reassurance should never be used to dismiss genuine symptoms.
Patients should contact the surgical team for concerns such as:
- sudden swelling
- rapidly worsening asymmetry
- fever
- drainage
- wound separation
- visual disturbance
- severe escalating pain
- implant exposure
- persistent vomiting or dehydration
- breathing difficulty
- new facial weakness
- suspected allergic or medication reaction
The appropriate balance is patience with expected healing and prompt evaluation of unexpected changes.
Part 13: Warning Signs and Potential Complications
Custom facial implants generally have favorable outcomes, but complications can occur. Reported problems across clinical series include infection, displacement, sensory disturbance, recurrent edema, wound problems, and dissatisfaction with contour.
Infection
Possible warning signs include:
- increasing redness
- warmth
- worsening tenderness
- fever
- cloudy or foul drainage
- new swelling after improvement
- wound separation
- persistent oral drainage
- implant exposure
Infections do not always appear immediately. Delayed infections have been reported, so a new inflammatory change weeks or months after surgery should not be ignored.
Hematoma
A hematoma is a collection of blood.
Warning signs may include:
- sudden expansion
- severe pressure
- increasing asymmetry
- firm swelling
- marked bruising
- worsening pain
- difficulty breathing or swallowing, depending on location
A rapidly expanding neck or facial swelling is an emergency.
Seroma
A seroma is a fluid collection.
It may feel:
- soft
- fluctuant
- mobile
- asymmetrical
Large skull implants and broad implant pockets may be particularly susceptible to fluid accumulation.
Implant Displacement
Possible signs include:
- increasing asymmetry after swelling has decreased
- a palpable change in implant position
- movement
- a new step-off
- altered contour
- implant exposure
Early screw fixation is intended to reduce this risk. Contemporary reviews of custom facial implant practice emphasize internal fixation as a means of limiting migration and displacement.
Wound Separation
Incisions may open because of:
- tension
- infection
- trauma
- tobacco exposure
- poor tissue quality
- excessive activity
- pressure from the implant
Wound separation should be evaluated, particularly if the implant becomes visible.
Persistent Numbness
Some sensory changes take months to recover.
Persistent numbness does not automatically mean that revision is necessary, but it should be documented and monitored.
Sudden new numbness after a period of normal sensation is less typical and should be reported.
Eye Symptoms
After infraorbital, orbital, or upper midface surgery, urgent assessment is needed for:
- loss or reduction of vision
- severe eye pain
- rapidly increasing pressure
- abnormal eye position
- double vision that is new or worsening
- inability to move the eye normally
- severe proptosis
These symptoms should not wait for a routine postoperative visit.
Part 14: Preparing for Recovery
Arrange a Recovery Location
The patient should have:
- easy access to a bathroom
- a comfortable elevated sleeping arrangement
- medications organized in advance
- water and soft food available
- reliable transportation
- assistance during the early period
- access to the surgical team
Prepare Food Before Surgery
Soft, nutritious foods should be available before the operation.
Protein and hydration are important.
The recovery diet should not consist entirely of sugary drinks or low-protein snacks.
Organize Medications
Patients should understand:
- which medications are scheduled
- which are taken only as needed
- which medicines should not be combined
- when antibiotics begin and end
- whether blood-thinning medications remain restricted
- what to do if nausea occurs
Written tracking can prevent missed or duplicated doses.
Stop Nicotine
Nicotine can impair blood flow and wound healing.
Patients should follow their surgeon’s cessation requirements for:
- cigarettes
- vaping
- nicotine gum
- nicotine patches
- oral nicotine products
Substituting one nicotine source for another does not eliminate nicotine’s vascular effects.
Plan Work Conservatively
It is easier to return earlier than expected than to explain why additional time is suddenly required.
Patients should account for:
- visible swelling
- fatigue
- medication effects
- follow-up visits
- travel
- public-facing responsibilities
- the extent of surgery
Prepare Emotionally
Patients should expect:
- an initially unfamiliar appearance
- fluctuating swelling
- imperfect early symmetry
- numbness
- slower aesthetic recovery than physical recovery
Knowing this in advance reduces the likelihood of interpreting normal healing as failure.
Part 15: Frequently Asked Questions
1. How Long Is Recovery After Custom Facial Implant Surgery?
Most patients require approximately one to three weeks for early social recovery, but complete healing and contour refinement usually take several months.
The timeline varies significantly by implant location and surgical extent.
2. When Does Swelling Peak?
Swelling commonly increases during the first several days and is often most pronounced around postoperative days two through four.
3. How Long Will My Face Look Swollen?
Major swelling usually improves substantially during the first few weeks.
Residual swelling can persist for several months, particularly after large jawline, midface, forehead, or skull implants.
4. Is Jawline Implant Recovery More Difficult Than Chin Implant Recovery?
Usually, yes.
A full jawline implant covers a much larger area and involves more extensive dissection around the mandibular body and jaw angles.
5. When Can I Return to Work?
Many patients with desk-based jobs return within one to two weeks.
Patients with public-facing or physical work may need two to four weeks or longer.
6. Will I Need Someone to Stay With Me?
Adult assistance is advisable during at least the first postoperative period, particularly after general anesthesia or extensive multi-region surgery.
7. How Much Pain Should I Expect?
Pain is usually manageable and often described as pressure, soreness, or tightness.
Severe or worsening pain should be reported.
8. Why Does the Implant Look Too Large?
Early swelling sits on top of the augmentation and exaggerates its dimensions.
The implant should not be judged during this period.
9. Why Does One Side Look Larger?
Unequal swelling is common.
True structural symmetry cannot be assessed accurately until edema has substantially resolved.
10. How Long Will My Face Feel Tight?
Tightness may last for several weeks and sometimes longer after large implants.
It gradually improves as swelling resolves and tissues adapt.
11. Is Numbness Normal?
Temporary numbness is common near facial sensory nerves.
The location and duration depend on the implant region and extent of surgery.
12. Can Numbness Be Permanent?
Yes, although most sensory changes improve.
Permanent altered sensation is a recognized risk and should be discussed before surgery.
13. When Can I Chew Normally?
Chewing is advanced gradually according to comfort, incision healing, and surgeon instructions.
Full jawline and jaw-angle procedures often require a longer soft-food period than forehead or skull surgery.
14. When Can I Brush My Teeth?
Gentle brushing usually resumes early, but oral incisions must be protected.
The surgeon’s specific oral-hygiene protocol should be followed.
15. When Can I Sleep on My Side?
This depends on implant location.
Patients are often asked to avoid direct pressure during early healing.
16. When Can I Exercise?
Walking commonly begins early.
More vigorous cardiovascular exercise and weight training are reintroduced gradually after surgical approval.
17. When Can I Lift Heavy Weights?
Heavy lifting is often restricted for several weeks because it increases blood pressure and facial pressure.
The exact timing depends on the operation and healing progress.
18. When Can I Resume Contact Sports?
Only after the surgeon confirms that the implant and tissues have healed adequately.
Contact activities usually require a longer restriction than noncontact exercise.
19. Can I Shower After Surgery?
This depends on incision location, dressings, and whether drains are present.
Patients should follow procedure-specific instructions.
20. Can I Wear Makeup?
Makeup should not be applied directly over unhealed incisions.
It may be used elsewhere when permitted by the surgeon.
21. Can I Wear Glasses?
Glasses may place pressure on forehead, brow, cheek, or infraorbital implants.
Patients should ask when pressure from eyewear is safe.
22. When Can I Travel Home?
Travel timing depends on the extent of surgery, distance, medical stability, and access to follow-up care.
Patients traveling long distances should remain locally for the recommended period.
23. Do I Need Drains?
Some procedures use drains, particularly when a broad pocket has been created.
Others do not.
The decision depends on surgical location and surgeon preference.
24. How Long Do Drains Stay In?
When used, drains are typically temporary and removed according to output and the surgeon’s protocol.
25. Is It Normal to Feel the Implant?
Early implant awareness is common because of swelling, tightness, and unfamiliarity.
This usually diminishes as the tissues soften.
26. When Will the Implant Feel Like Part of Me?
Many patients stop consciously noticing it over several months.
Psychological adaptation and physical tissue integration occur gradually.
27. When Can I Judge the Final Result?
Preliminary assessment may be possible after several months.
More reliable judgment is usually made between three and six months, with continued refinement possible up to one year.
28. When Should Revision Be Considered?
Revision should generally not be planned while meaningful swelling and tissue adaptation remain, unless an urgent problem such as infection, exposure, or clear displacement is present.
29. Can Massage Speed Recovery?
Massage is not appropriate for every implant or every stage of healing.
It should be performed only when specifically recommended.
Unapproved pressure may irritate tissues or affect healing.
30. What Is the Most Important Recovery Rule?
Do not confuse early appearance with the final result.
The face needs time to adapt to its new skeletal framework.
Key Takeaways
- Recovery after custom facial implant surgery occurs on physical, social, functional, sensory, and aesthetic timelines.
- Swelling commonly increases during the first several days before it begins to improve.
- Tightness and pressure often last longer than significant pain.
- Temporary numbness is common around facial sensory nerves and may require months to resolve.
- Early asymmetry is usually related to uneven swelling and should not be judged prematurely.
- Jawline and extensive midface implants generally require more recovery than small localized implants.
- A soft diet and careful oral hygiene are important after procedures using intraoral incisions.
- Walking usually begins early, but heavy exercise and contact sports require a gradual return.
- Revision surgery may produce a longer recovery because of scar tissue and altered anatomy.
- New swelling, escalating pain, drainage, fever, wound separation, visual symptoms, or breathing difficulty require prompt communication with the surgical team.
- Most patients feel better before they look fully healed.
- Final results should be evaluated only after swelling, scar firmness, and soft tissue adaptation have substantially resolved.
Final Perspective
Custom facial implant surgery creates a permanent change in the underlying skeletal framework, but the tissues covering that framework need time to adapt.
The operation may be completed in several hours.
Recovery cannot be compressed into the same time frame.
During the first week, swelling and tightness dominate the experience. During the following weeks, the patient becomes increasingly functional and socially comfortable. Over the next several months, the tissues soften, sensation improves, muscles adjust, and the true implant contours gradually emerge.
This explains why recovery often feels inconsistent.
A patient may look better one day and more swollen the next. One side may soften before the other. Sensation may improve through tingling or brief electrical feelings. The jawline may appear too wide before edema resolves. The cheeks may seem too prominent before the midface settles.
These fluctuations are part of healing, not evidence that the implant itself is changing.
The best recovery experience comes from combining realistic expectations with careful postoperative management. Patients should understand which symptoms are expected, which activities must be limited, and which warning signs require evaluation. They should also resist the urge to make an aesthetic judgment while the face remains distorted by swelling.
Patience is not passive.
It is an essential part of the surgical process.
Dr. Eppley’s Bottom Line
Custom facial implant recovery is a process of tissue adaptation to a new skeletal architecture. Most patients become comfortable and functional within weeks, but the face continues to refine for months. The early swollen appearance is not the result, temporary tightness is not the permanent feel, and initial asymmetry is not necessarily structural. Successful recovery requires careful postoperative care, appropriate activity restrictions, prompt attention to warning signs, and enough time for the face to reveal the design that was placed beneath it.
CORNERSTONE ARTICLE #8
Revision Custom Facial Implant Surgery
Why Facial Implants Are Revised, How Revision Surgery Is Performed, and What Patients Can Expect
Quick Answer
Revision surgery is a normal part of custom facial implant practice and should not automatically be viewed as a surgical failure.
Unlike many cosmetic procedures, facial implants are permanent structural devices. While most patients remain satisfied with their results, some eventually seek revision because of changing aesthetic preferences, incomplete correction, anatomical changes, implant-related complications, or surgery performed elsewhere.
The most common reasons for revision include:
- undercorrection
- overcorrection
- asymmetry
- implant malposition
- dissatisfaction with shape
- conversion from stock implants to custom implants
- infection
- soft-tissue changes over time
One of the greatest advantages of modern custom implant technology is that revision surgery can often be planned even more precisely than the original operation. Three-dimensional CT imaging allows the existing implant, surrounding bone, and facial skeleton to be analyzed in detail before a new implant is designed.
Revision surgery is therefore not simply repeating the first operation. It is an opportunity to improve the original diagnosis, redesign the implant, and create a result that better reflects both the patient’s anatomy and current aesthetic goals.
Quick Facts
- Revision surgery is one of the most common secondary procedures performed with facial implants.
- Most revisions are performed for aesthetic refinement rather than medical complications.
- A revision does not necessarily mean the original surgery was technically incorrect.
- Many patients simply want a different degree of augmentation years later.
- Three-dimensional CT imaging has transformed revision planning.
- Existing implants can frequently be removed and replaced during the same operation.
- Silicone implants are generally the easiest implants to revise.
- Revision surgery is usually more technically demanding because of scar tissue and altered anatomy.
- Bone remodeling beneath long-standing implants may influence redesign.
- Custom implants frequently provide better solutions than modifying existing stock implants.
- The ultimate goal of revision surgery is not replacing an implant—it is improving facial architecture.
Part 1: Understanding Revision Surgery
Revision surgery occupies a unique place in facial implant surgery.
Patients often assume that a revision means the original surgery failed. In reality, revision surgery can occur even when the implant is technically well positioned and the operation was performed correctly.
Unlike repairing a fractured bone or removing a tumor, facial implant surgery has an aesthetic objective. That objective depends upon anatomy, facial proportions, soft-tissue response, patient expectations, and individual perception. As those factors evolve, so can the desire to refine the result.
Some patients simply want more projection.
Others eventually decide they prefer a subtler appearance.
Some have asymmetries that could not be fully appreciated before surgery.
Others develop age-related soft-tissue changes that alter the way an implant appears many years later.
Revision surgery should therefore be viewed as part of the long-term management of facial skeletal enhancement rather than evidence that something necessarily went wrong.
One of the greatest misconceptions about revision surgery is that it represents failure.
In reality, revision often represents progress.
The first operation teaches both the surgeon and the patient valuable information:
- how the soft tissues responded
- how much projection was aesthetically pleasing
- whether asymmetry became more or less noticeable
- how the implant healed
- whether adjacent skeletal deficiencies became apparent
The revision operation benefits from that experience.
Instead of operating with only photographs, examination, and CT imaging, the surgeon now has knowledge of how that individual patient actually responded to skeletal augmentation.
That information often leads to a more refined implant design.
Revision Is More Common Than Most Patients Realize
Because custom facial implants are permanent, many patients assume revision must be extremely uncommon.
The opposite is often true.
Revision surgery is relatively common—not because implants frequently fail, but because aesthetic surgery is inherently subjective.
Patients change.
Faces age.
Goals evolve.
A patient who wanted a conservative chin enhancement at age 28 may desire greater definition at age 40.
Another patient may initially request aggressive jawline augmentation only to decide several years later that a softer appearance better suits their facial balance.
Neither decision represents surgical failure.
Both represent evolving aesthetic preferences.
Why Revision Surgery Is Different
Revision surgery differs fundamentally from primary surgery.
During primary surgery, the surgeon predicts how augmentation will affect the face.
During revision surgery, the surgeon already knows the answer.
The existing implant provides valuable information regarding:
- projection
- width
- border transitions
- implant position
- symmetry
- soft-tissue response
- facial balance
Revision therefore becomes less of a prediction and more of a refinement.
Clinical Pearl
Revision surgery should be viewed as the second stage of understanding the patient’s facial architecture—not simply the second operation.
Dr. Eppley’s Bottom Line
The purpose of revision surgery is not merely to replace an implant. It is to improve the diagnosis, refine the design, and create a result that better matches the patient’s anatomy and aesthetic goals than the original operation.
Primary Surgery vs. Revision Surgery
Diagram comparing:
Primary Surgery
↓
Prediction
↓
Implant Design
↓
Healing
↓
Revision Surgery
↓
Improved Diagnosis
↓
Refined Implant Design
↓
Improved Facial Balance
Part 2: Why Do Patients Need Revision Surgery
Although every patient is unique, revision surgery generally falls into four broad categories:
- Aesthetic revision
- Anatomical revision
- Mechanical revision
- Medical revision
Understanding which category applies is the first step in planning an appropriate solution.
Aesthetic Reasons
By far the most common reason for revision surgery is aesthetic refinement.
In these patients, the implant is healthy, stable, and correctly positioned.
The patient simply wants a different appearance.
Common concerns include:
- the implant is too small
- the implant is too large
- the implant is too wide
- the implant is too narrow
- excessive angularity
- insufficient definition
- inadequate facial width
- excessive projection
- inadequate projection
- poor transitions between adjacent facial regions
These patients usually require redesign rather than repair.
Anatomical Reasons
Sometimes the original implant correctly addressed one skeletal deficiency while another deficiency remained untreated.
Examples include:
- incomplete asymmetry correction
- previously unrecognized skeletal deficiency
- changes following orthognathic surgery
- post-traumatic skeletal remodeling
- progressive facial aging
- congenital asymmetry becoming more apparent
Modern CT analysis often identifies anatomical relationships that were difficult to appreciate during the original operation.
Mechanical Reasons
Mechanical problems involve the physical behavior of the implant.
Examples include:
- implant displacement
- implant rotation
- inadequate fixation
- screw loosening
- edge visibility
- contour step-offs
- palpable implant borders
- implant instability
Fortunately, most mechanical problems can be corrected successfully.
Medical Reasons
Medical indications for revision are less common but require prompt evaluation.
Examples include:
- infection
- chronic seroma
- implant exposure
- wound breakdown
- persistent pain
- chronic inflammation
- late implant contamination
Although these problems may require implant removal, many patients ultimately undergo successful replacement once healthy tissues have recovered.
More Than One Reason Often Exists
Revision surgery rarely fits neatly into one category.
For example:
A patient with jawline implants may complain that one side feels larger than the other.
CT imaging may reveal:
- mild asymmetry
- slight implant rotation
- undercorrection of the opposite side
- previously unrecognized mandibular asymmetry
The revision therefore addresses both mechanical and anatomical factors simultaneously.
Similarly, a patient requesting a larger chin implant may also benefit from increased mandibular body width, producing a more harmonious lower facial contour rather than simply increasing chin projection.
Successful revision surgery therefore focuses on identifying the true anatomical cause of dissatisfaction rather than treating only the most obvious complaint
Part 3: Revision After Standard (Stock) Facial Implants
Perhaps the single most common revision procedure in contemporary facial implant surgery is the conversion of standard stock implants to patient-specific custom implants.
Standard implants have been used successfully for decades and remain appropriate for many patients. However, they are manufactured in a limited range of sizes and shapes that are intended to fit a broad population rather than an individual skeleton.
As a result, they often address only part of a patient’s anatomical deficiency.
Common limitations include:
- incomplete correction of facial asymmetry
- abrupt implant borders
- poor transitions into adjacent skeletal regions
- inadequate control of facial width
- inability to match unusual skeletal anatomy
- difficulty creating continuous contours across multiple facial regions
These limitations become particularly apparent in patients seeking revision.
Rather than modifying another stock implant, modern revision surgery frequently begins with a new three-dimensional CT scan and a completely individualized implant design.
Instead of asking:
“Which stock implant should replace the existing one?”
The question becomes:
“What implant should have been designed for this patient’s anatomy in the first place?”
That shift in philosophy is one of the greatest advances in contemporary facial implant surgery.
Part 4 — Revision After Previous Custom Facial Implants
Revision of a custom facial implant differs fundamentally from conversion of a stock implant. The original implant was already designed specifically for the patient’s anatomy, which means the revision is usually focused on refinement rather than replacement of a generalized design.
Fortunately, the original custom implant also provides an invaluable source of information.
The surgeon knows:
- exactly how much augmentation was performed
- where the implant ended
- how the implant healed
- how the soft tissues responded
- which design features were successful
- which features should be modified
Instead of designing an implant from a “blank slate,” revision begins with a proven foundation.
Why Would a Custom Implant Need Revision?
Patients often assume that a custom implant should never require revision because it was individually designed.
In reality, even the best custom implant reflects the information and aesthetic goals available at the time of surgery.
Those factors may change.
The most common reasons include:
- the patient desires greater augmentation
- the patient prefers a more conservative appearance
- facial asymmetry becomes more apparent after surgery
- aging changes alter facial balance
- another facial procedure changes overall proportions
- the patient’s aesthetic preferences evolve
Unlike stock implants, revision of a custom implant is rarely because the implant “did not fit.”
It is usually because the desired facial architecture has changed.
Larger Custom Implant
One of the most common revisions involves increasing augmentation.
Initially, many patients request conservative enhancement because they are uncertain how dramatic facial skeletal augmentation will appear.
After living with the implant for several months or years, they often realize that a modest increase would better achieve their goals.
Common examples include:
- greater chin projection
- wider jawline
- increased jaw angle flare
- additional forehead projection
- more cheek definition
- greater infraorbital support
This is especially common in male facial masculinization procedures.
Patients frequently become more comfortable with skeletal enhancement once they appreciate how naturally the first implant healed.
Smaller Custom Implant
The opposite situation also occurs.
A patient may initially request aggressive augmentation and later decide that a more subtle appearance better reflects their long-term aesthetic goals.
Reasons include:
- facial changes with age
- changing personal preferences
- career considerations
- excessive angularity
- overcorrection becoming more apparent as swelling resolves
- increased edge visibility in patients with thin soft tissues
Fortunately, reducing implant dimensions is usually straightforward because the existing implant serves as a template for redesign.
Refining Shape Rather Than Size
Many revisions involve neither increasing nor decreasing implant volume.
Instead, they modify shape.
Examples include:
- softening jaw angles
- broadening a narrow chin without increasing projection
- improving cheek transitions
- extending a forehead implant farther laterally
- improving continuity along the mandibular body
- correcting subtle asymmetry
These revisions often involve only a few millimeters of change.
Ironically, these small modifications frequently produce the greatest improvement in facial harmony.
Secondary Revision
Occasionally, patients undergo more than one revision.
Although uncommon, multiple revisions may occur because:
- facial proportions continue to evolve
- additional procedures change facial balance
- previous surgeries performed elsewhere require staged correction
- infection required temporary implant removal
- the patient’s goals changed gradually over time
The important point is that every revision begins with a completely new evaluation rather than simply reproducing previous designs.
Clinical Pearl
Custom implants are not permanent design decisions—they are permanent devices that can be redesigned whenever the patient’s anatomy or aesthetic goals change.
Evolution of a Custom Implant
Original CT
↓
Original Custom Implant
↓
Healing and Long-Term Evaluation
↓
Updated CT Analysis
↓
Second-Generation Custom Implant
Part 5: CT-Based Revision Planning
Perhaps no area of facial implant surgery has benefited more from modern three-dimensional imaging than revision surgery.
Before CT-based planning, revision frequently depended upon surgical exploration and the surgeon’s memory of the previous operation.
Today, the existing implant can be analyzed in extraordinary detail before the patient ever enters the operating room.
This transforms revision from an exploratory procedure into a carefully engineered operation.
Why CT Is Essential
A three-dimensional CT scan provides information unavailable through photographs or physical examination alone.
It allows evaluation of:
- implant position
- implant thickness
- screw location
- implant symmetry
- underlying skeletal asymmetry
- bone remodeling
- implant edge transitions
- relationship to adjacent facial structures
- nerve canals
- previous osteotomies
- fixation hardware
Each of these factors influences revision planning.
Understanding Bone Remodeling
One of the most misunderstood aspects of long-standing facial implants is bone remodeling.
Many patients worry that the implant has “eroded the bone.”
In reality, mild remodeling beneath facial implants is relatively common and usually represents normal biological adaptation rather than destructive bone loss.
Pressure from the implant may produce:
- shallow contour remodeling
- localized cortical thinning
- minor surface adaptation
These findings are generally anticipated during revision planning.
True destructive bone loss is uncommon.
Understanding the difference prevents unnecessary concern.
Evaluating the Existing Implant
CT imaging answers several critical questions:
Is the implant centered?
Has it rotated?
Are both sides symmetrical?
Is the implant completely seated?
Has one portion migrated?
Are fixation screws stable?
Is additional augmentation needed only in selected regions?
These answers determine whether the existing implant should be:
- left in place
- modified
- replaced
- enlarged
- reduced
- completely redesigned
Overlay Design
One of the greatest advantages of modern digital planning is overlay design.
Instead of beginning with a new implant, the existing implant becomes the starting point.
The designer can digitally add:
- more chin projection
- additional jaw width
- increased forehead height
- extended temporal contours
- infraorbital support
- asymmetric correction
This preserves successful portions of the original design while improving deficient areas.
Overlay design frequently results in smaller revisions with smoother transitions than designing an entirely new implant.
Color Thickness Mapping
Modern implant software can generate color-coded thickness maps showing:
- current implant dimensions
- areas requiring enlargement
- areas requiring reduction
- asymmetry correction
- transition zones
These maps allow both surgeon and patient to appreciate exactly where the revision differs from the original implant.
Rather than discussing abstract millimeter measurements, the planned changes become visually intuitive.
Virtual Revision
Perhaps the greatest strength of digital planning is the ability to compare multiple designs before surgery.
For example, the surgeon may generate:
Version A
Moderate augmentation
Version B
Greater lower facial width
Version C
Additional chin projection with unchanged jaw angles
Each version can be evaluated before manufacturing.
This flexibility dramatically reduces guesswork.
CT-Based Revision Workflow
Existing Implant
↓
Three-Dimensional CT Analysis
↓
Assessment of Bone Remodeling
↓
Digital Overlay Design
↓
Patient-Specific Revision Implant
Dr. Eppley’s Bottom Line
The greatest advantage of revision surgery today is not improved surgical technique—it is improved diagnosis. Modern CT imaging allows the surgeon to understand exactly why the original result developed as it did and to design a second-generation implant that is more anatomically precise and aesthetically refined.
Part 6: Revision by Facial Region
Every facial region presents unique revision challenges.
Although the principles of diagnosis, redesign, and precise implant placement remain consistent, the goals differ according to anatomy and function.
Chin Revision
The chin is one of the most frequently revised facial implants because even small changes in projection or shape can significantly influence overall facial balance.
Common reasons for revision include:
- inadequate projection
- excessive projection
- excessive width
- insufficient width
- vertical height imbalance
- chin asymmetry
- persistent labiomental fold
- soft-tissue chin ptosis
- transition irregularities
Many patients requesting a larger chin implant actually require improved continuity into the mandibular body rather than simply greater anterior projection.
A wraparound custom design often produces a more harmonious result than enlarging the chin alone.
Jawline Revision
Jawline revisions are among the most technically demanding because they involve long implant borders extending from the chin to the posterior mandibular angles.
Common concerns include:
- inadequate lower facial width
- excessive jaw angle flare
- insufficient angle definition
- abrupt transitions
- mandibular asymmetry
- visible implant borders
- underdeveloped mandibular body
The goal is usually continuity rather than isolated enlargement.
A natural jawline should appear as one uninterrupted skeletal contour rather than separate chin and angle augmentations.
Cheek Implant Revision
Revision of cheek implants requires an understanding that the cheek is not a single anatomical region. It is composed of three distinct skeletal areas—the malar eminence, the anterior cheek over the maxilla, and the infraorbital rim. A patient may describe the cheek as being “too big” or “too small,” when the real issue is augmentation in the wrong location.
Common reasons for revision include:
- excessive lateral cheek width
- inadequate anterior projection
- overemphasized cheekbones
- flattened midface appearance
- abrupt transition into the infraorbital region
- persistent facial asymmetry
- implant visibility in thin patients
One of the most common revision requests is to decrease excessive lateral prominence while increasing anterior support. Patients frequently discover that prominent cheekbones alone do not create youthful facial contours if the area beneath the lower eyelid remains deficient.
Modern custom implants allow each portion of the cheek complex to be modified independently, creating smoother transitions and a more natural three-dimensional contour.
Infraorbital Implant Revision
The infraorbital region is among the most technically demanding areas for revision because small differences in implant design can produce significant changes in lower eyelid support and midfacial contour.
Common indications include:
- persistent tear trough deformity
- residual negative orbital vector
- lower eyelid retraction
- asymmetry
- inadequate transition into the cheek
- insufficient support of the inferior orbital rim
Many early infraorbital implants were designed primarily to add projection. Current revision philosophy emphasizes restoring the entire infraorbital-maxillary relationship rather than simply making the rim more prominent.
Successful revision frequently blends the infraorbital rim into the cheek and anterior maxilla, creating a continuous skeletal contour beneath the lower eyelid.
Forehead Implant Revision
Revision of forehead implants is usually performed to improve overall forehead shape rather than simply increasing projection.
Common reasons include:
- insufficient projection
- excessive projection
- an unnatural forehead slope
- asymmetry
- inadequate lateral extension
- abrupt temporal transitions
- visible implant borders
The forehead is a large, gently curved surface. Even small irregularities can become noticeable under certain lighting conditions.
Modern CT-based redesign allows subtle modifications of forehead curvature that would be difficult to achieve by modifying an existing implant intraoperatively.
Skull Implant Revision
Revision of skull implants often involves contour refinement rather than dramatic enlargement.
Common indications include:
- incomplete correction of flatness
- persistent contour irregularities
- visible implant edges
- inadequate extension
- asymmetry
- palpable transitions
- patient desire for greater overall head shape improvement
The occipital and parietal regions require particularly careful attention to implant borders. A successful skull implant should blend gradually into the surrounding calvarium without abrupt changes in contour.
Revision frequently involves extending an existing implant rather than replacing it with a dramatically larger one.
Clinical Pearl
The most successful regional revisions do not simply increase or decrease implant size—they improve the transitions between adjacent skeletal regions. Facial harmony depends more on smooth anatomical continuity than on absolute projection.
Illustration Callout #5
Revision by Facial Region
A color-coded anterior and lateral skull illustration highlighting the six most common revision areas:
- Chin
- Jawline
- Cheek
- Infraorbital Rim
- Forehead
- Skull
Each region should include a small callout listing its most common reasons for revision.
Part 7: Revision for Complications
Although most revision procedures are performed for aesthetic refinement, complications occasionally require surgical intervention. Fortunately, serious complications are uncommon, and many can be successfully managed when recognized early.
The objective is always twofold:
- Resolve the complication.
- Preserve or restore the desired facial architecture whenever possible.
Implant Malposition
Implant malposition is one of the most frequent mechanical causes of revision.
It may result from:
- inadequate initial positioning
- insufficient fixation
- postoperative movement
- asymmetrical soft-tissue tension
- trauma during healing
Patients may notice:
- facial asymmetry
- prominence on one side
- contour irregularity
- palpable implant borders
- changes in jawline or cheek definition
CT imaging is invaluable for determining whether the implant has actually moved or whether the appearance results from underlying skeletal asymmetry.
Treatment usually involves repositioning or replacing the implant rather than simply tightening fixation.
Infection
Infection remains one of the most concerning complications, although it is fortunately uncommon with modern facial implant surgery.
Infections are generally classified as:
Early Infection
Occurs during the first few weeks after surgery.
Typical signs include:
- increasing swelling
- redness
- drainage
- localized tenderness
- fever
Some early infections respond to antibiotics combined with surgical irrigation if recognized promptly.
Delayed Infection
Delayed infections may occur months or even years later, often after:
- dental infections
- facial trauma
- sinus infections
- bloodstream bacterial contamination
Although uncommon, delayed infections usually require more aggressive management because bacteria may form a protective biofilm on the implant surface.
Implant Salvage
One of the most important questions during revision is whether the implant can be saved.
Successful salvage depends upon:
- timing
- severity of infection
- implant stability
- surrounding tissue health
- implant material
If the implant remains stable and surrounding tissues are healthy, irrigation, debridement, and antibiotics may occasionally preserve the implant.
However, persistent infection usually requires removal.
Implant Removal
Patients often assume that removing the implant completely solves the problem.
While removal eliminates the foreign material, it may create new aesthetic concerns.
These include:
- loss of skeletal projection
- soft-tissue collapse
- contour irregularity
- persistent facial asymmetry
Whenever possible, the long-term plan should include restoration of the underlying skeletal contour once the infection has completely resolved.
Immediate Versus Delayed Replacement
The decision to replace an implant immediately depends upon:
- tissue quality
- bacterial contamination
- wound condition
- implant location
- patient health
In selected patients with minimal contamination, immediate replacement with a new implant may be appropriate.
More commonly, delayed replacement after complete healing provides the safest and most predictable result.
Bone Remodeling During Revision
Long-standing implants frequently demonstrate mild remodeling of the underlying cortical bone.
This should not automatically be interpreted as pathological erosion.
Most remodeling represents normal biological adaptation to chronic pressure.
Recognizing this distinction prevents unnecessary concern and allows more accurate redesign of the replacement implant.
Clinical Pearl
Most complications are not failures of implant design. They result from biological healing, bacterial contamination, or mechanical factors that can usually be addressed with thoughtful revision planning.
Management of Implant Infection
Flowchart:
Signs of Infection
↓
Clinical Examination
↓
CT Evaluation
↓
Antibiotics ± Irrigation
↓
Implant Salvage?
↓
Yes → Preserve Implant
No → Remove Implant
↓
Healing Phase
↓
CT-Based Custom Redesign
↓
Replacement Implant
Part 8: Recovery After Revision Surgery
Recovery after revision facial implant surgery is often similar to primary surgery, but it is rarely identical. Previous operations create scar tissue, alter normal anatomy, and change the biological environment in which healing occurs. As a result, revision procedures require more surgical dissection and more meticulous handling of the tissues.
Patients should not assume that because they have already undergone facial implant surgery, the second recovery will be easier. Likewise, they should not expect it to be dramatically more difficult. Most revisions fall somewhere between these two extremes.
The recovery depends on several factors:
- the facial region being revised
- the extent of implant redesign
- whether one or multiple implants are replaced
- the amount of scar tissue encountered
- whether infection or other complications are being treated
- the patient’s overall health and healing characteristics
Is Recovery More Difficult Than the First Surgery?
The answer is usually yes—but only modestly.
Revision surgery generally produces:
- slightly more swelling
- more tissue stiffness
- longer resolution of numbness
- increased temporary firmness from scar tissue
However, postoperative discomfort is usually very similar to primary surgery because the implants are again placed beneath the periosteum, where relatively few pain fibers exist.
Patients often report that they feel psychologically more comfortable during recovery because they already know what to expect.
The Effect of Scar Tissue
Scar tissue is the defining feature of revision surgery.
After the original implant heals, the body forms a thin fibrous capsule around it. This capsule stabilizes the implant and makes future surgery somewhat more complex.
During revision, the surgeon must carefully separate:
- skin and soft tissue
- muscle
- periosteum
- capsule
- implant
without damaging surrounding nerves or blood vessels.
Fortunately, facial implant capsules are usually thin and well organized, making implant removal considerably easier than many patients anticipate.
Swelling After Revision
Swelling generally follows the same pattern as primary surgery but may last slightly longer.
Typical progression includes:
First Week
- maximum swelling
- firmness
- bruising (when present)
Weeks 2–4
- rapid reduction in swelling
- improved facial definition
- decreasing stiffness
Months 2–4
- continued soft tissue relaxation
- gradual refinement
- improved implant blending
Six Months and Beyond
- final contour
- mature soft tissue adaptation
- complete assessment of symmetry
Patients should avoid judging the revision result during the first several weeks. Swelling is rarely symmetrical and often masks the subtle refinements that motivated the revision in the first place.
Numbness
Temporary numbness is common after revision surgery.
Because tissues have already been elevated once, small sensory nerve branches may require additional time to recover.
Most patients experience gradual improvement over several months.
Permanent numbness is uncommon but may occur after extensive revisions, particularly in areas where sensory nerves have been manipulated multiple times.
Returning to Normal Activities
Most patients follow a recovery timeline similar to primary surgery:
Office work: 7–10 days
Light exercise: 2–3 weeks
Heavy lifting: 4–6 weeks
Contact sports: 8–12 weeks
Patients undergoing multiple implant revisions or treatment for infection may require a longer recovery period.
Clinical Pearl
Revision recovery is measured in months rather than weeks. Although patients often look socially acceptable within two weeks, subtle refinement continues for many months as swelling resolves and the soft tissues adapt to the new skeletal framework.
Recovery Timeline After Revision Surgery
- Surgery
- 1 Week – Maximum Swelling
- 1 Month – Major Improvement
- 3 Months – Continued Refinement
- 6 Months – Near Final Result
- 12 Months – Complete Tissue Maturation
Part 9: Reducing the Need for Future Revision
Although no surgeon can guarantee that revision surgery will never be necessary, careful planning substantially reduces its likelihood.
The best revision surgery is the one that never becomes necessary.
Comprehensive Diagnosis
Every successful implant begins with an accurate diagnosis.
Many unsatisfactory outcomes result not from poor surgical technique but from treating the wrong anatomical problem.
For example:
A patient requesting greater chin projection may actually require:
- increased mandibular width
- improved jaw angle definition
- correction of mandibular asymmetry
Simply enlarging the chin would not solve the underlying imbalance.
Successful surgery begins with understanding the entire facial skeleton rather than focusing on one isolated feature.
High-Quality CT Imaging
Modern custom implant surgery depends upon high-resolution three-dimensional CT imaging.
CT evaluation allows accurate assessment of:
- skeletal deficiencies
- asymmetry
- previous implants
- fixation hardware
- bone remodeling
- adjacent anatomical structures
Better imaging produces better implant design.
Careful Digital Design Review
One of the greatest advantages of custom implants is the opportunity to review the design before surgery.
Patients should understand:
- implant thickness
- projection
- width
- transitions
- overall objectives
Careful review ensures that both patient and surgeon share the same expectations before manufacturing begins.
Conservative Augmentation
One of the most valuable lessons in aesthetic surgery is that it is generally easier to enlarge an implant later than to reduce an overly aggressive design.
For many first-time patients, a moderate degree of augmentation provides an excellent balance between noticeable improvement and long-term satisfaction.
Patients who later desire additional enhancement can undergo predictable secondary augmentation based on their experience with the original implant.
Stable Fixation
Rigid screw fixation has dramatically reduced implant migration compared with older techniques.
Stable fixation:
- preserves symmetry
- minimizes movement
- reduces contour irregularities
- improves long-term reproducibility
Although fixation alone cannot prevent every revision, it substantially improves implant stability.
Surgeon Experience
Revision surgery often reflects decisions made during the original diagnosis rather than technical errors during implantation.
Experience allows the surgeon to recognize subtle skeletal relationships that influence:
- facial balance
- symmetry
- transition zones
- soft-tissue response
This experience becomes increasingly valuable in complex custom implant procedures involving multiple facial regions.
Part 10: When Revision Surgery Should Not Be Performed
Not every patient who requests revision surgery is an appropriate candidate.
In some situations, additional surgery is more likely to create new problems than improve the existing result.
One of the surgeon’s most important responsibilities is recognizing when not to operate.
The Implant Is Anatomically Correct
Occasionally, CT imaging demonstrates that the implant is well positioned, symmetrical, and appropriately designed.
The patient’s concerns may instead relate to:
- natural facial asymmetry
- soft-tissue thickness
- skin quality
- lighting
- photographic distortion
Replacing the implant would not meaningfully improve these issues.
Swelling Has Not Completely Resolved
Perhaps the most common reason to postpone revision is incomplete healing.
Residual swelling may persist for:
- three months
- six months
- occasionally one year
Operating too early risks correcting a problem that may disappear naturally with continued healing.
Expectations Continue to Change
Some patients repeatedly alter their desired appearance over short periods of time.
Revision should not be performed until aesthetic goals have stabilized.
Custom facial implants are permanent structural devices—not temporary fashion accessories.
The Proposed Change Is Too Small
Modern manufacturing allows remarkable precision, but not every half-millimeter difference produces a visible clinical improvement.
Surgeons must distinguish between changes that are measurable and those that are actually meaningful.
Sometimes the best recommendation is observation rather than another operation.
Clinical Pearl
Successful revision surgery depends as much on appropriate patient selection as it does on surgical technique. The decision not to operate is sometimes the most beneficial treatment.
Dr. Eppley’s Bottom Line
The goal of revision surgery is improvement—not perfection. Understanding when additional surgery will genuinely improve facial architecture is one of the defining characteristics of experienced custom facial implant practice.
Part 11: Frequently Asked Questions
1. How common is revision facial implant surgery?
Revision surgery is more common than many patients realize. Most revisions are performed for aesthetic refinement rather than because of a complication or surgical error. As patients live with their implants, they may decide they would like more projection, less augmentation, or improved facial balance.
2. Does revision surgery mean my original operation failed?
No. Revision surgery should not automatically be viewed as a failure. Facial implants are aesthetic procedures, and aesthetic goals can evolve over time. A technically successful operation may still be revised because a patient’s preferences or facial proportions have changed.
3. What is the most common reason for revision surgery?
The most common indication is undercorrection. Many patients intentionally choose conservative augmentation during their first procedure and later decide they would like greater definition after seeing how naturally the original implant healed.
4. Can a stock implant be replaced with a custom implant?
Yes. This is one of the most common revision procedures. A custom implant can address deficiencies that stock implants cannot, including facial asymmetry, contour transitions, and individualized skeletal anatomy.
5. Can a custom implant be revised?
Absolutely. A custom implant can be enlarged, reduced, reshaped, or completely redesigned using a new CT scan. Revision is often simpler because the original implant provides valuable information about how the tissues healed and how the face responded to augmentation.
6. Do all revisions require a new implant?
No. Some revisions involve repositioning an implant, improving fixation, or correcting scar tissue. Others require complete redesign. The appropriate solution depends on the underlying problem rather than automatically replacing the implant.
7. Can an implant simply be trimmed during surgery?
Minor adjustments may occasionally be made to silicone implants, but extensive reshaping during surgery is generally less accurate than designing a new custom implant. Significant changes are best accomplished digitally before surgery.
8. Is it better to replace an implant than modify it?
When substantial changes are required, replacement usually provides a more predictable result than modifying an existing implant. Modern digital planning allows every aspect of the new implant to be optimized before surgery.
9. How long should I wait before considering revision?
Most patients should wait at least six months, and often one year, before deciding on elective revision. Swelling, scar maturation, and soft-tissue adaptation continue long after the initial surgery.
10. Can implants be exchanged during the same operation?
Yes. In most revision procedures, the original implant is removed and the new implant is inserted during the same surgery. This avoids an unnecessary second operation and minimizes recovery time.
11. Is revision surgery more difficult than the first operation?
Usually yes. Scar tissue and altered anatomy make revision technically more demanding. However, improved imaging and knowledge gained from the original surgery often make surgical planning much more precise.
12. Is recovery longer after revision surgery?
Recovery is usually somewhat longer because of increased swelling and scar tissue dissection. Most patients, however, recover along a timeline similar to their original procedure.
13. Will revision surgery hurt more?
Most patients report discomfort similar to their primary surgery. Swelling and stiffness may last longer, but postoperative pain is generally comparable.
14. Can facial asymmetry be completely corrected?
Perfect facial symmetry is rarely achievable because no human face is perfectly symmetrical. The objective is noticeable improvement rather than mathematical perfection.
15. What happens if my implant has moved?
If CT imaging confirms displacement, revision generally involves repositioning or replacing the implant with secure fixation. The exact approach depends on the degree of movement and the underlying cause.
16. Can screws loosen over time?
Although uncommon, fixation screws may occasionally loosen. Most remain permanently stable once the implant has healed.
17. Can implants become infected years after surgery?
Yes, although delayed infection is rare. Dental infections, facial trauma, or bloodstream bacteria may occasionally seed an implant years after implantation.
18. Does infection always require implant removal?
No. Early infections may sometimes be successfully treated with antibiotics and surgical irrigation. Persistent or chronic infections usually require implant removal before replacement can be considered.
19. Can another implant be inserted immediately after removal?
Sometimes. If contamination is limited and tissues remain healthy, immediate replacement may be appropriate. More severe infections often require delayed reconstruction after complete healing.
20. Does bone erosion occur beneath implants?
Most long-standing implants produce mild bone remodeling rather than destructive erosion. This is usually a normal biological adaptation and is considered during revision planning.
21. Can facial aging make an implant look different?
Yes. Changes in skin elasticity, fat distribution, and soft-tissue support may alter the appearance of an implant over time even though the implant itself has not changed.
22. Can weight loss change the appearance of my implant?
Yes. Significant weight loss reduces soft-tissue thickness and may make implant borders more noticeable, particularly in the jawline and cheek regions.
23. Will a facelift eliminate the need for implant revision?
Not necessarily. A facelift repositions soft tissue but does not change the underlying skeleton. Some patients benefit from combining facial rejuvenation with revision implant surgery.
24. Can revision surgery improve a previous chin implant?
Yes. Common improvements include altering projection, width, vertical height, symmetry, and the transition into the jawline.
25. Can jawline implants be enlarged later?
Yes. This is one of the most predictable revision procedures. Additional width, angle definition, or mandibular body augmentation can be incorporated into a second-generation custom implant.
26. Can forehead implants be revised?
Yes. Forehead implants may be redesigned to improve projection, forehead slope, symmetry, temporal blending, or overall contour.
27. Can skull implants be enlarged years later?
Yes. Existing skull implants can often be replaced or extended with larger custom implants based on updated CT imaging and current aesthetic goals.
28. Will insurance cover revision surgery?
Most revision facial implant procedures performed for aesthetic reasons are not covered by health insurance. Revision for medical complications may be eligible for coverage depending on the individual policy.
29. How accurate are custom revision implants?
Modern CT-based custom implants are highly accurate because they are designed directly from the patient’s skeletal anatomy. They generally provide much greater precision than modifying stock implants during surgery.
30. Can I have more than one facial implant revised at the same time?
Yes. It is common to revise multiple implants during a single procedure, particularly when facial balance depends on the relationship between different skeletal regions.
31. Will I need another CT scan?
Almost always. An updated CT scan provides essential information about the existing implant, bone remodeling, fixation, and current facial anatomy.
32. Is revision surgery more expensive than primary surgery?
Revision surgery is often more complex and may require new implant design and manufacturing. Costs vary depending on the number of implants involved, surgical complexity, and implant fabrication.
33. How successful is revision surgery?
When the underlying cause of dissatisfaction is accurately diagnosed and addressed with appropriate implant redesign, revision surgery has a high rate of patient satisfaction. Success depends more on careful planning than on the operation itself.
34. Can revision surgery make my results perfect?
No. The objective is meaningful improvement, not perfection. Every face has natural asymmetry, and every revision must balance anatomical limitations with realistic aesthetic expectations.
35. What is the greatest advantage of revision surgery today?
The greatest advance is modern three-dimensional planning. High-resolution CT imaging and digital implant design allow surgeons to understand precisely why the original result developed as it did and to create a second-generation implant that is more individualized, anatomically accurate, and aesthetically refined.
Key Takeaways
- Revision facial implant surgery is a normal part of long-term facial skeletal enhancement and should not automatically be viewed as a surgical failure.
- Most revisions are performed to improve aesthetics rather than to treat complications.
- Three-dimensional CT imaging has transformed revision planning by allowing precise evaluation of existing implants, skeletal anatomy, and bone remodeling.
- Converting stock implants to custom implants is one of the most common and effective revision procedures.
- Revision surgery is generally more technically demanding than primary surgery because of scar tissue and altered anatomy.
- Successful revision depends on identifying the true anatomical cause of dissatisfaction rather than simply changing implant size.
- Modern custom implant design allows precise modification of projection, width, contour, and facial symmetry.
- Careful diagnosis, realistic expectations, and thoughtful digital planning remain the most effective ways to minimize the need for future revision surgery.
Final Perspective
Revision facial implant surgery is often misunderstood as the correction of a mistake. In reality, it is more accurately viewed as the next step in an ongoing process of facial skeletal refinement. The first operation provides valuable information about healing, implant position, soft-tissue adaptation, and the patient’s perception of their result. Revision surgery builds upon that knowledge.
Modern three-dimensional imaging has fundamentally changed the philosophy of revision surgery. Rather than relying on intraoperative judgment alone, surgeons can now evaluate the existing implant, underlying skeleton, and facial asymmetry in remarkable detail before entering the operating room. This information allows every aspect of the revision—from implant size and shape to border transitions and fixation—to be planned with far greater precision than was previously possible.
Ultimately, the goal of revision surgery extends beyond exchanging one implant for another. It is an opportunity to restore balance, improve facial architecture, and create a result that more closely reflects both the patient’s anatomy and long-term aesthetic objectives. When approached with careful diagnosis, realistic expectations, and thoughtful custom implant design, revision surgery is not simply a second operation—it is often the culmination of a more complete understanding of the individual face.
Dr. Eppley’s Bottom Line
Revision surgery is not about fixing an implant—it is about improving facial architecture. The greatest advantage of modern custom facial implants is that every revision begins with a fresh diagnosis, a new three-dimensional design, and a more complete understanding of the patient’s anatomy, healing characteristics, and aesthetic goals. Rather than viewing revision as a setback, it should be viewed as an opportunity to achieve a more refined, individualized, and naturally balanced result.
CORNERSTONE ARTICLE #9
Facial Skeletal Aesthetics
How Bone Structure Shapes Facial Proportion, Masculinity, Femininity, Symmetry, and Attractiveness
Quick Answer
Facial appearance is created by more than skin, fat, and muscle. Beneath those tissues is a three-dimensional skeletal framework that determines the face’s projection, width, height, angularity, symmetry, and relationship between its major regions.
The forehead influences how the upper face meets the nose. The orbital rims support the eyes. The cheeks and zygomatic arches determine midface projection and width. The maxilla supports the nasal base and upper lip. The chin and mandible shape the lower face, jawline, and neck.
This is why two patients with similar skin and soft-tissue volume can have very different facial appearances.
The central principle of facial skeletal aesthetics is:
Attractiveness is not created by making every feature larger. It is created by improving the relationships between facial regions.
A strong chin can improve the profile, but an excessively large chin may dominate the face. Wider cheekbones can create definition, but excessive width may look disproportionate. A more projected brow can strengthen a male face, while the same degree of projection may be undesirable in a patient seeking a softer appearance.
Successful skeletal enhancement therefore depends on proportion, balance, continuity, and identity—not isolated measurements alone.
Quick Facts
- The facial skeleton provides the structural foundation for the overlying soft tissues.
- Facial attractiveness depends more on proportion than on the size of any single feature.
- Projection, width, height, angularity, and symmetry must be evaluated separately.
- The frontal view, profile, oblique view, and superior or inferior views reveal different skeletal relationships.
- Male and female skeletal patterns overlap considerably and should not be reduced to rigid templates.
- A facial feature may appear too large because an adjacent skeletal region is underdeveloped.
- Facial asymmetry is normal, but greater asymmetry may become visually distracting.
- Soft-tissue aging can make preexisting skeletal deficiencies more noticeable.
- Custom implants can modify skeletal contours without moving the teeth or changing the bite.
- Millimeter measurements are useful, but they do not independently define beauty.
- The best skeletal enhancement preserves facial identity.
- Full-face balance often produces a more natural result than aggressive correction of one region.
Part 1: The Face as a Three-Dimensional Structure
Facial Appearance Begins With the Skeleton
The visible face is composed of several tissue layers:
- skin
- subcutaneous fat
- superficial fascia
- facial muscles
- deep fat compartments
- periosteum
- bone
The skeleton is the deepest layer, but it influences every layer above it.
A deficient infraorbital rim can contribute to under-eye hollowing. A retrusive chin can make the neck appear fuller. A narrow zygomatic arch can make the upper face look constricted. A backward-sloping forehead can increase the apparent prominence of the brow, nose, or central face.
Soft-tissue procedures may improve the surface, but they cannot always correct an inadequate skeletal foundation.
Facial Architecture Rather Than Isolated Features
Patients commonly describe their concern as one feature:
- “My chin is weak.”
- “My cheeks are flat.”
- “My eyes look hollow.”
- “My forehead slopes backward.”
- “My face is too narrow.”
- “My jaw is not defined.”
These observations may be accurate, but they are incomplete.
The face should be analyzed as an architectural system in which each feature changes the perception of the others.
For example:
- Increasing chin projection can make the nose appear smaller.
- Improving forehead projection can balance the nasal profile.
- Supporting the infraorbital rims can make the cheeks appear more continuous.
- Widening the jaw angles can make the chin appear relatively narrower.
- Increasing zygomatic arch width can change the relationship between the upper and lower face.
- Correcting paranasal deficiency can improve the apparent projection of the nasal base and upper lip.
The correct question is not merely:
“Which feature should be enlarged?”
It is:
“Which skeletal relationship is creating the imbalance?”
The Importance of Facial Continuity
Natural facial contours do not occur as isolated bumps.
They flow across anatomical regions.
Examples include:
- forehead into brow
- brow into lateral orbital rim
- infraorbital rim into cheek
- cheek into zygomatic arch
- chin into mandibular body
- mandibular body into jaw angle
- jawline into neck
An implant can fit the bone accurately yet still appear unnatural if it creates a sudden step-off between augmented and unaugmented regions.
For this reason, custom implant design is often concerned as much with transitions as with central projection.
Dr. Eppley’s Bottom Line
The face is not a collection of independent features. It is a continuous skeletal framework covered by soft tissue. The goal of skeletal enhancement is to improve relationships and transitions, not simply to enlarge individual parts.
Part 2: The Five Variables of Facial Skeletal Aesthetics
Every skeletal region can be evaluated through five principal variables:
- Projection
- Width
- Vertical height
- Angularity
- Symmetry
These variables are related, but they are not interchangeable.
1. Projection
Projection describes how far a structure extends forward.
Examples include:
- forehead projection
- brow projection
- cheek projection
- paranasal projection
- chin projection
- jaw angle projection in selected vectors
A region can be deficient in projection even when its width is normal.
For example, a patient may have wide cheekbones but insufficient forward cheek projection. Another may have a broad chin that still remains retrusive in profile.
Projection must therefore be evaluated in relation to:
- the nose
- lips
- eyes
- forehead
- neck
- adjacent skeletal contours
2. Width
Width describes the transverse dimension of the face.
Important skeletal width regions include:
- temporal region
- zygomatic arches
- mandibular body
- jaw angles
- chin
- cranial vault
A face can be narrow despite adequate forward projection.
Width also changes the perceived shape of the face:
- Greater upper facial width may create a more athletic or angular appearance.
- Greater lower facial width may strengthen the jaw.
- A narrow chin with wide jaw angles creates a different lower-face shape from a wide chin with narrow jaw angles.
- Excessive width in one region can make another region appear deficient.
Width should be planned from the frontal and three-quarter views, not the profile alone.
3. Vertical Height
Vertical height influences facial length and the relationships between the upper, middle, and lower thirds.
Relevant areas include:
- forehead height
- orbital height
- midface height
- lower facial height
- chin height
- jaw angle length
- ramus height
A jaw angle can appear weak because it lacks width, because it lacks vertical length, or because it lacks both.
Similarly, a chin may be adequately projected but vertically short.
A patient who requests “more chin” may therefore require vertical lengthening rather than additional horizontal projection.
4. Angularity
Angularity refers to the sharpness and directional change of skeletal contours.
Examples include:
- brow prominence
- lateral cheek definition
- zygomatic arch contour
- mandibular border definition
- jaw angle shape
- chin corners
Angular features often create:
- stronger shadow lines
- greater skeletal definition
- more dramatic transitions
- a more structured appearance
But excessive angularity can appear artificial.
Natural angularity is not produced by creating sharp geometric corners. It is created by carefully controlled changes in contour that remain compatible with the soft tissues.
5. Symmetry
Symmetry refers to the relationship between the two sides of the face.
No human face is perfectly symmetrical.
Common normal differences include:
- unequal orbital height
- cheek projection differences
- nasal deviation
- unequal jaw angle position
- chin deviation
- cranial flattening
- different facial widths
The goal is rarely perfect numerical symmetry.
The more realistic goal is reducing the asymmetries that are visually distracting while respecting the soft-tissue and skeletal limitations of the patient.
The Five Variables of Skeletal Design
Create five simplified face diagrams showing:
- projection
- width
- vertical height
- angularity
- symmetry
Each diagram should alter only one variable.
Part 3: Facial Proportion and Balance
Why Proportion Matters More Than Size
A facial feature is not attractive because it is large or small.
It is attractive when its dimensions are compatible with the rest of the face.
A chin may be objectively prominent but still look balanced on a large face with a strong nose and brow. The same chin may appear excessive on a smaller, softer face.
Likewise:
- A wide jaw may complement broad cheekbones.
- A wide jaw may look bottom-heavy beneath a narrow midface.
- Strong brows may balance a projected forehead and nose.
- Strong brows may overpower a delicate midface.
- Large cheeks may look harmonious with a broad cranial shape.
- The same cheeks may look artificial if the temples remain narrow.
This is why implant design cannot be reduced to one universal set of dimensions.
The Facial Thirds
The face is often divided vertically into three general regions:
Upper third
From the hairline to the brow region.
Middle third
From the brow region to the base of the nose.
Lower third
From the nasal base to the bottom of the chin.
These divisions are useful for analysis, but they are not rigid rules.
Hairline position, forehead shape, nasal length, lip length, chin height, and head posture all affect apparent thirds.
A patient can have mathematically equal thirds and still appear unbalanced.
The Facial Fifths
The frontal face is sometimes described in five vertical segments approximately equal to one eye width.
This can help identify:
- orbital spacing
- central facial width
- cheek width
- jaw width
- facial asymmetry
But, again, it is an analytical framework rather than a definition of attractiveness.
Ethnicity, sex, age, and individual facial type create substantial normal variation.
Ratio-Based Analysis
Ratios can help surgeons compare:
- facial height to width
- cheek width to jaw width
- chin width to mouth width
- brow projection to forehead projection
- jaw angle width to zygomatic width
- facial thirds
- nose-to-chin relationships
However, ratios should support judgment rather than replace it.
A face can satisfy a mathematical ratio and still lack harmony because:
- soft-tissue thickness differs
- the implant transition is poor
- one feature dominates visually
- facial expression changes perception
- asymmetry is present
- the patient’s identity is not respected
The Golden Ratio
The golden ratio is frequently promoted as a universal formula for facial beauty.
It may be interesting as a descriptive concept, but it should not be treated as a surgical blueprint.
Human faces do not conform to one mathematical template.
Attractiveness exists across:
- different ethnic backgrounds
- different facial widths
- different vertical proportions
- different nose shapes
- different chin sizes
- different levels of angularity
The golden ratio may offer a conceptual reference, but it cannot determine the ideal implant thickness or facial shape for an individual patient.
Clinical Pearl
Measurements help describe a face. They do not independently decide how the face should be changed.
Part 4: The Upper Face
The Forehead as the Beginning of the Profile
The forehead forms the upper boundary of the facial profile.
Its shape is influenced by:
- frontal bone projection
- forehead slope
- brow prominence
- hairline position
- frontal sinus anatomy
- temporal transitions
A forehead that slopes backward may make the:
- brow appear more prominent
- nose appear larger
- upper face look retrusive
- facial profile seem discontinuous
Increasing forehead projection can improve the entire profile even though the nose and chin remain unchanged.
Forehead Shape
Important forehead variables include:
- central projection
- lateral projection
- vertical slope
- width
- curvature
- transition into the temples
- relationship to the brow bones
A forehead implant should not simply add a uniform layer.
It may need to:
- increase projection superiorly
- reduce a backward slope
- widen the upper forehead
- fill central flattening
- blend into the temporal regions
- correct asymmetry
Brow Bone Aesthetics
The brow bones frame the upper orbit.
Their appearance depends on:
- supraorbital rim projection
- glabellar projection
- lateral brow contour
- orbital depth
- forehead position
- soft-tissue thickness
- eyebrow position
More brow projection can create:
- greater upper-face strength
- deeper-set eye appearance
- stronger orbital framing
- increased masculinity in many patients
Less brow projection often creates:
- a more open orbital appearance
- a softer upper face
- less shadowing around the eyes
However, these are tendencies rather than universal rules.
The Forehead–Brow Relationship
The forehead and brow should be designed together.
Increasing forehead projection without considering the brow may flatten the transition.
Increasing brow projection without considering the forehead may create a shelf-like contour.
A natural upper face requires a coordinated relationship between:
- forehead slope
- glabella
- central brow
- lateral brow
- temple
Temporal Width
The temples form the lateral bridge between the forehead, cheekbones, and skull.
Temporal hollowing can make the:
- forehead appear narrow
- cheekbones appear excessively prominent
- face look older
- upper head look constricted
Temporal augmentation may improve upper facial width without directly altering the forehead or cheek.
The temporal region may be deficient because of:
- skeletal narrowness
- muscle contour
- fat loss
- previous surgery
- aging
The correct treatment depends on the tissue layer responsible for the hollow.
Skull Shape and Facial Perception
Although the skull is not traditionally considered part of facial aesthetics, cranial contour influences the way the face is perceived.
Examples include:
- a narrow head exaggerating facial width
- a flat occiput affecting overall head balance
- temporal narrowing making the face appear more vertical
- forehead asymmetry reflecting cranial asymmetry
- a high sagittal contour affecting head shape
For some patients, improving facial balance requires considering the entire head rather than the face alone.
Show a male and female side profile highlighting:
- forehead slope
- brow projection
- orbital depth
- temporal transition
- nasal relationship
Avoid presenting one profile as universally ideal.
Part 5: The Orbital and Periorbital Skeleton
The Eyes Are Framed by Bone
The appearance of the eyes is strongly influenced by the surrounding skeleton.
Important structures include:
- superior orbital rim
- lateral orbital rim
- inferior orbital rim
- nasal bones
- upper maxilla
- cheekbone
The eyeball itself may be normal, but deficient skeletal support can create the appearance of:
- prominent eyes
- under-eye hollowing
- negative orbital vectors
- weak lateral eye support
- excessive scleral show
- tiredness
The Orbital Vector
The orbital vector describes the relationship between the cornea and the supporting infraorbital or cheek contour.
In a positive vector, the lower orbital rim and cheek support project adequately relative to the eye.
In a negative vector, the eye projects farther forward than the supporting infraorbital and malar skeleton.
A negative vector may contribute to:
- apparent eye prominence
- lower eyelid weakness
- under-eye hollowing
- deep tear troughs
- poor lid–cheek transition
Custom infraorbital or infraorbital-malar implants can improve the supporting skeletal framework.
Infraorbital Support
The lower orbital rim is not merely the lower border of the eye socket.
It is part of the transition between:
- lower eyelid
- tear trough
- upper cheek
- nasal sidewall
- anterior maxilla
Augmenting only the cheek may not correct an infraorbital deficiency.
Likewise, an isolated infraorbital implant may be insufficient if the cheek and maxilla are also retrusive.
Lateral Orbital Framing
The lateral orbital rim affects:
- eye width
- outer eye support
- transition into the zygoma
- temporal contour
- upper midface width
In selected cases, lateral orbital augmentation may strengthen the upper midface or improve continuity between the brow and cheek.
This is a specialized area requiring careful attention to soft-tissue coverage and implant borders.
Part 6: The Midface
The Midface Is Not One Structure
The midface includes several distinct skeletal regions:
- infraorbital rims
- malar eminences
- zygomatic arches
- paranasal areas
- anterior maxilla
- piriform aperture
- nasal base support
Each region contributes differently to appearance.
This is why the term “cheek implant” is often too imprecise.
Cheek Projection
The malar eminence provides forward and anterolateral projection.
Greater cheek projection can create:
- stronger midface definition
- a more sculpted appearance
- improved lid–cheek transition
- better balance with the lower face
But cheek projection is not the same as facial width.
A patient can have strong forward cheeks and still have narrow zygomatic arches.
Zygomatic Arch Width
The zygomatic arches extend laterally toward the ears.
They influence:
- upper facial width
- side-of-face contour
- relationship between the temples and cheeks
- masculine or athletic appearance in some patients
Arch augmentation must be designed carefully.
Excessive lateral width can look unnatural, particularly if:
- the temples remain narrow
- the jaw is very narrow
- the central cheeks are flat
- the patient’s soft tissues are thin
Paranasal Projection
The paranasal skeleton lies beside the nasal base.
Deficiency in this region may contribute to:
- recessed nasal base
- deep nasolabial folds
- midface retrusion
- inadequate upper-lip support
- apparent nasal prominence
Paranasal augmentation can improve the skeletal foundation around the nose without changing the nose itself.
Anterior Maxillary Support
The anterior maxilla supports:
- nasal base
- upper lip
- paranasal tissues
- central midface
A deficient maxilla may produce a generalized retrusive appearance.
However, custom implants cannot correct a bite problem or reposition the tooth-bearing maxilla.
When occlusal or functional deformity is present, orthognathic surgery may be necessary.
Midface Mask Design
A custom midface mask implant can combine several regions:
- infraorbital
- malar
- paranasal
- anterior maxillary
This can be useful when the deficiency is generalized rather than isolated.
The advantage is continuity.
The challenge is that a broad implant affects multiple facial relationships at once and must be designed conservatively.
Clinical Pearl
A flat midface does not always require larger cheeks. It may require support beneath the eyes, beside the nose, across the maxilla, or in several of these regions together.
Create two diagrams:
- forward cheek and infraorbital projection
- lateral zygomatic arch width
Show that the two variables can be modified independently.
Part 7: The Lower Face
The Mandible as a Continuous Structure
The lower jaw includes:
- chin
- parasymphyseal region
- mandibular body
- antegonial region
- jaw angle
- ramus
These regions form one continuous border.
Treating them as separate aesthetic objects can create unnatural transitions.
A strong jawline is not simply a large chin plus wide angles.
It is a coherent mandibular contour.
Chin Projection
The chin affects:
- facial profile
- lip balance
- apparent nasal size
- neck definition
- lower facial strength
Horizontal projection is only one dimension.
Chin design may also alter:
- width
- vertical length
- shape
- lateral corners
- asymmetry
- labiomental relationship
Chin Width
A narrow chin can create a tapered lower face.
A wider chin can create:
- greater frontal strength
- improved continuity with the jawline
- a broader masculine appearance in some patients
But excessive width may create a block-like appearance.
The correct width depends on:
- mouth width
- jaw width
- facial width
- sex-related goals
- patient preference
- existing chin shape
Chin Height
Increasing vertical chin length may improve:
- lower facial proportion
- chin shape
- profile continuity
- mandibular border appearance
But excessive vertical length can make the lower face appear heavy or elongated.
Vertical height should be evaluated separately from projection.
Jawline Continuity
The mandibular body connects the chin to the angles.
Deficiency in this region may create:
- a weak lateral jawline
- a visible break between chin and angle implants
- poor neck definition
- lower-face asymmetry
- a narrow mandibular contour
A full jawline implant can address continuity rather than treating only endpoints.
Jaw Angle Width
Wider jaw angles can create:
- stronger lower facial width
- increased posterior definition
- a more angular frontal appearance
- greater contrast between jaw and neck
However, excessive width can create a bottom-heavy or overly square face.
Jaw angle width should be considered relative to:
- cheekbone width
- chin width
- neck width
- ramus length
- masseter thickness
Vertical Jaw Angle Length
A short jaw angle may sit high above the lower border of the face.
Vertical lengthening can create:
- a lower posterior jawline
- a stronger mandibular corner
- improved side profile
- a more complete angle contour
But the implant should not create a sharply squared geometric corner that the soft tissues cannot naturally support.
Ramus and Posterior Mandibular Shape
The ramus contributes to the vertical posterior height of the jaw.
Although cosmetic implants do not reproduce the functional anatomy of a larger ramus, selected designs can improve the external contour over its lower and posterior aspects.
This must be balanced against:
- masseter muscle position
- parotid region
- facial nerve anatomy
- incision access
- implant fixation
The Jaw–Neck Relationship
A stronger jawline may improve the appearance of the neck by increasing skeletal separation between the face and cervical tissues.
However, skeletal augmentation cannot correct all causes of neck fullness.
Residual concerns may result from:
- submental fat
- loose skin
- platysma laxity
- low hyoid position
- enlarged submandibular glands
- chin pad ptosis
The jawline and neck should be evaluated together, but they may require different treatments.
The Five Aesthetic Vectors of the Lower Jaw
Show:
- horizontal chin projection
- chin width
- jawline width
- jaw angle flare
- vertical jaw angle length
Emphasize that each vector can be adjusted independently.
Part 8: Profile Aesthetics
The Profile Is a Chain of Relationships
The facial profile includes:
- forehead
- brow
- nasal bridge
- nasal tip
- lips
- chin
- jawline
- neck
A change in one region alters the apparent prominence of others.
This is why profile analysis should not focus only on the nose or chin.
Forehead–Nose Relationship
A backward-sloping forehead can make the nose appear larger.
A stronger forehead can create a smoother upper profile and reduce the visual dominance of the nasal bridge.
Nose–Chin Relationship
The nose and chin are often analyzed together.
A retrusive chin can exaggerate nasal prominence.
Increasing chin projection may improve the profile without changing the nose.
However, an excessively large chin is not a substitute for rhinoplasty when the nose itself is disproportionate.
Lip–Chin Relationship
The chin should be evaluated relative to:
- upper lip
- lower lip
- labiomental fold
- dental position
- soft-tissue chin thickness
Skeletal chin projection and soft-tissue chin projection are not identical.
A patient with a thick chin pad may require less implant projection than the bone alone suggests.
Chin–Neck Relationship
The chin influences:
- cervicomental angle
- submental contour
- apparent neck length
- lower facial definition
But the result also depends on:
- skin elasticity
- submental fat
- hyoid position
- platysma
- mandibular border
The profile must therefore be assessed as a complete contour from the lower lip to the neck.
Why Profile Measurements Have Limits
Profile lines and angles can be useful, but they depend on:
- head posture
- photography
- nasal shape
- lip position
- dental relationships
- sex and ethnicity
- patient preference
A profile that falls outside a textbook measurement may still be attractive and appropriate for the individual.
Part 9: Frontal Aesthetics
The Frontal View Reveals Width and Shape
The frontal view is the primary view for evaluating:
- facial width
- chin width
- jaw angle width
- cheek width
- orbital symmetry
- vertical facial thirds
- left-right asymmetry
- facial shape
A result that looks excellent in profile may still appear unbalanced from the front.
Common Facial Shapes
Common descriptive categories include:
- oval
- round
- square
- rectangular
- heart-shaped
- triangular
- inverted triangular
- diamond-shaped
These are simplified labels.
Most faces combine characteristics from several categories.
Custom skeletal augmentation can influence facial shape by changing:
- temple width
- cheek width
- jaw width
- chin width
- vertical height
- lower facial taper
Upper-to-Lower Facial Width
The relationship between zygomatic width and jaw width strongly influences facial character.
Wider cheeks with a narrower jaw
Often produces a tapered or heart-shaped appearance.
Similar cheek and jaw width
Can create a rectangular or square appearance.
Narrow cheeks with a wide jaw
May create a bottom-heavy or triangular appearance.
Neither relationship is universally best.
The desired balance depends on anatomy and aesthetic goals.
The Importance of Chin Centering
A deviated chin can make the entire lower face appear asymmetric.
But chin deviation may originate from:
- chin bone asymmetry
- mandibular body asymmetry
- jaw angle asymmetry
- dental midline differences
- head posture
- soft-tissue asymmetry
Correcting the chin alone may not fully correct the face.
Part 10: Oblique and Three-Quarter Aesthetics
Why the Oblique View Matters
The three-quarter view shows relationships that may be hidden in frontal and profile views.
It reveals:
- cheek projection
- zygomatic arch contour
- infraorbital support
- jawline continuity
- chin-to-angle transition
- forehead curvature
- facial depth
Patients are seen in motion and from changing angles, not only in standardized photographs.
A successful implant must look natural across multiple views.
The Ogee Curve
The ogee curve describes the flowing S-shaped contour of the cheek in the oblique view.
It is created by the interaction of:
- infraorbital rim
- malar prominence
- submalar contour
- soft-tissue fullness
- lighting
A custom implant can improve the skeletal support beneath the curve, but the visible result also depends on fat compartments, skin, and age.
Jawline Transition in the Oblique View
The oblique view demonstrates whether the lower jaw forms a smooth path from:
- chin
- body
- angle
- neck
A design that looks strong from the front may appear discontinuous from the oblique view if:
- the chin is too isolated
- the mandibular body is underdeveloped
- the angle is too wide
- the implant edge is abrupt
Part 11: Masculine Skeletal Aesthetics
Masculinity Is Not Simply More Size
Masculine facial skeletal characteristics often include tendencies toward:
- stronger brow projection
- greater upper facial width
- more prominent zygomatic arches
- broader chin
- straighter mandibular borders
- wider or vertically longer jaw angles
- greater overall angularity
However, increasing every region aggressively does not create a natural masculine face.
It can create an exaggerated or artificial one.
The Male Forehead and Brow
A masculine upper face may have:
- a more prominent supraorbital region
- less abrupt forehead convexity
- greater glabellar projection
- stronger lateral brow contours
But the degree must be coordinated with:
- orbital depth
- nasal size
- forehead slope
- temple width
- overall head size
The Male Midface
Masculine midface goals may emphasize:
- zygomatic arch width
- lateral cheek structure
- orbital framing
- less centrally rounded cheek fullness
The desired appearance is often structural rather than simply volumetric.
The Male Lower Face
Common goals include:
- broader chin
- increased jawline width
- stronger jaw angles
- greater vertical angle length
- reduced lower facial taper
The chin, body, and angles should form a unified shape.
Avoiding Overmasculinization
Potential signs of excessive augmentation include:
- overly heavy brow
- excessively deep-set eye appearance
- very wide arches
- block-like chin
- geometric jaw angles
- disproportionate lower-face width
- loss of facial individuality
The goal is not to create a generic “strong male face.”
It is to strengthen the patient’s existing anatomy.
Part 12 Feminine Skeletal Aesthetics
Femininity Is Not Simply Less Bone
Feminine facial aesthetics often favor tendencies toward:
- smoother forehead curvature
- less prominent brow ridges
- open orbital framing
- refined cheek projection
- less mandibular width
- a narrower or more tapered chin
- softer transitions
But many women naturally have strong cheekbones, broad foreheads, or defined jawlines.
Feminine facial enhancement should not be based on erasing skeletal structure.
Female Forehead Aesthetics
A feminine forehead may benefit from:
- smoother convexity
- correction of flatness
- improved upper profile
- blending into the temples
- limited brow projection
A custom forehead implant can sometimes feminize the upper face by creating a more continuous contour rather than by reducing bone.
Female Midface Aesthetics
Cheek augmentation may emphasize:
- controlled anterolateral projection
- smooth lid–cheek transition
- subtle ogee contour
- balance with the lower face
Excessive lateral arch width or overly sharp cheek edges may create an unintended result.
Female Chin and Jaw Aesthetics
Female lower-face goals may include:
- modest chin projection
- improved chin symmetry
- controlled vertical length
- a smoother mandibular border
- preserved taper
- limited jaw-angle widening
Some women prefer a stronger or more angular jaw. Individual goals remain more important than generalized sex-based expectations.
Clinical Pearl
Masculine and feminine design principles are useful starting points, not rigid templates. The patient’s identity and desired appearance should determine how strongly those principles are applied.
Part 13: Facial Symmetry
Perfect Symmetry Does Not Exist
Every face contains asymmetry.
Common causes include:
- developmental differences
- skull-base asymmetry
- unequal jaw growth
- dental relationships
- trauma
- previous surgery
- muscle size differences
- soft-tissue thickness
- habitual expression
Some asymmetries are obvious. Others become visible only after CT analysis.
Skeletal vs. Soft-Tissue Asymmetry
A custom implant can correct skeletal asymmetry.
It cannot completely correct asymmetry caused by:
- facial nerve weakness
- unequal muscle size
- different fat distribution
- skin laxity
- scar contraction
- dental cant
- head posture
The surgeon must identify which portion of the asymmetry is skeletal and which is not.
Mirror-Image Planning
One planning method compares one side of the face with a mirrored version of the other.
This can help demonstrate:
- width differences
- contour deficiencies
- projection differences
- jaw angle height differences
- orbital asymmetry
- skull asymmetry
But the more developed side is not always the ideal side.
A perfectly mirrored face may look unnatural or inconsistent with the patient’s identity.
Correcting One Side or Both
Some asymmetries can be treated with a unilateral implant.
Others require different designs on both sides.
For example:
- one jaw angle may require more width
- both sides may require augmentation, but one side requires more
- the chin may require central repositioning through asymmetric thickness
- the cheek and infraorbital rim may require coordinated correction
Custom design allows each side to be treated independently while maintaining overall continuity.
Why Perfect Symmetry May Be Impossible
Even a perfectly symmetrical skeletal correction may not create a perfectly symmetrical external face because:
- soft tissues differ
- nerves and muscles behave differently
- scars contract unevenly
- the eyes and nose remain asymmetric
- postoperative swelling resolves at different rates
The realistic goal is meaningful improvement.
Part 14: Aging and the Facial Skeleton
Facial Aging Is Not Only a Skin Problem
Aging is commonly described as:
- skin laxity
- fat loss
- tissue descent
- muscle change
But skeletal changes also contribute.
With aging, there may be changes in:
- orbital rim dimensions
- maxillary support
- mandibular contour
- dental and alveolar bone
- chin projection relative to soft tissues
- skeletal support beneath facial compartments
These changes can make preexisting deficiencies more visible.
Skeletal Deficiency and Soft-Tissue Descent
Soft tissues age over the framework beneath them.
When the framework is weak, age-related changes may become more apparent.
Examples include:
- infraorbital deficiency worsening the lid–cheek transition
- maxillary deficiency increasing central facial flattening
- chin retrusion worsening neck definition
- mandibular deficiency reducing lower-face support
- temporal narrowing exaggerating hollowing
Skeletal augmentation cannot stop aging, but it may improve structural support.
Implants and Future Facelift Surgery
Custom implants do not prevent future facelift or neck-lift procedures.
In some patients, skeletal augmentation and soft-tissue lifting are complementary.
The implant improves the foundation.
The lift repositions the soft tissues.
The sequence depends on:
- patient age
- degree of laxity
- implant location
- incision planning
- surgeon preference
- whether both procedures can be performed safely together
Part 15: The Role of CT Imaging
What CT Imaging Shows
A three-dimensional CT scan provides detailed information about:
- skeletal contour
- asymmetry
- bone thickness
- nerve canals
- sinus anatomy
- prior implants
- previous osteotomies
- fixation hardware
- cranial shape
- facial width and projection
This makes CT imaging central to patient-specific implant design.
What CT Imaging Does Not Show Perfectly
CT does not fully predict:
- soft-tissue thickness
- muscle behavior
- smile dynamics
- skin elasticity
- final implant visibility
- patient satisfaction
- the exact external appearance
The scan provides the skeletal map.
The surgeon must interpret how changing that map will affect the visible face.
Bone Measurements
Measurements may include:
- projection deficits
- side-to-side differences
- implant thickness
- facial width
- vertical jaw angle position
- chin deviation
- orbital rim relationships
These measurements improve precision.
But the surgeon must still decide what amount of correction is aesthetically appropriate.
Digital Overlays
Digital planning may use:
- color thickness maps
- mirrored anatomy
- side-to-side comparisons
- transparency views
- profile simulations of the skeleton
- sectional analysis
- multiple design versions
These tools improve communication and design control.
They do not replace artistic judgment.
Part 16: From Analysis to Implant Design
Step 1: Identify the Patient’s Concern
The surgeon begins with what the patient sees and wants to change.
Examples include:
- weak profile
- narrow face
- tired-looking eyes
- poor jawline
- facial asymmetry
- sloping forehead
- flat back of head
Step 2: Identify the Anatomical Cause
The concern may originate from:
- bone
- fat
- muscle
- skin
- dental position
- a combination
Implants are appropriate only when skeletal augmentation addresses the true cause.
Step 3: Analyze the Entire Face
The surgeon evaluates:
- frontal proportions
- profile balance
- oblique contours
- symmetry
- width
- projection
- vertical height
- soft-tissue thickness
- facial identity
Step 4: Decide What Should Not Change
This is one of the most important steps.
The treatment plan should preserve:
- recognizable identity
- successful existing features
- natural transitions
- sex-appropriate or personally desired character
- ethnic and familial traits the patient values
More change is not automatically better.
Step 5: Define the Aesthetic Vectors
The design is broken into separate variables such as:
- forward projection
- lateral width
- vertical length
- angularity
- asymmetry correction
This prevents vague instructions such as “make the jaw stronger.”
Step 6: Create the Digital Implant
The implant is designed with:
- controlled thickness
- anatomical boundaries
- smooth feathering
- nerve clearances
- fixation sites
- insertion strategy
- region-to-region continuity
Step 7: Review the Design
The patient and surgeon may review:
- overall shape
- degree of change
- symmetry correction
- boundaries
- multiple design versions
- areas intentionally left unchanged
The patient should understand that skeletal design images are not exact soft-tissue simulations.
Step 8: Translate the Design Into Surgery
The final result depends on:
- accurate manufacturing
- correct surgical pocket
- precise orientation
- stable fixation
- proper tissue closure
- healing
The digital plan must be executed faithfully.
From Facial Analysis to Custom Implant
Patient concern
↓
Facial photography
↓
Three-dimensional CT
↓
Skeletal diagnosis
↓
Aesthetic vector planning
↓
Digital implant design
↓
Patient and surgeon review
↓
Manufacturing
↓
Surgical placement
Part 17: Common Errors in Facial Skeletal Planning
Treating One View Only
An implant designed only for the profile may be too wide or narrow from the front.
An implant designed only for frontal width may project poorly in the oblique view.
All major views must be considered.
Confusing Width With Projection
A patient asking for “more cheekbone” may want:
- forward cheek projection
- lateral arch width
- infraorbital support
- all three
These are different changes.
Making Every Region Larger
Full-face enhancement should not mean maximum augmentation everywhere.
The goal is coordinated correction.
Using Geometric Shapes
The face is not built from:
- squares
- blocks
- sharp right angles
- uniform thickness
Implants should follow biological contours.
Ignoring Soft-Tissue Thickness
A thick implant beneath thin tissue may show more than a similar implant beneath thicker tissue.
The same skeletal design can produce different external results in different patients.
Ignoring Facial Identity
A technically symmetrical, proportionate result may still feel wrong if it changes the patient’s recognizable character excessively.
Copying Another Person’s Face
An implant design made for one patient cannot simply be transferred to another.
Differences include:
- skull size
- bone shape
- facial width
- nerve location
- soft tissues
- sex
- ethnicity
- personal goals
Assuming AI Can Determine Beauty
Artificial intelligence can analyze patterns and generate design suggestions.
It cannot independently determine which appearance the patient should prefer.
Aesthetic planning remains a human decision informed by anatomy, experience, and patient goals.
Part 18: Frequently Asked Questions
1. What Is Facial Skeletal Aesthetics?
It is the study of how the shape, size, position, and relationships of the facial bones influence appearance.
2. Does Bone Structure Really Affect the Soft Tissues?
Yes.
The facial skeleton supports the overlying muscles, fat, fascia, and skin.
3. Can a Weak Chin Make the Nose Look Larger?
Yes.
A retrusive chin can increase the apparent prominence of the nose in profile.
4. Can Forehead Augmentation Improve the Profile?
Yes.
Increasing forehead projection can improve its relationship with the brow and nose.
5. Are High Cheekbones Always Attractive?
No feature is universally attractive in isolation.
Cheek projection must fit the rest of the face.
6. What Is the Difference Between Cheek Projection and Facial Width?
Cheek projection moves the malar region forward.
Zygomatic arch augmentation increases lateral width.
7. Does a Wider Jaw Always Look More Masculine?
A wider jaw often creates a stronger lower face, but excessive width can appear unnatural or disproportionate.
8. Can a Woman Have a Strong Jawline and Still Look Feminine?
Yes.
Femininity is determined by the total facial pattern, not one isolated feature.
9. What Makes a Chin Look Masculine?
Common characteristics include greater width, stronger corners, and increased projection, but individual preferences vary.
10. What Makes a Chin Look Feminine?
A more tapered width, smoother contour, and controlled projection may create a softer appearance, but there is no universal female chin.
11. Can Custom Implants Improve Facial Symmetry?
Yes.
They can be designed with different thicknesses and contours on each side.
12. Can Facial Symmetry Be Made Perfect?
Usually not.
Soft-tissue and muscular asymmetries limit perfect correction.
13. Is One Side of the Face Normally Larger?
Yes.
Mild side-to-side differences are normal.
14. Should the Smaller Side Always Be Enlarged to Match the Larger Side?
Not necessarily.
The larger side may itself be excessive or aesthetically undesirable.
15. Can Implants Change the Shape of the Face?
Yes.
They can alter width, projection, vertical height, angularity, and regional proportions.
16. Can Implants Make a Round Face Look More Angular?
They may increase skeletal definition, but soft-tissue fullness also influences facial roundness.
17. Can Implants Make a Long Face Look Shorter?
Implants do not physically shorten the face, but strategic changes in width and projection may alter its apparent proportions.
18. Can Implants Make a Narrow Face Wider?
Yes.
Temporal, zygomatic arch, cheek, jawline, or skull implants may increase width in selected regions.
19. Can Implants Improve a Negative Orbital Vector?
Infraorbital and infraorbital-malar implants can improve skeletal support beneath the eyes.
20. Can a Jawline Implant Improve the Neck?
It may improve skeletal definition between the jaw and neck, but it does not remove loose skin or excess fat.
21. Can Facial Implants Prevent Aging?
No.
They do not stop aging, although improved skeletal support may influence how the soft tissues are supported.
22. Do Facial Proportions Change With Age?
Yes.
Soft-tissue changes, dental changes, and skeletal remodeling can alter facial relationships over time.
23. Is the Golden Ratio Useful in Facial Implant Design?
It may provide a conceptual reference but should not be used as a rigid surgical formula.
24. Are Facial Thirds Supposed to Be Exactly Equal?
No.
They are analytical guidelines, not requirements.
25. How Many Millimeters of Augmentation Are Usually Needed?
There is no standard amount.
Even a few millimeters can create a meaningful change, depending on the region.
26. Can a CT Scan Show Exactly How I Will Look?
No.
It shows the skeleton and implant design but does not perfectly predict the final soft-tissue appearance.
27. Can AI Determine My Ideal Facial Proportions?
AI can assist with analysis, but it cannot independently define the patient’s ideal appearance or aesthetic preferences.
28. Is a More Symmetrical Face Always More Attractive?
Not necessarily.
Mild asymmetry can be natural and characteristic.
29. Should Every Deficient Region Be Corrected?
No.
Only the changes that improve the patient’s goals and overall balance should be included.
30. What Is the Most Important Principle of Facial Skeletal Aesthetics?
The most important principle is balance.
Each skeletal change must improve the relationship between facial regions while preserving the patient’s identity.
Key Takeaways
- The facial skeleton is the structural foundation of facial appearance.
- Projection, width, vertical height, angularity, and symmetry are separate design variables.
- Facial attractiveness depends on relationships rather than the size of individual features.
- The upper, middle, and lower face must be evaluated together.
- The frontal, profile, and oblique views reveal different aspects of skeletal balance.
- Forehead shape affects brow and nasal perception.
- Infraorbital support strongly influences under-eye appearance.
- Cheek projection and zygomatic arch width are not the same.
- The chin and mandible should be treated as one continuous lower-face structure.
- Masculine and feminine skeletal patterns overlap and should not be applied as rigid templates.
- Perfect facial symmetry is neither realistic nor always desirable.
- Skeletal deficiencies may become more visible as the face ages.
- CT imaging improves anatomical accuracy but does not independently determine the ideal aesthetic result.
- Measurements and ratios are useful tools, not definitions of beauty.
- The best implant design changes only what is necessary and preserves facial identity.
Final Perspective
Facial skeletal aesthetics is the study of relationships.
It is not the study of the largest chin, widest jaw, highest cheekbone, or strongest brow.
Every facial feature exists within a larger structure.
The forehead affects the nose. The infraorbital rims affect the eyes. The cheeks affect the width and depth of the midface. The chin affects the lips, nose, and neck. The jaw angles affect the relationship between the lower face and cheekbones.
This interconnected anatomy explains why isolated treatment can sometimes produce an incomplete result. It also explains why aggressive full-face enhancement can fail when every region is enlarged without a clear proportional strategy.
The purpose of custom facial implant design is to identify the skeletal changes that improve the whole face.
That may require:
- a small correction in one region
- a continuous implant across several regions
- asymmetric augmentation
- a coordinated upper-, middle-, and lower-face plan
- or no implant at all when the concern is primarily soft tissue
Technology allows the implant to fit the skeleton with remarkable precision.
But technology does not define beauty.
That responsibility remains shared between the patient and surgeon. The patient defines the desired identity, character, and degree of change. The surgeon interprets those goals through anatomy, proportion, surgical limitations, and long-term experience.
When those elements are combined thoughtfully, custom implants do more than enlarge facial bones.
They refine facial architecture.
Dr. Eppley’s Bottom Line
Facial skeletal aesthetics is not about making every feature stronger. It is about understanding how projection, width, height, angularity, and symmetry interact across the entire face. The best custom implant design improves those relationships while preserving the patient’s identity. Beauty is not found in one measurement or mathematical ratio. It is found in the harmony between the parts.
CORNERSTONE ARTICLE #10
The Future of Custom Facial Implants
Artificial Intelligence, Digital Planning, Robotic Surgery, and the Next Generation of Patient-Specific Facial Design
Quick Answer
The future of custom facial implants will be shaped by the increasing integration of:
- artificial intelligence
- three-dimensional imaging
- automated anatomical analysis
- advanced computer-aided design
- additive manufacturing
- augmented reality
- surgical navigation
- robotic assistance
- predictive soft-tissue modeling
- long-term outcome databases
These technologies will make custom implant planning faster, more measurable, and potentially more accurate. Artificial intelligence may identify skeletal asymmetries, suggest implant boundaries, compare design alternatives, predict technical risks, and analyze outcomes across large numbers of patients.
But artificial intelligence will not independently determine what a patient should look like.
Facial implant surgery is not simply a mathematical reconstruction problem. It is an aesthetic process involving identity, proportion, sex-related characteristics, ethnicity, age, soft-tissue behavior, surgical limitations, and personal preference.
The central principle of the next generation of custom implant surgery will therefore be:
Artificial intelligence can improve how an implant is analyzed, designed, manufactured, and placed—but it should assist rather than replace the judgment of the surgeon and the preferences of the patient.
Quick Facts
- Three-dimensional CT-based planning is already central to patient-specific facial implant design.
- Artificial intelligence can assist with anatomical segmentation, measurements, asymmetry analysis, design generation, risk prediction, and outcome assessment.
- AI-generated implant designs should not be accepted without surgeon review.
- A technically perfect bone fit does not guarantee an attractive external facial result.
- Soft-tissue prediction remains more difficult than skeletal modeling.
- Digital simulations are estimates, not promises of the final appearance.
- Future implants may have variable thickness, flexibility, porosity, and surface characteristics within the same device.
- Augmented reality and surgical navigation may help confirm implant position during surgery.
- Robotics may eventually assist with surgical exposure, drilling, fixation, and implant positioning, but autonomous aesthetic implant surgery is not a near-term reality.
- Larger outcome databases may improve design recommendations, but biased or unrepresentative datasets can produce biased recommendations.
- AI-enabled medical technologies require validation, transparency, performance monitoring, and risk management throughout their life cycle. Current FDA and international guidance emphasizes these principles.
- Human aesthetic judgment will remain essential even as technical planning becomes increasingly automated.
Part 1: Understanding the Digital Transformation of Facial Implant Surgery
From Hand Carving to Patient-Specific Design
Traditional facial implants were manufactured in a limited selection of standardized shapes.
The surgeon selected the closest available implant and then attempted to adapt it to the patient by:
- trimming
- carving
- stacking
- bending
- repositioning
- using different sizes on each side
This approach remains useful for selected patients with straightforward anatomical deficiencies.
Its limitation is that the implant begins as a generalized shape rather than as a direct representation of the patient’s anatomy.
Modern custom implant planning reverses that process.
Instead of asking:
“Which existing implant most closely fits this patient?”
The process asks:
“What implant should be created specifically for this patient?”
That change became possible through the integration of:
- Thin-slice CT imaging
- Three-dimensional skeletal reconstruction
- Computer-aided design
- Computer-aided manufacturing
- Patient-specific surgical planning
Virtual surgical planning and CAD/CAM methods are now established across craniomaxillofacial surgery, where they can improve the translation of a three-dimensional plan into a patient-specific guide or implant. Systematic reviews continue to evaluate their effects on accuracy, operative efficiency, and cost.
Artificial intelligence represents the next step in this evolution.
Digital Planning Is Not the Same as Artificial Intelligence
These terms are often used interchangeably, but they do not mean the same thing.
Digital planning
Digital planning means that the implant is designed using computer software.
A human operator may perform every step manually.
Automation
Automation means that software completes a predefined task without requiring the user to perform each individual action.
For example, software may automatically calculate the distance between two anatomical landmarks.
Artificial intelligence
Artificial intelligence generally refers to computer systems that identify patterns, make predictions, classify information, generate content, or recommend actions based on data.
Machine learning
Machine learning is a form of AI in which an algorithm learns relationships from examples rather than being programmed with every rule individually.
Generative AI
Generative AI can produce new outputs such as:
- text
- images
- three-dimensional shapes
- design options
- simulations
In facial implant surgery, a generative system might eventually create several possible implant designs based on a CT scan and specified aesthetic goals.
These technologies can overlap, but simply using a computer to design an implant does not mean AI created it.
The Current Custom Implant Workflow
A contemporary custom implant workflow commonly includes:
- Patient consultation
- Clinical examination
- Standardized photography
- Three-dimensional CT scan
- Segmentation of the facial skeleton
- Identification of anatomical deficiencies
- Digital implant design
- Surgeon review
- Patient review when appropriate
- 10.Design modification
- Final approval
- 12.Manufacturing
- 13.Sterilization
- 14.Surgical placement
- 15.Postoperative evaluation
Artificial intelligence could potentially contribute to almost every step, but its value and reliability will vary across those steps.
Dr. Eppley’s Bottom Line
Custom facial implant surgery was digital before it became artificially intelligent. AI does not replace the existing CT and CAD/CAM process. It adds new analytical and predictive capabilities to it.
The Evolution of Facial Implant Design
Stock implants
↓
Hand-modified implants
↓
CT-based custom implants
↓
AI-assisted design
↓
Predictive and adaptive implant planning
Part 2: What Artificial Intelligence Can Already Do
Automated CT Segmentation
A CT scan contains hundreds or thousands of individual image slices.
To create a three-dimensional facial model, software must distinguish bone from:
- soft tissue
- air
- teeth
- metal
- existing implants
- image noise
This process is known as segmentation.
Traditional segmentation may require considerable manual work, particularly when:
- metal hardware creates artifact
- anatomy is asymmetric
- previous surgery has altered the skeleton
- bone is thin
- an existing implant is present
- the scan quality is limited
AI-assisted segmentation can accelerate this process by identifying anatomical structures automatically.
The benefits may include:
- reduced design time
- improved consistency
- faster generation of three-dimensional models
- easier identification of nerves, sinuses, or defects
- reduced repetitive manual work
But automated segmentation still requires verification.
A software-generated skeletal model may contain errors such as:
- missing thin bone
- false holes
- inaccurate nerve canals
- incomplete orbital rims
- distorted teeth
- incorrect implant boundaries
An error in the anatomical model can become an error in the implant.
Automated Landmark Identification
Facial skeletal analysis often uses anatomical landmarks such as:
- orbital rims
- infraorbital foramina
- mental foramina
- gonial angles
- chin point
- nasal bones
- zygomatic arches
- cranial midline
- mandibular border
- glabella
- frontozygomatic sutures
AI can identify many of these landmarks and calculate:
- distances
- angles
- side-to-side differences
- projection
- width
- vertical position
- deviation from the midline
This may make facial analysis more reproducible.
However, an anatomical landmark does not define an aesthetic goal.
The software may correctly identify the most anterior point of the chin, but it cannot determine solely from that point whether the patient wants:
- more projection
- more width
- more height
- a square shape
- a tapered shape
- no chin change at all
Measurement is not the same as judgment.
Automated Asymmetry Analysis
AI may become particularly valuable in facial asymmetry.
A system can compare:
- right and left orbital rims
- cheek projection
- zygomatic width
- mandibular body shape
- jaw angle position
- chin deviation
- forehead contour
- cranial shape
It can then produce:
- color-coded difference maps
- numerical side-to-side comparisons
- mirrored models
- regional deficiency measurements
- suggested augmentation zones
This is useful because asymmetry often crosses multiple regions.
For example, a patient may have:
- a smaller left cheek
- a narrower left zygomatic arch
- a shorter left mandibular ramus
- a higher left jaw angle
- a chin deviated toward the smaller side
A simple unilateral implant may not fully address that pattern.
AI may help identify how the asymmetry is distributed, but the surgeon must still determine which differences should be corrected and which should be left alone.
Existing Implant Analysis
Revision patients may have:
- silicone implants
- porous polyethylene implants
- PEEK implants
- titanium hardware
- bone cement
- prior osteotomies
- bone erosion
- fixation screws
- overlapping materials
AI may assist with identifying:
- the implant’s dimensions
- its position
- areas of undercorrection
- areas of excessive thickness
- its relationship to nerves
- screw location
- bone remodeling
- asymmetry between implants
This could make revision planning faster and more precise.
The challenge is that materials appear differently on imaging, and metal artifact may obscure surrounding structures. Automated conclusions must therefore be reviewed against the original scan and surgical history.
Clinical Documentation and Patient Education
Large language models can help produce:
- patient education materials
- postoperative instructions
- consultation summaries
- procedure comparisons
- question lists
- design-review explanations
- consent drafts
A systematic review of large language models in oral and maxillofacial surgery found promising performance in education and document generation but variability in complex clinical decision-making and personalized recommendations.
Such systems can improve communication, but they may also:
- provide incorrect information
- omit uncommon risks
- misunderstand the operation
- present generic advice as personalized guidance
- sound confident despite uncertainty
AI-generated medical information requires professional review.
Part 3: Can Artificial Intelligence Design a Custom Facial Implant?
The Technical Answer
Yes, AI can generate a three-dimensional implant shape.
A sufficiently trained system could potentially:
- read the CT scan
- identify the target region
- analyze symmetry
- estimate the skeletal deficiency
- create implant borders
- propose thickness
- taper the edges
- avoid nerve foramina
- suggest screw positions
- produce multiple design options
From an engineering perspective, this is achievable.
The more important question is:
Can AI determine which implant design will create the best aesthetic result for a particular patient?
At present, the answer is no—not without substantial human direction and review.
Bone Fit Is Easier Than Aesthetic Design
There are two different surfaces in a custom facial implant.
The internal surface
The internal surface contacts the bone.
Its purpose is to fit the patient’s anatomy.
This is primarily an engineering problem.
The external surface
The external surface determines the new skeletal contour.
Its purpose is to influence the visible face.
This is an aesthetic and clinical problem.
Software can create an internal surface that closely matches the CT-derived bone.
That does not mean it knows how thick the implant should be externally.
A perfectly fitting implant may still be:
- too large
- too narrow
- too wide
- too angular
- too rounded
- incorrectly extended
- poorly blended
- inconsistent with the patient’s identity
Custom fit does not equal custom aesthetic judgment.
AI Requires an Objective
An AI system cannot generate a meaningful design unless it is given a goal.
Possible goals might include:
- increase chin projection by 5 millimeters
- widen the jaw angles by 7 millimeters
- correct the smaller side to match the larger side
- create a more masculine lower face
- reduce a negative orbital vector
- smooth the forehead profile
- increase head width
- create greater symmetry
Each instruction contains assumptions.
For example:
“Match the smaller side to the larger side”
This assumes the larger side is aesthetically ideal.
It may not be.
“Create a masculine jaw”
There is no single masculine jaw shape.
“Correct the negative orbital vector”
The amount of correction must consider the eyes, cheeks, lower eyelids, and soft tissues.
“Make the face symmetrical”
Perfect skeletal symmetry may produce an unnatural result or fail to correct soft-tissue asymmetry.
AI can optimize toward a goal, but a human must define the right goal.
Training Data and the Definition of an Ideal Result
An AI implant-design system would need examples from which to learn.
Those examples might include:
- CT scans
- implant designs
- preoperative photographs
- postoperative photographs
- patient satisfaction
- surgeon ratings
- complication data
- revision data
But the system would inherit the characteristics of its dataset.
If the training data contain mostly:
- men
- younger patients
- one ethnic group
- large jaw implants
- one surgeon’s design philosophy
- only successful results
- only frontal photographs
the model may perform poorly for other patients.
Recent systematic reviews of AI in cosmetic and maxillofacial surgery describe substantial promise but also repeatedly identify small datasets, single-center studies, limited external validation, heterogeneous methods, and risk of bias as major barriers to clinical translation.
Surgeon-Specific AI Design Systems
One likely future development is not a universal AI facial designer but a surgeon-specific design assistant.
Such a system could learn from:
- the surgeon’s prior implant designs
- preferred border extensions
- commonly selected thicknesses
- revision patterns
- postoperative results
- patient feedback
- regional design philosophies
The AI might then say:
“For a patient with this anatomy and these goals, previous designs by this surgeon used approximately this range of projection and these anatomical boundaries.”
This could improve efficiency while preserving a consistent surgical philosophy.
But it would also risk repeating the surgeon’s past errors unless revision data and long-term outcomes were included.
The Most Appropriate Near-Term Model
The safest near-term system is likely:
AI proposes
Surgeon evaluates
Patient provides preferences
Engineer refines
Surgeon approves
This is different from:
AI designs
Manufacturer produces
Surgeon simply inserts
The latter gives too much authority to a system that cannot fully understand the patient’s aesthetic priorities or the surgical realities of placement.
Dr. Eppley’s Bottom Line
AI may generate an implant design, but it cannot assume responsibility for the aesthetic decision. The surgeon must remain the final designer because the external implant surface represents a clinical judgment, not merely a calculation.
AI can calculate the fit more easily than it can determine the ideal appearance.
Part 4: AI and Facial Aesthetic Analysis
Measuring Facial Proportions
AI can measure:
- facial thirds
- facial fifths
- cheek-to-jaw width
- chin-to-mouth width
- brow projection
- orbital vector
- facial convexity
- mandibular angles
- chin deviation
- forehead slope
- left-right asymmetry
This can make analysis more detailed and consistent.
It may also allow comparisons between:
- the patient’s present anatomy
- several potential implant designs
- population reference ranges
- prior surgical outcomes
- the patient’s own preferred images
But the use of population averages must be approached cautiously.
An average is not necessarily attractive.
It is also not necessarily appropriate for the individual patient.
AI-Based Masculinization and Feminization
AI could analyze characteristics commonly associated with masculine or feminine facial patterns.
For example, it may identify tendencies involving:
- forehead slope
- brow prominence
- cheek projection
- zygomatic width
- chin width
- jaw angle width
- mandibular height
- facial taper
It may then suggest modifications consistent with the requested direction.
The danger is that such systems may convert broad population tendencies into rigid stereotypes.
A male patient may prefer a narrow jaw.
A female patient may prefer a strong chin.
A nonbinary patient may want a mixture of characteristics.
A patient may want greater skeletal definition without being categorized into a conventional male or female template.
AI should therefore describe design variables rather than prescribe identity.
Aesthetic Preference Learning
Future systems may ask patients to choose between paired images:
- narrower versus wider jaw
- stronger versus softer brow
- more versus less chin projection
- anterior versus lateral cheek emphasis
- square versus tapered lower face
After multiple choices, the software could estimate the patient’s preferences.
This may improve communication because many patients find it difficult to describe shape verbally.
However, image-based preference testing has limitations:
- the examples may not resemble the patient
- lighting changes perception
- images may contain soft-tissue differences unrelated to bone
- preferences may change when applied to the patient’s own face
- patients may favor exaggerated simulations that do not translate naturally
Preference learning could be helpful, but it should begin a discussion rather than end one.
Can AI Measure Attractiveness?
AI can be trained to predict how a group of raters might score an image.
That does not mean it has discovered an objective measure of beauty.
Attractiveness scores are influenced by:
- culture
- age
- ethnicity
- fashion
- sexual dimorphism
- image quality
- expression
- hairstyle
- skin quality
- rater demographics
- social bias
A system trained to maximize attractiveness ratings might unintentionally:
- homogenize faces
- reduce ethnic characteristics
- exaggerate fashionable features
- undervalue atypical facial structures
- encourage unnecessary surgery
The purpose of facial implant planning should not be to generate the highest algorithmic beauty score.
It should be to help the patient achieve a realistic facial change consistent with their own identity and goals.
Part 5: Predicting the Soft-Tissue Result
The Central Prediction Problem
The implant is designed on bone, but the patient sees the skin.
This creates one of the most difficult problems in facial implant planning:
How will a specific skeletal change alter the external soft tissues?
The answer depends on:
- skin thickness
- fat thickness
- muscle position
- fascia
- scar tissue
- tissue elasticity
- implant location
- implant size
- previous surgery
- age
- sex
- ethnicity
- facial expression
- gravity
- postoperative swelling
A 5-millimeter implant does not necessarily produce a 5-millimeter visible change.
Why One-to-One Prediction Does Not Work
The external response varies by region.
Chin
A change in skeletal projection may be transmitted relatively directly through the chin pad, but the result is influenced by soft-tissue thickness and muscle attachment.
Jawline
Skeletal width may be partially concealed by:
- masseter muscle
- subcutaneous fat
- skin thickness
- neck tissues
Cheek
Projection may influence:
- the cheek mound
- lower eyelid
- tear trough
- nasolabial fold
- shadow patterns
Forehead
The scalp and forehead tissues may closely follow a smooth implant, but brow position and muscle activity affect the visible result.
Skull
Scalp thickness can vary substantially across the implant surface.
A single conversion formula cannot accurately predict every region.
Finite Element Modeling
One method of prediction uses finite element analysis.
In simplified terms, the face is converted into a digital model containing tissue layers with estimated mechanical properties.
The computer then calculates how those tissues may deform when the skeleton is changed.
This approach is promising but limited by the difficulty of assigning accurate properties to:
- living skin
- fat
- muscle
- scar tissue
- fascia
- ligaments
Living tissues also change through swelling, healing, and biological adaptation—processes that are difficult to model precisely.
Machine-Learning Prediction
Machine learning offers another approach.
A model could learn from large numbers of patients who have:
- preoperative CT scans
- implant design files
- standardized preoperative photographs
- standardized postoperative photographs
- long-term follow-up
- known surgical techniques
The system could then estimate the likely external response to a proposed implant.
Published AI studies in oral and maxillofacial cosmetic surgery have reported promising soft-tissue prediction performance in selected settings, but reviews emphasize that much of the available evidence remains retrospective and methodologically limited.
The Problem of Postoperative Timing
A prediction model must know what time point it is predicting.
The face at:
- two weeks
- six weeks
- three months
- six months
- one year
may look different.
A model trained on photographs taken at inconsistent postoperative times may confuse residual swelling with the permanent result.
Reliable prediction requires standardized long-term data.
Simulation Should Be Presented as a Range
A responsible simulation should show:
- expected direction of change
- approximate magnitude
- potential range
- areas of uncertainty
It should not imply:
“This is exactly how you will look.”
A simulation is an educational tool.
It is not a contractual guarantee.
From Bone Change to Visible Facial Change
Custom implant
↓
Muscle and fascia
↓
Fat and soft tissue
↓
Skin
↓
Visible facial result
Part 6: Generative Design and Implant Optimization
What Is Generative Design?
Generative design allows software to produce multiple solutions based on defined objectives and constraints.
For a custom facial implant, those constraints might include:
- avoid the mental nerve
- maintain a minimum edge thickness
- fit through a specified incision
- provide a chosen amount of projection
- permit screw fixation
- minimize implant volume
- avoid sinus penetration
- maintain smooth transitions
- remain below a maximum thickness
- preserve muscle attachments
The software could then generate several implant options.
Multiple Design Alternatives
Instead of producing one implant, future systems may present:
Design A: Conservative
- subtle projection
- smaller footprint
- minimal change
Design B: Moderate
- balanced augmentation
- broader regional correction
- stronger transitions
Design C: Strong
- greater width
- greater projection
- more angular contours
The surgeon and patient could compare the options.
This may be more useful than discussing isolated millimeter measurements because it shows how several dimensions interact.
Topology Optimization
Topology optimization determines where material is structurally necessary and where it can be removed.
This technique is widely used in engineering and may allow implants to become:
- lighter
- thinner
- stronger in selected regions
- more flexible during insertion
- more rigid around fixation sites
A skull or facial implant might have:
- a solid border
- an internal lattice
- reinforced screw zones
- flexible transition zones
- reduced material in low-stress areas
Variable Stiffness
Most current implants have relatively consistent material properties throughout their structure.
Future implants may be designed with:
- firm fixation zones
- flexible insertion zones
- softer feathered edges
- rigid load-bearing sections
- porous integration zones
This could combine properties that currently require different materials.
Implant Insertion Simulation
Design software may eventually test whether the implant can physically pass through the planned incision and surgical pathway.
A virtual insertion simulation could assess:
- necessary implant bending
- incision length
- risk of tearing
- collision with bone
- nerve clearance
- whether a multi-piece design is needed
- the best orientation for insertion
This would link design more directly to operative feasibility.
A design that looks excellent on the computer is not useful if it cannot be inserted safely.
Automatic Fixation Planning
AI may suggest screw locations based on:
- bone thickness
- nerve canals
- tooth roots
- sinus cavities
- implant forces
- incision access
- screwdriver trajectory
The system could warn:
- screw is too close to a nerve
- bone is too thin
- screw angle is inaccessible
- fixation is inadequate
- implant may rotate around a single screw
This could improve planning, but the surgeon must confirm that the proposed fixation can actually be reached during the operation.
Part 7: The Future of Implant Manufacturing
Additive Manufacturing
Three-dimensional printing builds an object layer by layer.
It allows the creation of:
- complex curves
- internal lattices
- controlled porosity
- hollow structures
- integrated fixation features
- patient-specific contours
PEEK and titanium are major areas of additive-manufacturing research, while custom silicone manufacturing often uses different molding or indirect production methods.
Directly Printed Silicone
Direct three-dimensional printing of medical-grade silicone remains more technically challenging than printing rigid thermoplastics or metals.
Challenges include:
- controlling viscosity
- maintaining dimensional accuracy
- curing
- supporting complex shapes during printing
- achieving consistent mechanical properties
- sterilization
- regulatory validation
As these methods improve, directly printed silicone implants may allow:
- internal structures
- variable flexibility
- more complex perforations
- region-specific firmness
- shorter manufacturing times
Hybrid Materials
A future implant could combine:
- silicone-like flexibility
- PEEK-like rigidity at fixation zones
- porous tissue-contact surfaces
- smooth external borders
- antibacterial coatings
- embedded radiographic markers
Hybrid construction may allow the implant to be customized not only in shape but also in behavior.
Smart Implants
The term “smart implant” may eventually describe implants containing sensors that monitor:
- pressure
- temperature
- motion
- fluid accumulation
- tissue oxygenation
- local inflammation
In theory, such sensors could help detect:
- hematoma
- seroma
- infection
- excessive pressure
- implant movement
But implantable electronics introduce major concerns involving:
- power supply
- device durability
- data transmission
- cybersecurity
- false alarms
- cost
- removability
- regulation
This technology may be more relevant initially to complex reconstructive implants than routine cosmetic augmentation.
Antibacterial Surfaces
Future implants may incorporate surfaces designed to reduce bacterial attachment or biofilm formation.
Potential strategies include:
- antimicrobial coatings
- antibiotic-releasing surfaces
- silver-containing materials
- microtextured bacterial-resistant patterns
- localized drug delivery
A major challenge is maintaining long-term safety without:
- damaging surrounding cells
- creating bacterial resistance
- weakening the implant
- impairing tissue healing
An infection-resistant implant would be valuable, but no surface is likely to eliminate the importance of sterile technique, tissue coverage, and wound healing.
Faster Manufacturing
Current custom implant manufacturing requires time for:
- design
- approval
- fabrication
- quality control
- sterilization
- shipping
AI-assisted design and automated manufacturing may shorten this process.
Future workflows may allow:
- same-week production
- local hospital manufacturing
- regional manufacturing hubs
- rapid replacement implants
- emergency reconstructive implants
Speed should not come at the expense of design review or quality assurance.
Part 8: Augmented Reality and Virtual Reality
Virtual Reality Planning
Virtual reality could allow the surgeon to inspect the patient’s three-dimensional anatomy at full scale.
The surgeon might:
- walk around the skeletal model
- enlarge specific regions
- remove existing implants virtually
- examine nerve pathways
- compare implant designs
- evaluate the profile from multiple angles
- simulate surgical access
This may be especially useful for complex:
- orbital implants
- midface mask implants
- cranial implants
- asymmetry correction
- revision surgery
Patient Design Review in Virtual Reality
Patients may eventually review proposed skeletal changes in an immersive environment.
They could compare:
- conservative versus stronger designs
- one implant region versus several
- greater chin width versus greater projection
- cheek versus zygomatic arch augmentation
- forehead-only versus forehead-temporal correction
This could improve understanding.
However, a highly realistic simulation may also create excessive confidence in a predicted outcome.
The patient must understand that the virtual model represents a plan, not a guaranteed biological result.
Augmented Reality During Surgery
Augmented reality overlays digital information onto the real surgical field.
The surgeon might wear a headset or view a screen displaying:
- implant boundaries
- planned screw locations
- nerve positions
- bone thickness
- planned pocket limits
- symmetry references
This could be helpful when much of the implant pocket is created through a limited incision.
The Registration Problem
For augmented reality to be accurate, the virtual model must be aligned precisely with the patient.
This is called registration.
Even a small registration error could cause the overlay to show:
- a nerve in the wrong location
- an incorrect implant border
- an inaccurate screw site
Sources of error include:
- head movement
- soft-tissue displacement
- tracker movement
- image distortion
- changes in patient position
Augmented reality should therefore complement direct anatomy rather than replace it.
Part 9: Surgical Navigation
What Is Surgical Navigation?
Surgical navigation functions like a three-dimensional positioning system.
The surgeon uses a tracked instrument, and the computer shows its location relative to the preoperative CT scan.
Navigation is already used in areas such as:
- neurosurgery
- sinus surgery
- orbital surgery
- craniofacial reconstruction
- selected maxillofacial procedures
Navigation in Custom Implant Placement
Navigation could help confirm:
- implant height
- side-to-side symmetry
- posterior extension
- orbital rim position
- screw trajectory
- relationship to nerves
- whether the implant is fully seated
This may be particularly valuable when the implant cannot be seen completely through the incision.
Navigation Does Not Guarantee Seating
A navigation system may show that an implant is near the planned location.
It cannot always detect:
- trapped soft tissue
- an implant folded underneath itself
- a small gap between implant and bone
- incorrect screw tension
- soft-tissue compression
- a subtle rotational error
The surgeon must still:
- expose the anatomy adequately
- palpate the implant
- confirm border position
- assess stability
- inspect the surgical pocket
Intraoperative Imaging
Future operating rooms may combine navigation with:
- cone-beam CT
- intraoperative CT
- three-dimensional fluoroscopy
- surface scanning
After implant placement, imaging could verify:
- position
- symmetry
- fixation
- seating
- nerve clearance
The disadvantage is additional:
- time
- radiation
- expense
- equipment
- workflow complexity
It is likely to be most valuable in complex reconstruction or difficult revision cases rather than every cosmetic implant procedure.
Part 10: Robotics and Custom Facial Implant Surgery
What Could a Robot Do?
Robotic assistance might eventually help with:
- precise drilling
- screw placement
- bone preparation
- limited-incision dissection
- implant positioning
- endoscopic visualization
- symmetrical fixation
- repetitive measurements
Robots are particularly effective when a task requires:
- stable positioning
- repeatable motion
- predetermined trajectories
- submillimeter mechanical control
What Is Difficult to Automate?
Facial implant surgery also requires:
- feeling tissue resistance
- recognizing scar tissue
- protecting nerves
- adapting to unexpected anatomy
- controlling bleeding
- evaluating muscle position
- deciding whether the pocket is adequate
- modifying the plan during surgery
- judging soft-tissue tension
- responding to a complication
These tasks depend on experience, tactile feedback, and situational judgment.
Autonomous Surgery Is Unlikely in the Near Term
A robot may assist the surgeon, but fully autonomous cosmetic implant surgery presents substantial challenges.
An autonomous system would need to:
- interpret anatomy
- create the pocket
- protect nerves
- respond to bleeding
- handle variable tissue
- position the implant
- judge tension
- choose fixation
- recognize when the original plan should be abandoned
The technical and ethical barriers are considerable.
The more likely model is:
Robot-assisted, surgeon-controlled surgery
rather than:
Robot-performed surgery without direct surgeon control
The Importance of Conversion to Manual Surgery
Any robotic system must allow immediate conversion to conventional surgery.
The surgeon must remain capable of completing the operation if:
- tracking fails
- software crashes
- anatomy differs from the scan
- bleeding obscures the field
- the implant does not fit
- the robotic instrument cannot reach the target
- an emergency occurs
Technology must expand surgical capability without creating dependence that reduces basic surgical competence.
Part 11: I in the Operating Room
Real-Time Surgical Assistance
AI may eventually analyze intraoperative video and identify:
- nerves
- blood vessels
- implant borders
- surgical instruments
- areas of inadequate dissection
- deviations from the plan
It might provide warnings such as:
- “The instrument is approaching the mental nerve.”
- “The implant is rotated relative to the planned position.”
- “The left side is positioned lower than the right.”
- “The screw trajectory is approaching a tooth root.”
Automated Surgical Checklists
AI could verify that important steps have been completed:
- correct implant and patient
- correct side
- implant integrity
- planned screw availability
- antibiotic administration
- nerve location reviewed
- implant seated
- fixation confirmed
- counts completed
This may reduce preventable workflow errors.
Real-Time Symmetry Assessment
A surface scanner could compare both sides of the face during surgery.
This might be useful in:
- jaw angle augmentation
- cheek augmentation
- forehead asymmetry correction
- skull reshaping
- implant revision
But intraoperative swelling and patient positioning distort soft-tissue symmetry.
The system would need to distinguish:
- implant-related asymmetry
- preexisting soft-tissue asymmetry
- swelling
- head rotation
- lighting artifact
Part 12: Outcome Databases and Learning From Every Patient
The Missing Link in Custom Implant Design
A custom implant is designed digitally, but the long-term result is often not returned to the design system in a structured form.
A complete learning system would connect:
- Preoperative anatomy
- Implant design
- Surgical technique
- Postoperative imaging
- Standardized photographs
- Patient satisfaction
- Complications
- Revisions
- Long-term results
This would allow future designs to learn from previous cases.
Measuring More Than Satisfaction
Outcome data might include:
- objective symmetry
- implant position
- contour accuracy
- nerve symptoms
- infection
- revision
- palpability
- patient-reported satisfaction
- identity preservation
- social confidence
- whether the result met the requested degree of change
A patient may be medically complication-free but aesthetically dissatisfied.
Another may have a small measurable asymmetry but be highly satisfied.
Both outcomes matter.
Learning From Revisions
Revision surgery provides some of the most valuable design information.
A database should record:
- why the implant was revised
- which region was too large
- which region was too small
- whether borders were visible
- whether the implant moved
- whether the patient changed goals
- whether the new design solved the problem
An AI system trained only on primary implant designs would miss these lessons.
The Risk of Self-Reinforcing Design
A system may learn that a certain implant shape is commonly used.
It may then recommend that shape more frequently.
As more surgeons accept the recommendation, the database contains even more examples of the same shape.
This can create a self-reinforcing cycle in which common designs become more common—not because they are best, but because they are already common.
Outcome data and revision data are needed to prevent popularity from being mistaken for quality.
Part 13: Bias in Artificial Intelligence
What Is Algorithmic Bias?
Algorithmic bias occurs when a system performs differently or produces systematically different recommendations across patient groups.
Bias may originate from:
- unrepresentative training data
- inaccurate labels
- subjective aesthetic ratings
- photography differences
- socioeconomic differences
- selection of only successful cases
- exclusion of revision patients
- cultural assumptions
- surgeon preference
Ethnic and Racial Bias
Facial anatomy and aesthetic preferences vary widely.
A system trained predominantly on one population may recommend changes that:
- reduce ethnic facial characteristics
- apply inappropriate proportional standards
- overcorrect normal anatomical differences
- classify diversity as deficiency
AI should not be used to normalize every face toward a single population average.
Sex and Gender Bias
A system may assume:
- men want wider jaws
- women want narrower jaws
- masculine means angular
- feminine means soft
These may be common tendencies, but they are not universal goals.
The patient’s requested appearance should override generalized demographic assumptions.
Age Bias
A system trained on younger patients may underestimate:
- skin laxity
- soft-tissue descent
- bone remodeling
- scar behavior
- need for combined lifting procedures
A design appropriate for a 25-year-old may not produce the same external result in a 65-year-old.
Bias From Online Images
Training an aesthetic model on internet photographs is particularly problematic.
Online images may be:
- filtered
- edited
- posed
- professionally lit
- selected for popularity
- mislabeled
- altered by prior surgery
- unrepresentative of normal anatomy
Popularity on social media should not become the standard for facial implant design.
Regulatory Emphasis on Bias and Transparency
Current FDA guidance for AI-enabled medical devices emphasizes lifecycle risk management, transparency, representative data, performance evaluation, and the need to address bias. International good machine-learning principles similarly stress that datasets should represent the intended population and that deployed performance should be monitored.
Part 14: Privacy, Ownership, and Cybersecurity
The Sensitivity of Facial Data
Custom implant planning may involve:
- facial photographs
- CT scans
- dental information
- medical history
- biometric facial geometry
- implant design files
- postoperative images
- patient preferences
This information is highly personal.
A three-dimensional facial scan may function as a biometric identifier.
Who Owns the Implant Design?
Possible stakeholders include:
- the patient
- the surgeon
- the hospital
- the design engineer
- the software company
- the implant manufacturer
Questions may arise about:
- access to the design file
- reuse of design features
- retention of the file
- use for AI training
- transfer to another surgeon
- manufacturing replacements
These issues should be addressed clearly in consent and data-use agreements.
Can Patient Data Be Used to Train AI?
Patient data should not be used casually.
Appropriate safeguards may include:
- informed consent
- de-identification
- secure storage
- access controls
- defined retention periods
- restrictions on commercial reuse
- oversight of data-sharing agreements
Even de-identified facial data may be difficult to anonymize completely because the anatomy itself is unique.
Cybersecurity
An implant design file could theoretically be:
- altered
- corrupted
- substituted
- accessed without authorization
- attached to the wrong patient
- intercepted during transfer
Cybersecurity is therefore not only an information issue.
It can become a physical patient-safety issue.
FDA-recognized risk-management and cybersecurity frameworks increasingly address risks unique to machine-learning-enabled devices, including risks related to data, model development, deployment, maintenance, and security.
Design Verification
Before manufacturing, the system should verify:
- patient identity
- scan identity
- correct anatomical side
- design version
- surgeon approval
- file integrity
- manufacturing specifications
A secure digital signature or version-control process may become standard.
Part 15: Regulation and Validation
AI Does Not Escape Medical Device Regulation
Software that influences medical diagnosis, treatment planning, or device design may fall within medical-device regulatory frameworks depending on its function and jurisdiction.
The degree of oversight depends on:
- intended use
- level of risk
- whether the software provides recommendations
- whether the clinician can independently review the basis
- whether the software directly controls manufacturing
- whether the algorithm changes after deployment
The FDA has issued both draft and final guidance addressing AI-enabled device software, including lifecycle management and predetermined change-control plans.
Validation Questions
An AI implant-design system should be tested for:
- anatomical accuracy
- segmentation accuracy
- design consistency
- performance across demographic groups
- handling of unusual anatomy
- handling of existing implants
- revision cases
- poor-quality scans
- hardware artifact
- failure detection
- reproducibility
- clinical outcomes
External Validation
A system trained and tested within one institution may perform well only because:
- the scans use the same machine
- surgeons follow the same technique
- patient selection is similar
- photographs are standardized
- engineers follow the same workflow
External validation asks whether the system works in different:
- hospitals
- countries
- patient populations
- scanners
- software environments
- surgical practices
Without external validation, reported accuracy may not generalize.
Performance Drift
AI performance may change over time because:
- patient populations change
- scan protocols change
- software is updated
- manufacturing methods change
- user behavior changes
- new implant designs are introduced
This is called performance drift.
AI-enabled systems therefore require ongoing monitoring rather than one-time validation. FDA lifecycle guidance emphasizes postmarket performance monitoring and management of model changes.
Explainability
The surgeon should be able to understand why the system recommended:
- a certain implant thickness
- a particular border
- asymmetric augmentation
- a screw location
- a risk warning
A system that produces a design without explaining its basis may be difficult to evaluate safely.
The more influential the recommendation, the more important transparency becomes.
Part 16: The Role of the Surgeon in an AI-Assisted Future
The Surgeon as Diagnostician
The surgeon determines whether the concern is caused by:
- bone
- fat
- muscle
- skin
- dental position
- nerve dysfunction
- a combination
AI may identify a small chin, but it may not recognize that the patient’s main concern is actually:
- chin pad ptosis
- submental fat
- lower-lip imbalance
- malocclusion
- unrealistic expectations
Diagnosis comes before design.
The Surgeon as Aesthetic Interpreter
Patients rarely arrive with an engineering specification.
They say:
- “I want a stronger jaw.”
- “I want to look less tired.”
- “I want a more masculine face.”
- “I want better symmetry.”
- “I do not want to look overdone.”
- “I want my profile improved.”
The surgeon must translate these goals into:
- anatomical regions
- directional changes
- millimeter ranges
- implant boundaries
- realistic limitations
This interpretive function is difficult to automate.
The Surgeon as Designer
Even when an engineer or AI system creates the digital model, the surgeon remains responsible for determining:
- which regions should be augmented
- which should remain unchanged
- implant thickness
- transition zones
- degree of asymmetry correction
- fixation
- surgical access
- revision potential
The surgeon should not become a passive approver of computer-generated designs.
The Surgeon as Operator
A perfect plan can still fail through:
- incorrect pocket creation
- incomplete implant seating
- malposition
- nerve injury
- contamination
- poor fixation
- inadequate closure
Digital planning does not eliminate the need for surgical skill.
The Surgeon as Long-Term Reviewer
The surgeon must assess:
- implant position
- healing
- sensory recovery
- soft-tissue adaptation
- aesthetic success
- complications
- whether the design achieved its intended effect
These outcomes should guide future planning.
Human Accountability
When an AI recommendation contributes to a surgical plan, responsibility cannot be delegated to the algorithm.
The surgeon must ask:
- Does this recommendation make anatomical sense?
- Does it fit the patient’s goals?
- Can it be performed safely?
- Can the implant be inserted?
- Are the borders appropriate?
- Is the proposed change too aggressive?
- What happens if the software is wrong?
AI can assist decision-making.
It cannot assume professional accountability.
Part 17: The Role of the Patient
Patients Will Have Greater Design Participation
Future planning systems may allow patients to compare multiple designs more clearly.
They may be able to select preferences involving:
- subtle versus strong change
- width versus projection
- angular versus smooth contours
- isolated versus full-face treatment
- greater symmetry versus preservation of natural differences
This may improve communication.
Patient Approval Has Limits
Patients should participate in defining aesthetic goals.
They should not be expected to independently determine:
- safe nerve clearances
- implant thickness near thin tissues
- fixation strategy
- surgical access
- maximum practical size
- material requirements
The design process is collaborative, not consumer-directed manufacturing.
Simulation Literacy
Patients will need to understand:
- simulations are estimates
- skeletal images do not equal final appearance
- AI-generated images may be unrealistic
- swelling and healing are not shown
- exact symmetry is not guaranteed
- soft tissues may respond differently than predicted
The more realistic simulations become, the more important these warnings will be.
Avoiding Design Shopping
Patients may be tempted to request repeated design changes based on:
- social-media photographs
- celebrity images
- AI-generated faces
- different lighting
- daily preference changes
Too many design iterations can create confusion rather than clarity.
A successful process requires a stable definition of:
- what the patient wants changed
- what should remain unchanged
- how strong the change should be
- what risks are acceptable
Part 18: Potential Benefits of AI-Assisted Implant Surgery
AI may provide meaningful benefits in several areas.
Faster Planning
Automated segmentation and measurements may shorten design time.
Better Detection of Asymmetry
Subtle three-dimensional differences may be identified more consistently.
More Design Options
Software may generate several alternatives quickly.
Improved Surgical Planning
Insertion, fixation, and nerve clearance may be tested virtually.
More Consistent Documentation
Design decisions and changes may be recorded automatically.
Better Outcome Analysis
Preoperative and postoperative anatomy may be compared objectively.
Improved Revision Planning
Existing implants and deficiencies may be mapped in detail.
Greater Patient Understanding
Interactive visualization may make complex anatomy easier to understand.
Population-Level Learning
Large databases may reveal patterns that individual surgeons cannot detect from personal experience alone.
Part 19: Potential Risks of AI-Assisted Implant Surgery
False Precision
A computer model may display measurements to tenths of a millimeter.
That does not mean the biological result is predictable to that level.
Automation Bias
Surgeons may overtrust the system because it appears sophisticated.
A recommendation can be incorrect even when presented confidently.
Loss of Individuality
Models trained on averages may produce standardized facial shapes.
Dataset Bias
Recommendations may be less accurate for underrepresented patients.
Unrealistic Simulations
Patients may interpret generated images as promises.
Design Overcomplexity
The ability to create highly elaborate implants may encourage unnecessary complexity.
Technology Dependence
Surgical teams may lose manual planning skills.
Cybersecurity Failure
Corrupted or altered files may create physical risk.
Unclear Responsibility
Errors may involve the surgeon, engineer, software developer, or manufacturer.
Commercial Influence
Software may promote:
- larger implants
- more regions
- proprietary materials
- additional procedures
Recommendations should be based on clinical need rather than sales incentives.
Part 20: What AI Should Never Be Allowed to Decide Alone
AI should not independently decide:
- whether a patient should have surgery
- whether the patient has realistic expectations
- what the patient’s identity should look like
- which ethnicity-specific traits should be changed
- how masculine or feminine the patient should appear
- whether a larger implant is aesthetically better
- whether a complication can be ignored
- whether a surgeon can safely perform the operation
- whether informed consent has been achieved
These decisions require human communication, ethics, judgment, and accountability.
Part 21: The Likely Custom Implant Workflow of the Future
A future workflow may look like this:
Step 1: Multimodal Patient Capture
The patient undergoes:
- low-dose three-dimensional CT
- three-dimensional surface photography
- standardized video
- dental scanning when needed
- soft-tissue thickness mapping
Step 2: Automated Anatomical Analysis
AI identifies:
- skeletal landmarks
- asymmetry
- nerve canals
- sinus boundaries
- prior implants
- facial proportions
- potential treatment regions
Step 3: Patient Preference Mapping
The patient selects among examples showing:
- degree of projection
- width
- angularity
- regional emphasis
- masculine, feminine, neutral, or individualized traits
Step 4: AI-Generated Design Options
The software creates several implants that satisfy:
- anatomical constraints
- patient preferences
- surgeon-specific design principles
- surgical access limitations
Step 5: Surgeon Review
The surgeon modifies:
- thickness
- borders
- transitions
- symmetry
- screw sites
- implant segmentation
- insertion strategy
Step 6: Soft-Tissue Prediction
The system estimates the likely visible result and displays a range of outcomes rather than one guaranteed image.
Step 7: Virtual Surgical Simulation
The software tests:
- pocket creation
- implant insertion
- nerve clearance
- fixation
- collision with existing anatomy
Step 8: Secure Manufacturing
The approved design is:
- digitally signed
- version locked
- manufactured
- quality checked
- sterilized
Step 9: Navigated Surgical Placement
Augmented reality or navigation assists with:
- orientation
- seating
- fixation
- symmetry
Step 10: Outcome Capture
Postoperative photographs and imaging are compared with:
- the planned implant position
- predicted soft-tissue change
- patient goals
Step 11: Continuous Learning
De-identified outcome and revision data improve future design recommendations—when the patient has appropriately consented to that use.
The AI-Assisted Custom Implant Workflow
3D CT + Surface Scan
↓
Automated Anatomical Analysis
↓
Patient Preference Mapping
↓
AI Design Options
↓
Surgeon Modification
↓
Soft-Tissue Prediction
↓
Virtual Surgical Simulation
↓
Manufacturing
↓
Navigated Placement
↓
Outcome Analysis
Part 22: Frequently Asked Questions
1. Can Artificial Intelligence Design My Custom Facial Implant?
AI can generate a proposed implant shape, but the design should be reviewed and modified by an experienced surgeon.
2. Is AI Already Used in Custom Facial Implant Surgery?
AI-assisted imaging, segmentation, measurements, prediction, and planning tools are increasingly being developed and used across medical imaging and craniofacial surgery. Their role in purely aesthetic custom implant design remains evolving.
3. Can I Just Let AI Decide What Implant I Need?
No.
The correct implant depends on clinical diagnosis, soft-tissue examination, surgical feasibility, and your personal goals.
4. Can AI Tell Me Which Part of My Face Is Deficient?
It may identify differences from symmetry or reference measurements, but a difference is not automatically a deficiency requiring treatment.
5. Can AI Determine My Ideal Face?
No.
There is no single objectively ideal face, and personal identity cannot be reduced to an algorithm.
6. Can AI Make My Face Perfectly Symmetrical?
It may help design more symmetrical skeletal contours, but soft tissues, muscles, eyes, nose, and healing can remain asymmetric.
7. Can AI Predict Exactly How I Will Look?
No.
Soft-tissue simulations are estimates and cannot account perfectly for healing, swelling, scar tissue, muscle activity, and individual biological variation.
8. Is an AI Simulation a Guarantee?
No.
It should be viewed as a communication tool rather than a promised result.
9. Is AI Better Than a Human Implant Designer?
AI may be faster at measurements and pattern recognition.
A skilled surgeon remains better positioned to integrate anatomy, aesthetics, patient preference, surgical access, and long-term consequences.
10. Will AI Replace Implant Design Engineers?
AI may automate repetitive engineering tasks, but engineers will remain important for model verification, manufacturability, quality control, and complex design refinement.
11. Will AI Replace Facial Implant Surgeons?
No foreseeable technology eliminates the need for diagnosis, judgment, surgical skill, complication management, and professional accountability.
12. Can AI Decide How Masculine My Face Should Be?
No.
It can demonstrate possible changes, but the desired degree and type of masculinity are personal decisions.
13. Can AI Design a Feminine Facial Implant?
It can generate designs based on selected characteristics, but the surgeon and patient must determine which characteristics are appropriate.
14. Can AI Correct Facial Asymmetry Better?
AI may quantify asymmetry more accurately, but the surgeon must decide how much correction is desirable and surgically achievable.
15. Can AI Analyze an Existing Implant?
Potentially, yes.
It may help identify implant position, thickness, screw location, asymmetry, and surrounding bone changes.
16. Can AI Help With Revision Surgery?
Yes.
Revision planning may benefit from automated analysis of prior implants, bone remodeling, asymmetry, and alternative replacement designs.
17. Can AI Determine Whether My Implant Is Too Large?
It may compare the implant with measurements or outcome databases, but whether it appears too large is ultimately an aesthetic and personal judgment.
18. Can AI Select the Best Implant Material?
It may compare material properties with the surgical requirements, but the surgeon and manufacturer must make the final selection.
19. Can AI Choose Screw Locations?
It may suggest safe fixation sites based on bone thickness and nearby anatomy, but the surgeon must verify surgical access and safety.
20. Will Robots Place Facial Implants?
Robots may eventually assist with drilling, positioning, or fixation. Fully autonomous cosmetic implant surgery is unlikely in the near future.
21. What Is Surgical Navigation?
It is a tracking system that shows the location of surgical instruments or implants relative to the patient’s CT scan.
22. Can Augmented Reality Show the Surgeon Where to Place the Implant?
It may overlay the planned position on the surgical field, but accurate alignment and direct anatomical confirmation remain essential.
23. Will Future Implants Be Three-Dimensionally Printed?
Many patient-specific rigid implants are already manufactured with additive methods. Future printing technology may allow more complex polymer, silicone, hybrid, and variable-stiffness implants.
24. Will Implants Become Less Expensive?
Automation may reduce some planning and manufacturing costs, but regulatory requirements, quality control, materials, and surgical care will continue to contribute to cost.
25. Can an Implant Be Made on the Same Day as Surgery?
Rapid manufacturing may eventually make this possible in selected settings, but adequate design review and quality assurance should not be sacrificed for speed.
26. Could an Implant Monitor for Infection?
Future sensor-enabled implants may be able to detect temperature, fluid, or inflammatory changes, but this is not standard cosmetic implant technology.
27. Are AI-Designed Implants Regulated?
Regulation depends on the software’s intended use, degree of autonomy, and influence on medical-device design and treatment decisions.
28. Is My Facial Scan Safe in an AI Database?
It should be protected through consent, secure storage, access controls, and appropriate data-use policies. Facial scans are sensitive biometric and medical information.
29. Could My Implant Design Be Used for Another Patient?
An implant manufactured for your anatomy should not be used in another patient. Generalized design features may inform future planning only under appropriate privacy and data-use safeguards.
30. Who Is Responsible if AI Makes a Design Error?
The clinical team and manufacturer must maintain defined responsibilities. The surgeon should never approve a design solely because software generated it.
31. Can AI Eliminate Revision Surgery?
No.
It may reduce some design errors, but revisions can still occur because of healing, infection, malposition, changing goals, asymmetry, and limitations in predicting soft-tissue response.
32. Will AI Reduce Implant Complications?
It may help identify anatomical risks and improve planning. It cannot eliminate contamination, wound problems, nerve injury, healing variability, or surgical error.
33. Can AI Tell Whether I Am a Good Candidate?
It may assist with screening, but candidacy requires a medical history, physical examination, psychological assessment, and surgeon judgment.
34. Will Every Surgeon Use the Same AI Design?
No.
Different surgeons will continue to have different philosophies about proportion, implant size, boundaries, materials, fixation, and surgical technique.
35. What Is the Best Role for AI in Custom Facial Implant Surgery?
Its best role is as an analytical, design, planning, and quality-control assistant operating under direct human supervision.
Key Takeaways
- Artificial intelligence will increasingly influence every stage of custom facial implant planning and surgery.
- Automated CT segmentation and landmark analysis can reduce repetitive work and improve measurement consistency.
- AI can help identify asymmetry but cannot independently decide which asymmetries should be corrected.
- The internal surface of an implant is primarily an engineering problem; the external surface is an aesthetic decision.
- A precise bone fit does not guarantee a successful facial result.
- AI requires clearly defined goals and inherits assumptions from its training data.
- Soft-tissue prediction is improving but remains limited by biological variability.
- Simulations should be presented as estimates rather than guarantees.
- Generative design may produce multiple implant options with different degrees of augmentation.
- Future implants may contain variable stiffness, porosity, reinforcement, coatings, or internal lattices.
- Augmented reality and surgical navigation may help translate the digital plan into surgery.
- Robots are more likely to assist surgeons than replace them.
- Outcome databases should include complications, dissatisfaction, and revision surgery—not only successful results.
- Biased datasets may create biased or culturally inappropriate implant recommendations.
- Facial scans and implant designs require strong privacy and cybersecurity protections.
- AI-enabled medical tools require validation, transparency, monitoring, and clear accountability.
- The surgeon remains responsible for diagnosis, design approval, surgical execution, and complication management.
- The patient remains responsible for defining personal aesthetic goals and the acceptable degree of change.
- The most effective future system will combine artificial intelligence, surgeon judgment, engineering expertise, and patient preference.
Final Perspective
Custom facial implant surgery began as a process of selecting and manually modifying standardized implants.
Three-dimensional CT imaging transformed it into a patient-specific engineering process.
Artificial intelligence will transform it again.
AI will increasingly be able to:
- read the CT scan
- identify the anatomy
- measure asymmetry
- generate implant options
- predict technical risks
- simulate insertion
- recommend fixation
- estimate soft-tissue changes
- compare postoperative outcomes
These capabilities will make planning more efficient and may improve consistency.
But facial implant surgery is not simply the process of filling a measurable skeletal deficiency.
The patient is not a mathematical model.
A face contains:
- identity
- expression
- ethnicity
- sex-related characteristics
- age
- personality
- individual preference
An algorithm may determine that the left jaw angle is 4 millimeters narrower than the right. It cannot independently determine whether the patient wants that difference corrected, whether both sides should be enlarged, whether the larger side should be reduced, or whether the asymmetry contributes positively to the patient’s identity.
The future of custom facial implant surgery should therefore not be described as AI-designed surgery.
It should be described as AI-assisted facial architecture.
The technology will provide better maps, faster calculations, more design choices, and increasingly sophisticated predictions.
The surgeon will continue to determine which destination is appropriate.
The patient will continue to determine whether that destination reflects the person they wish to remain—or become.
Dr. Eppley’s Bottom Line
Artificial intelligence will become one of the most powerful tools ever introduced into custom facial implant surgery, but it should remain a tool. It can measure anatomy, identify asymmetry, generate designs, and improve surgical planning. It cannot independently define beauty, understand identity, or determine what a patient should look like. The future belongs not to AI replacing the surgeon, but to the experienced surgeon using AI to make more informed, precise, and patient-specific decisions.